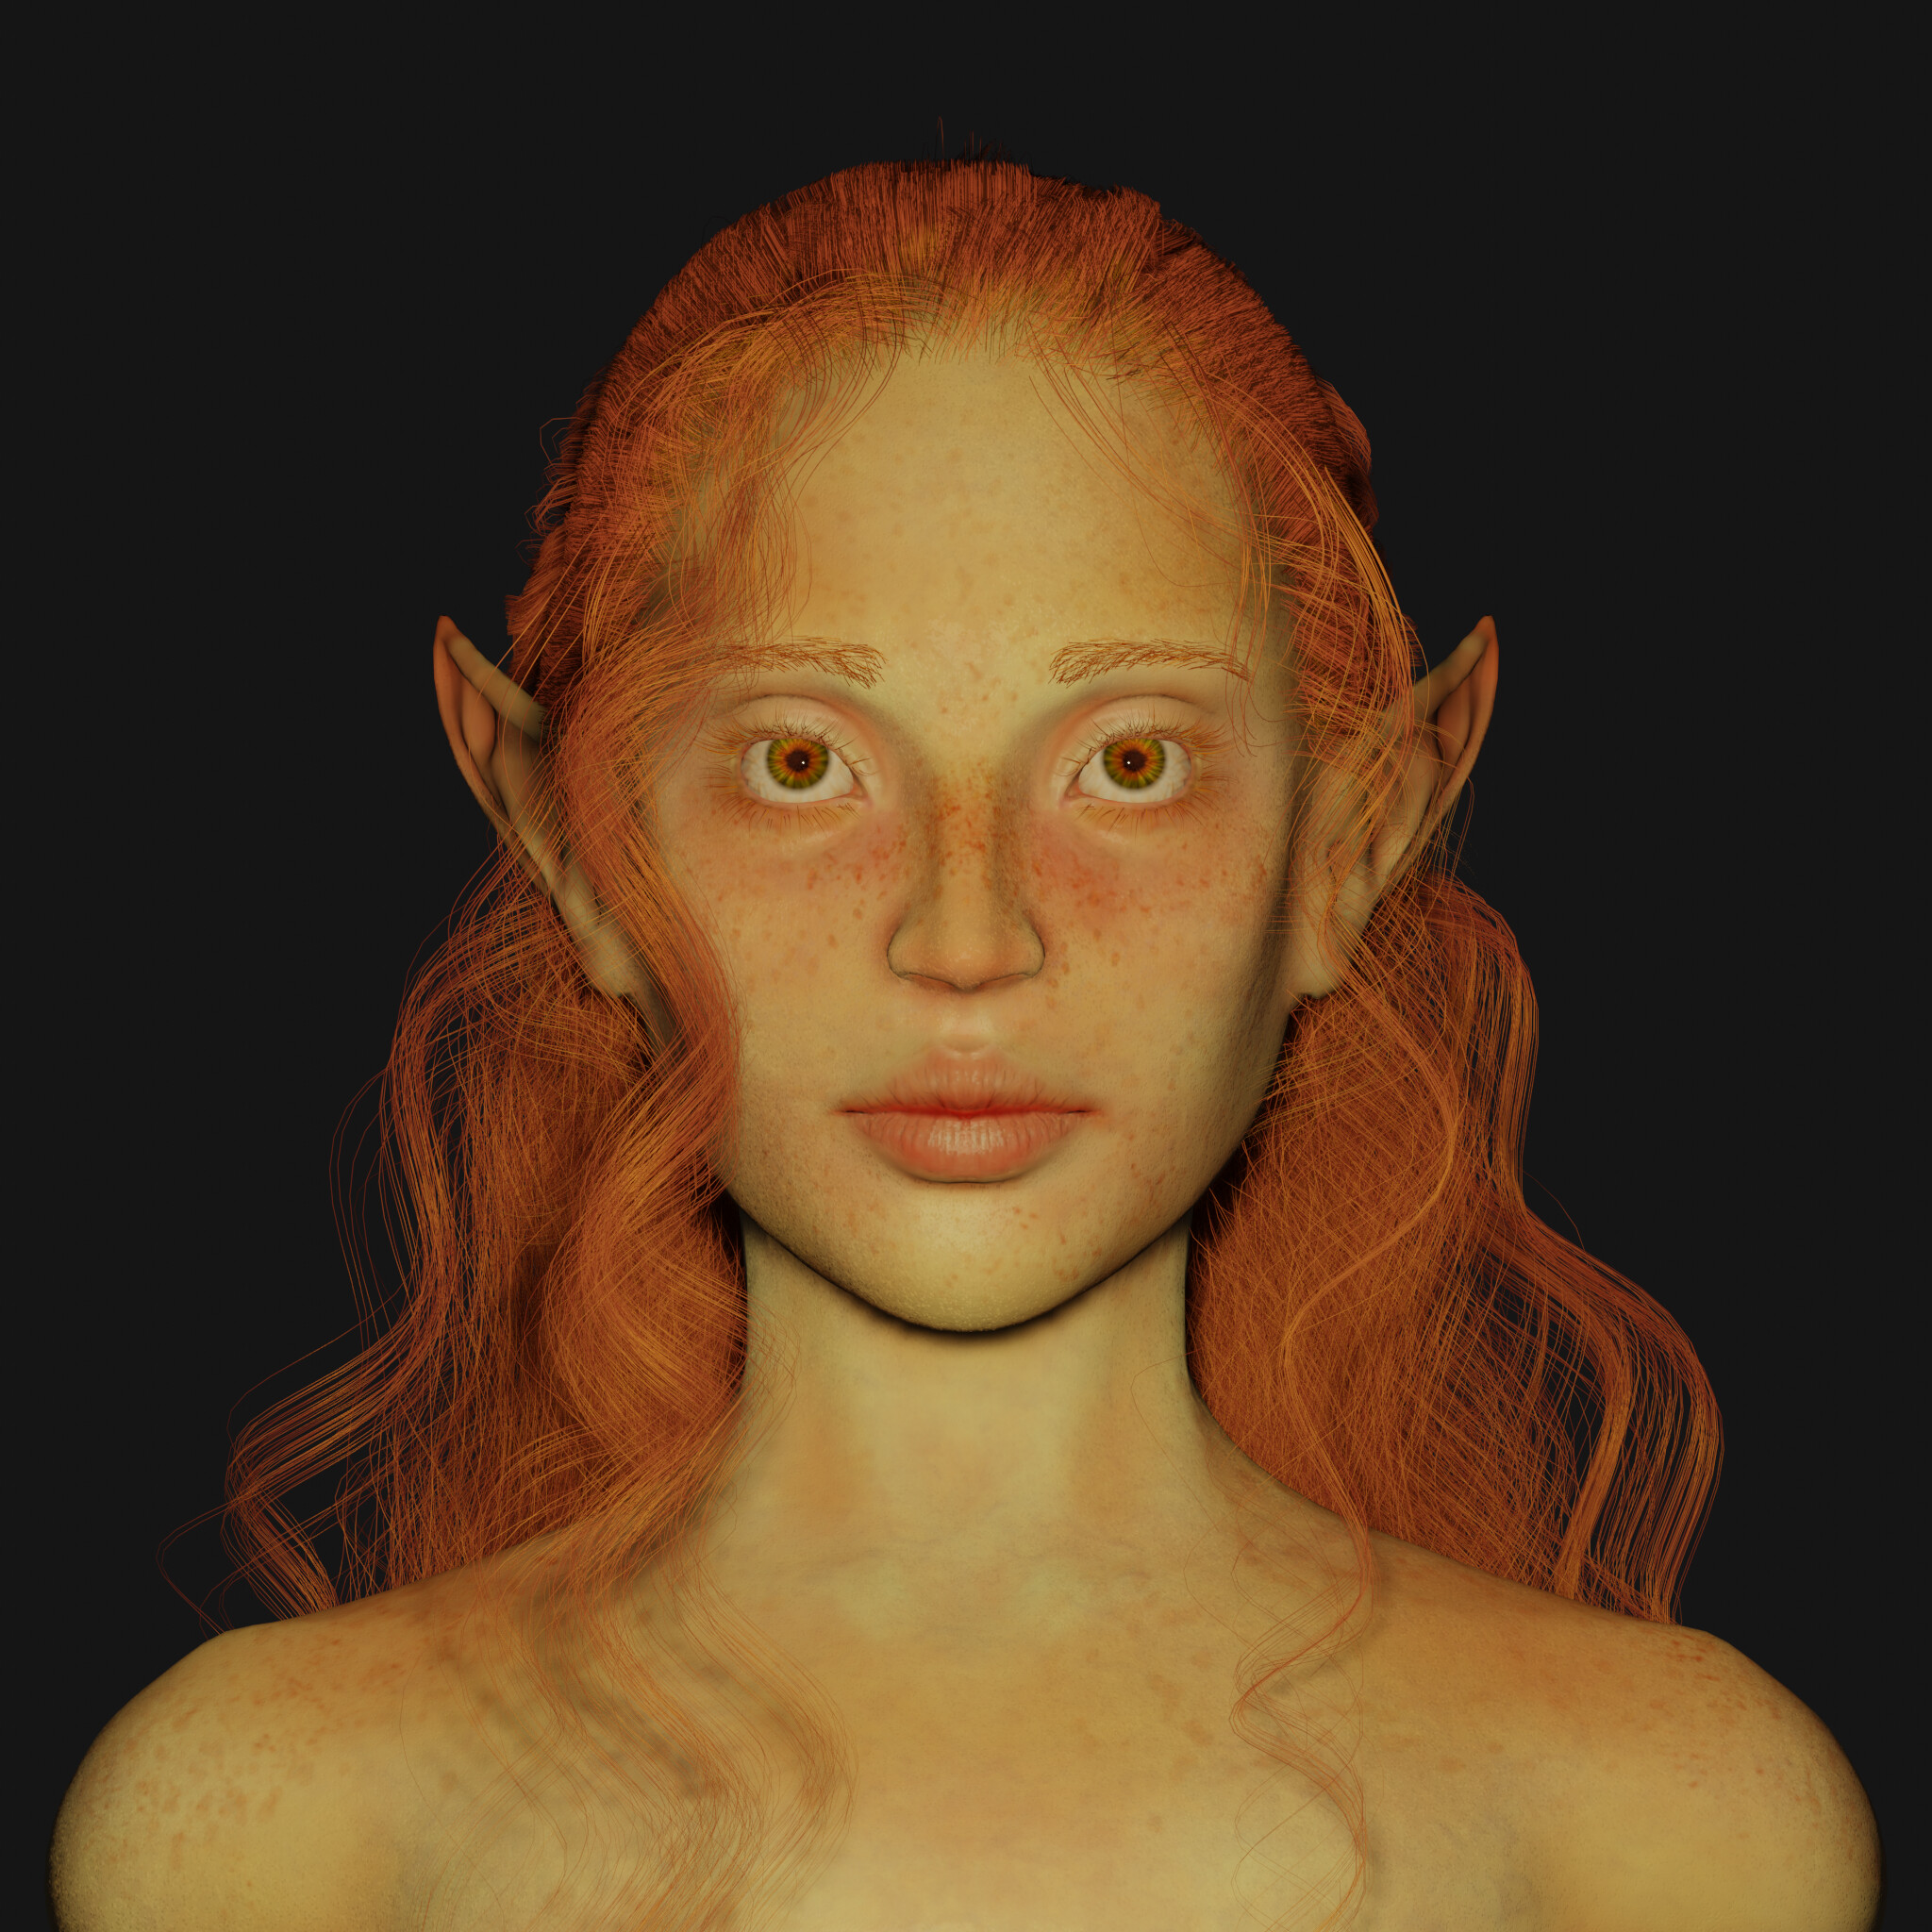
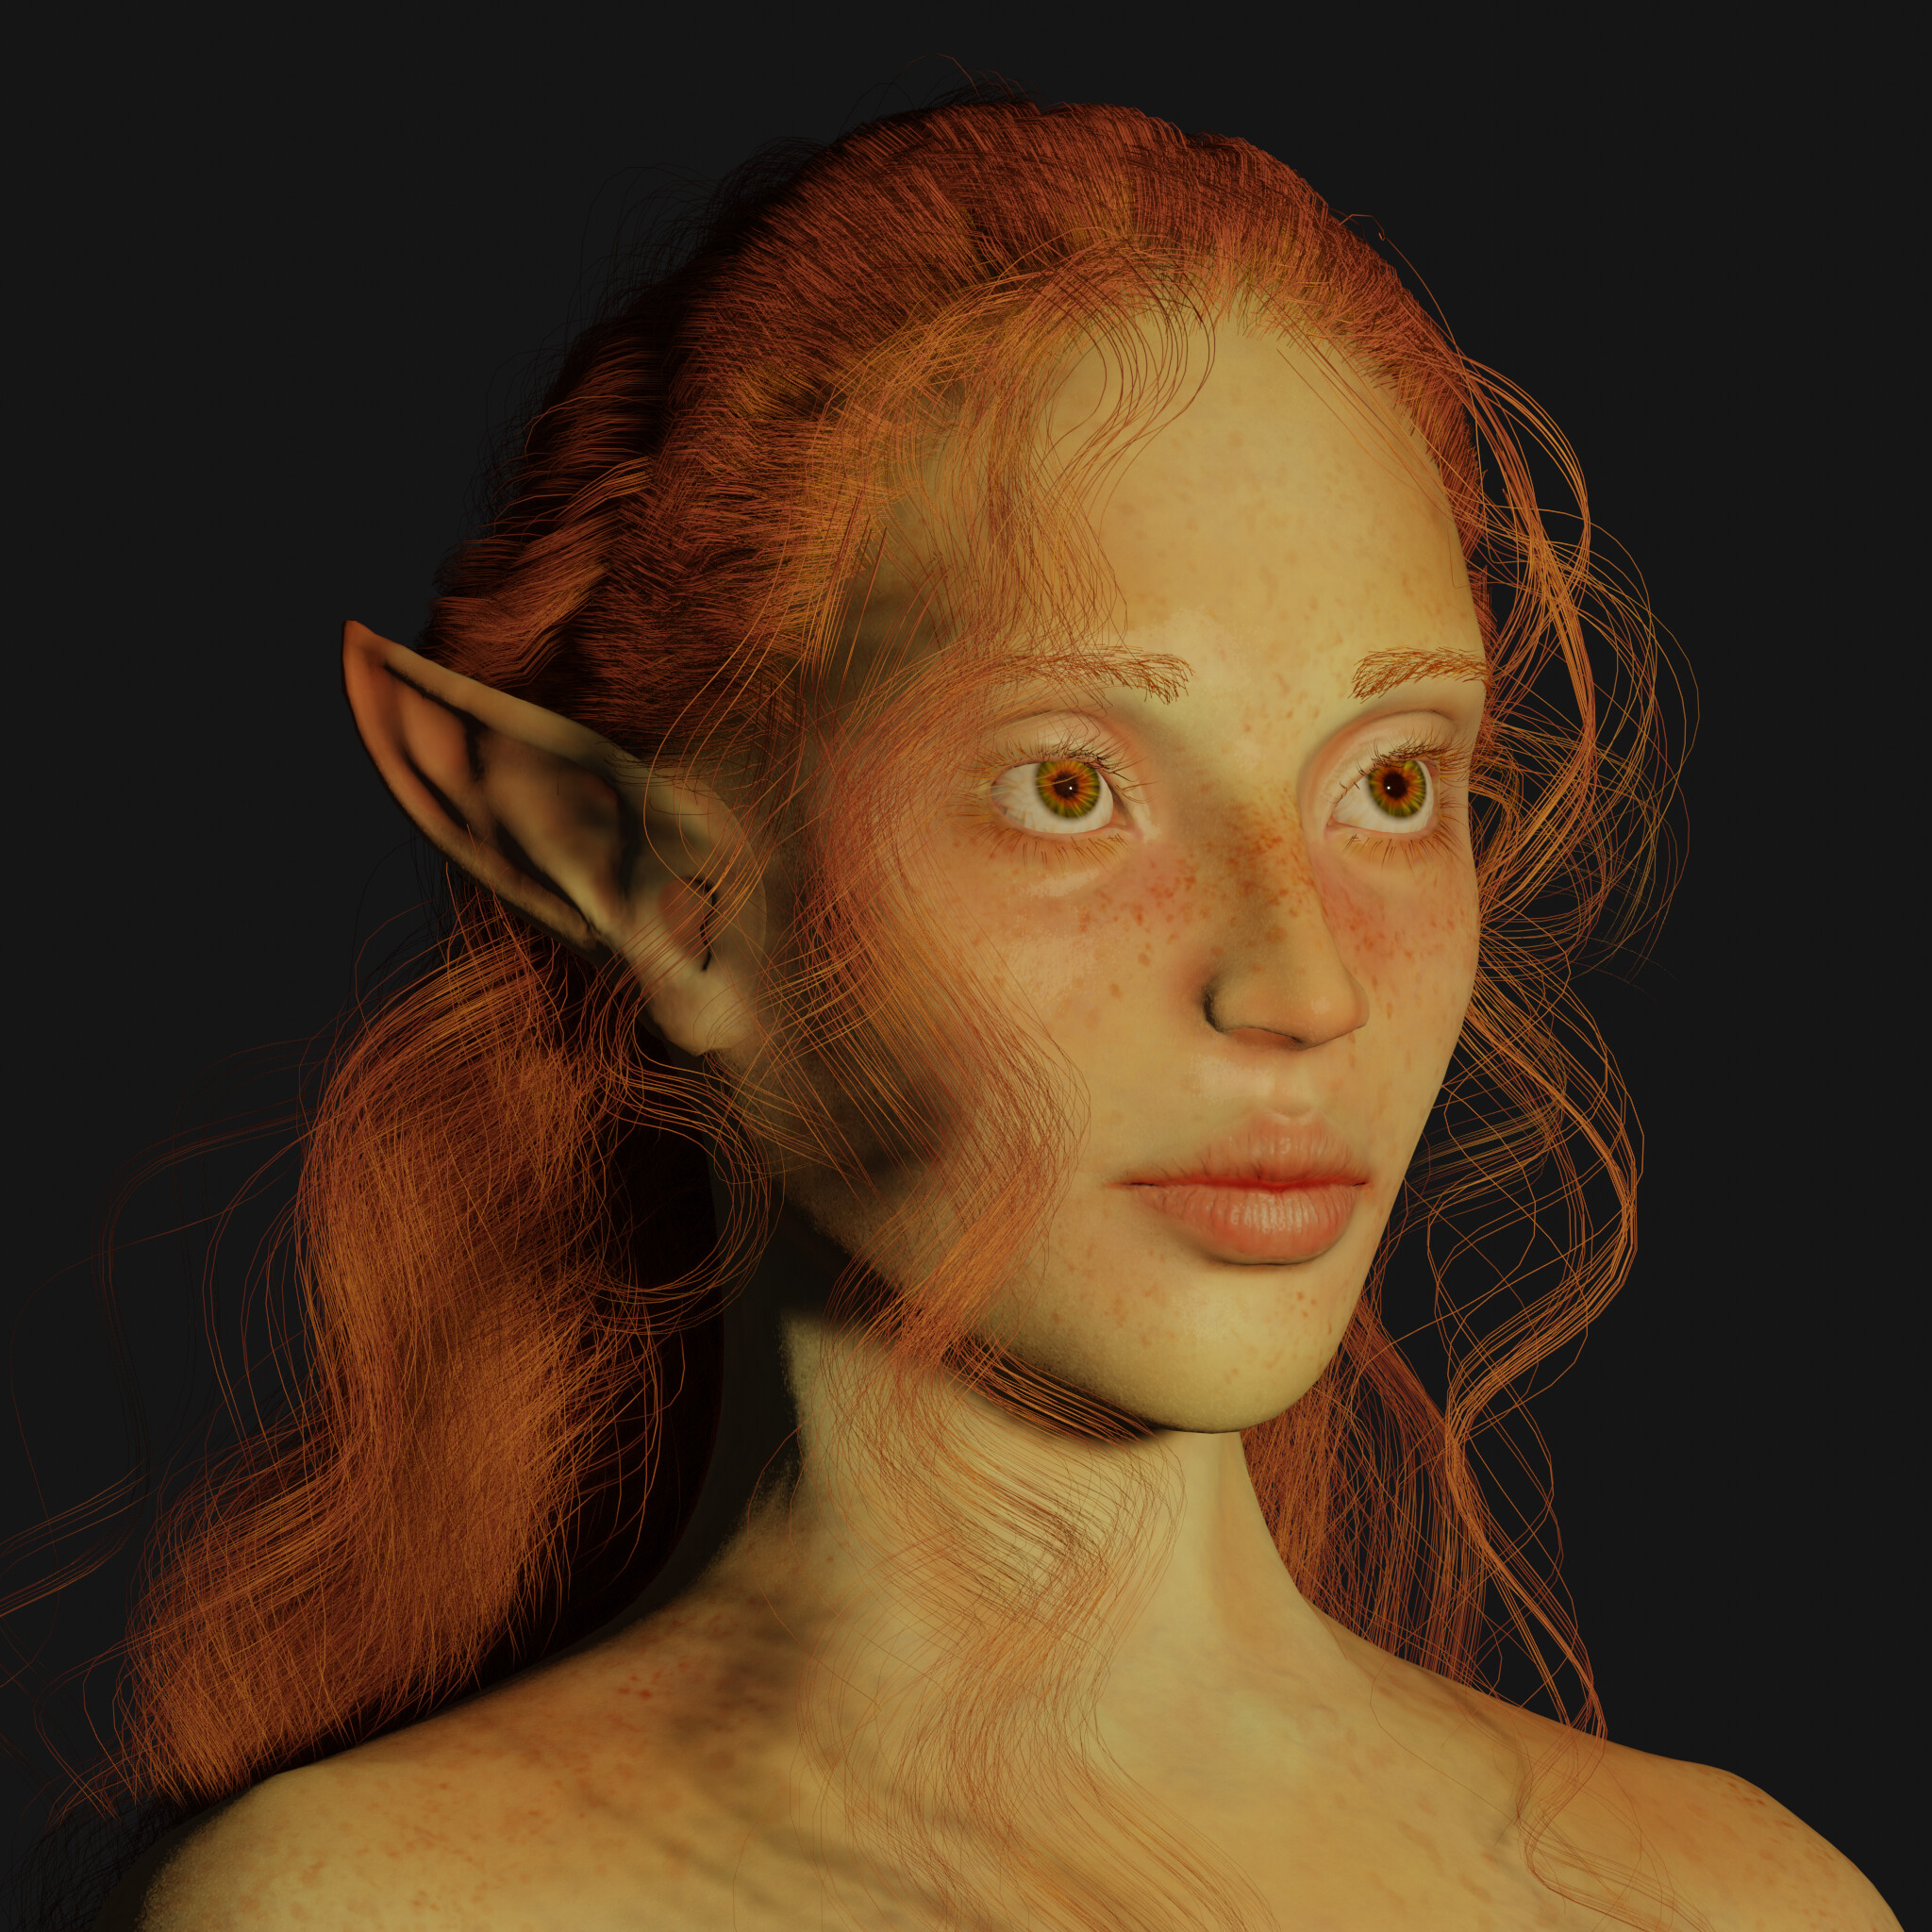
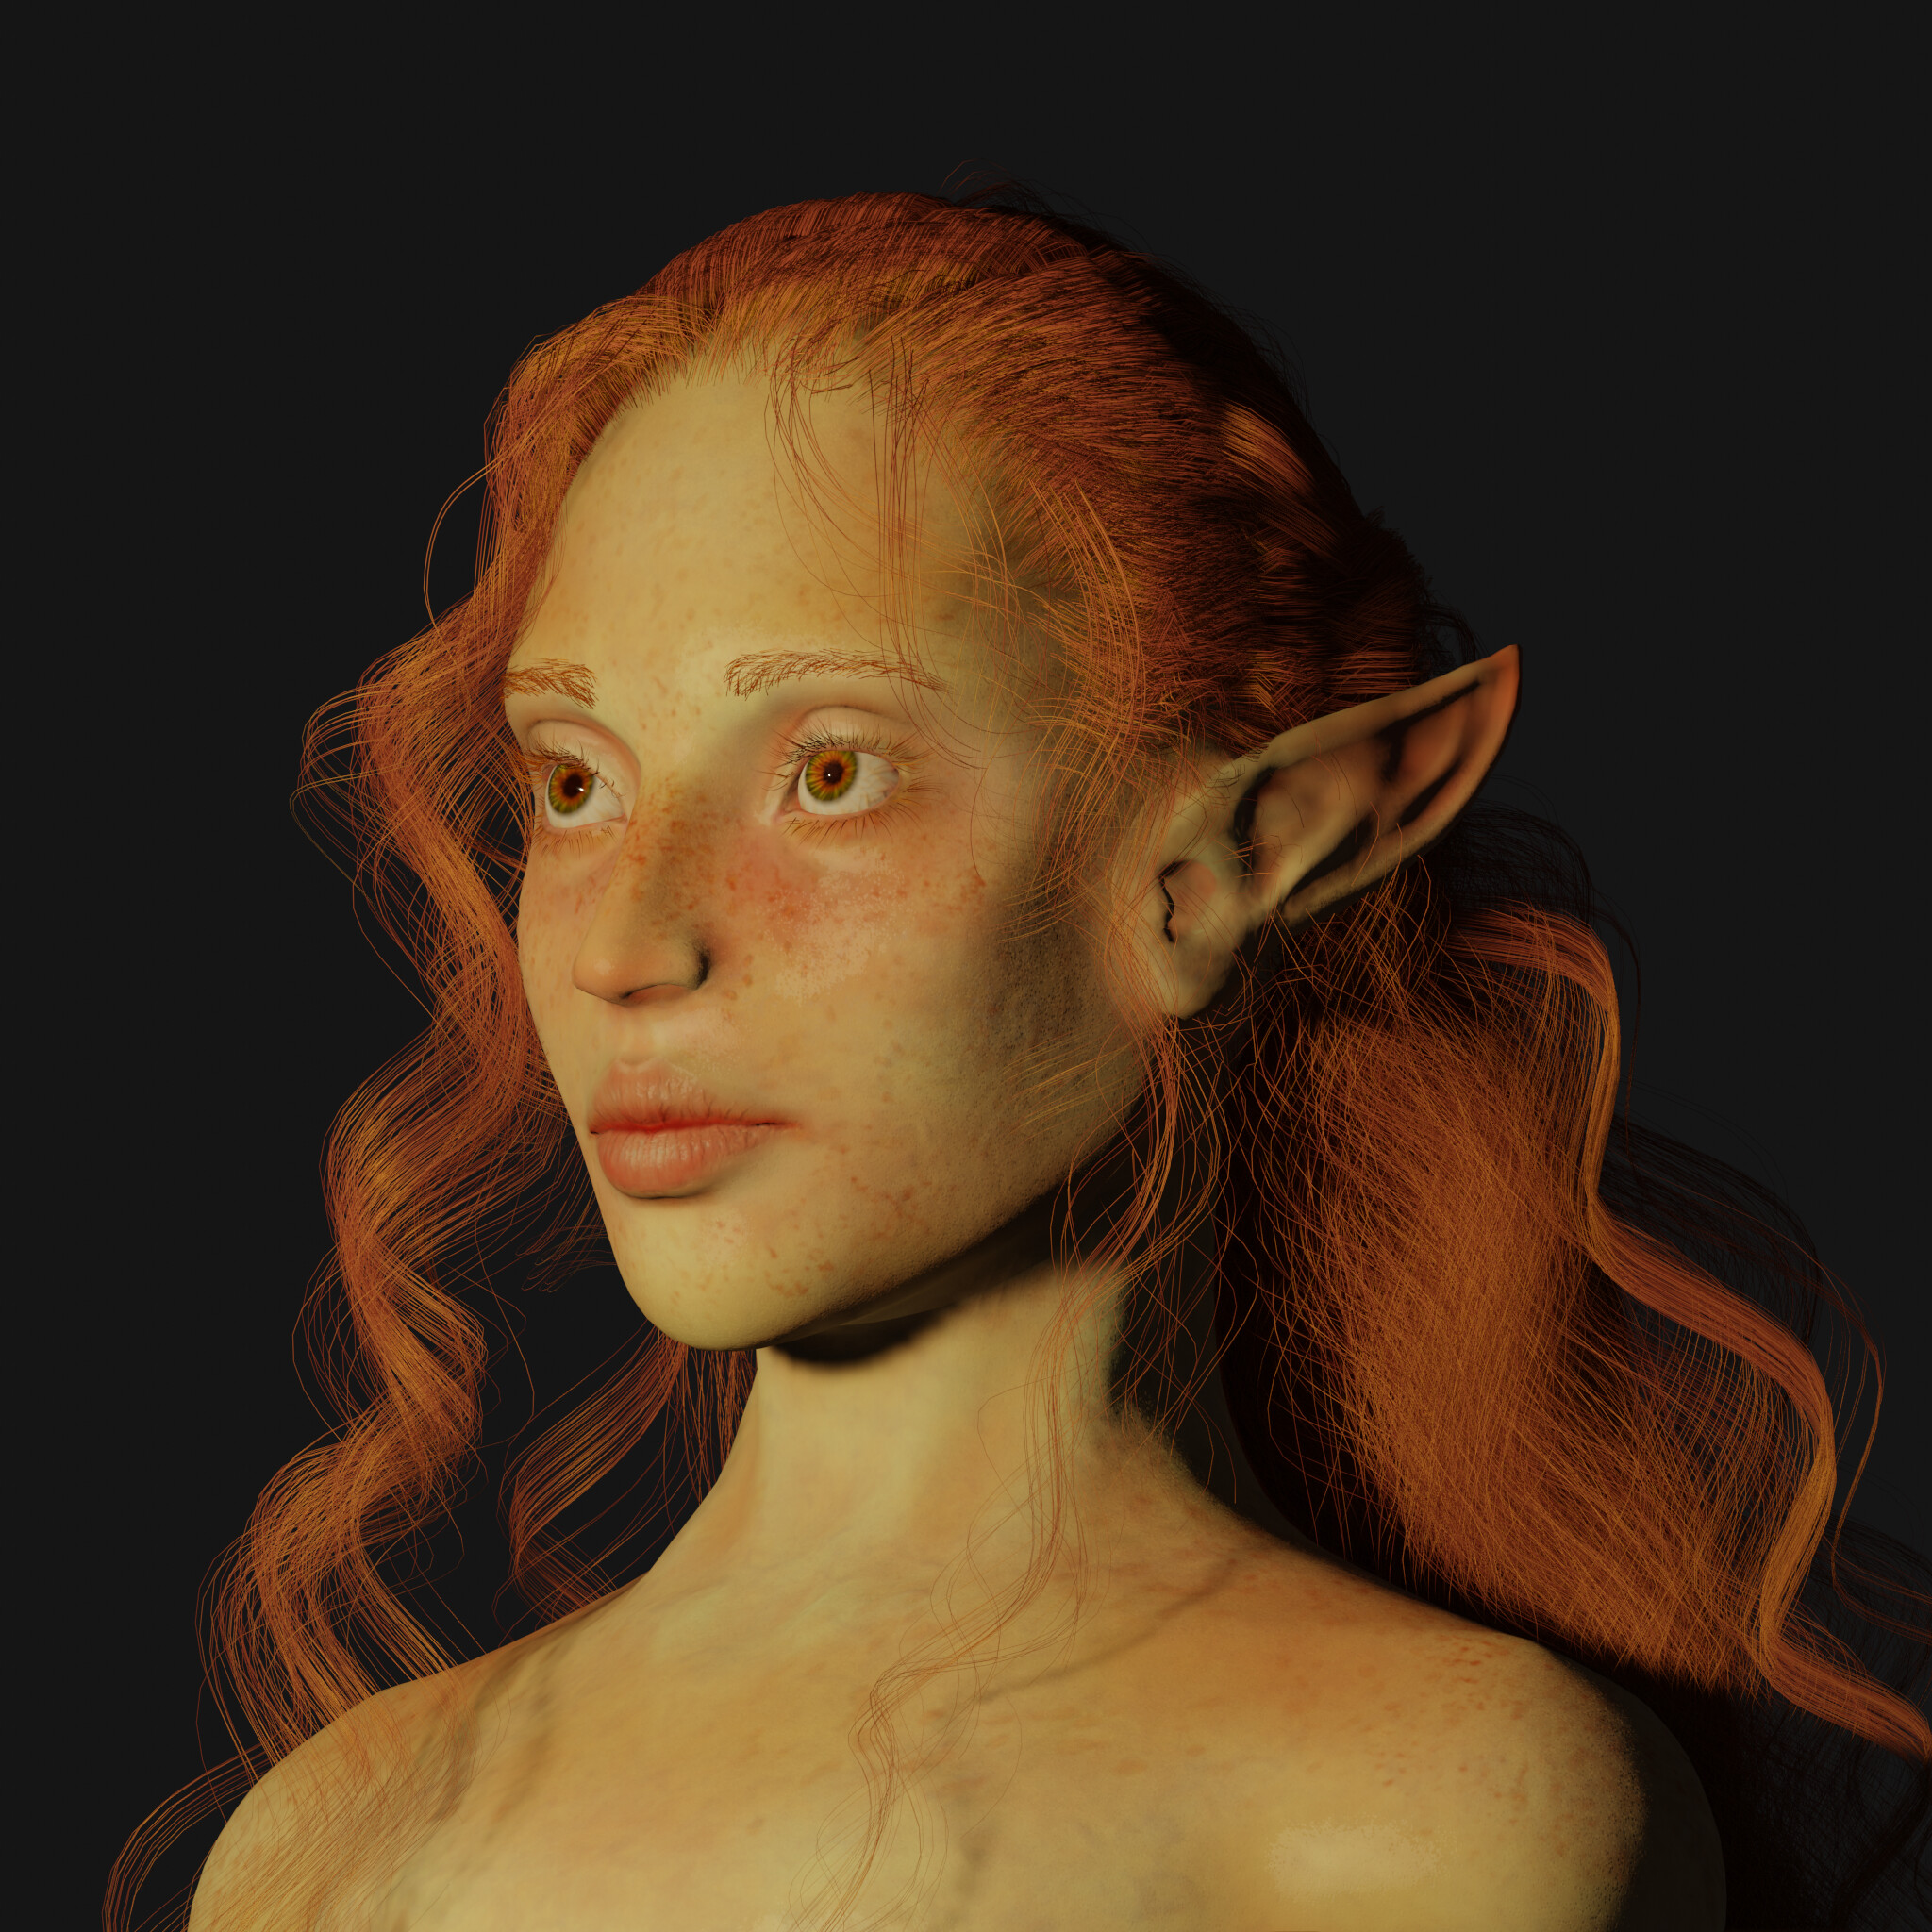
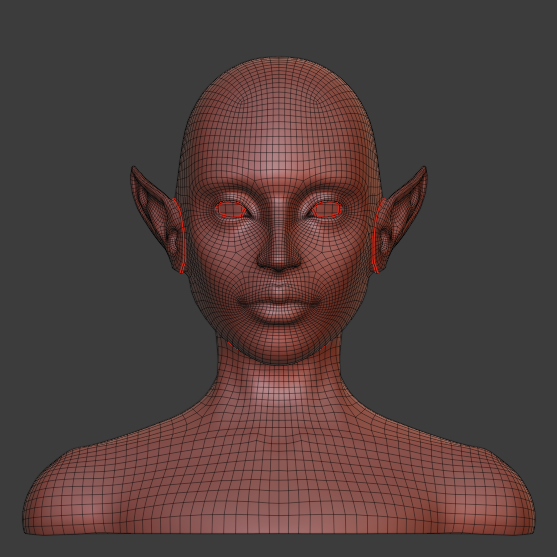
This part of the course is what I was looking forward to the most! I enjoyed every step of the process and realised that character creation is definitely the niche that I want to focus on in the near future. So here’s my very first sculpt! Rendered in Eevee.
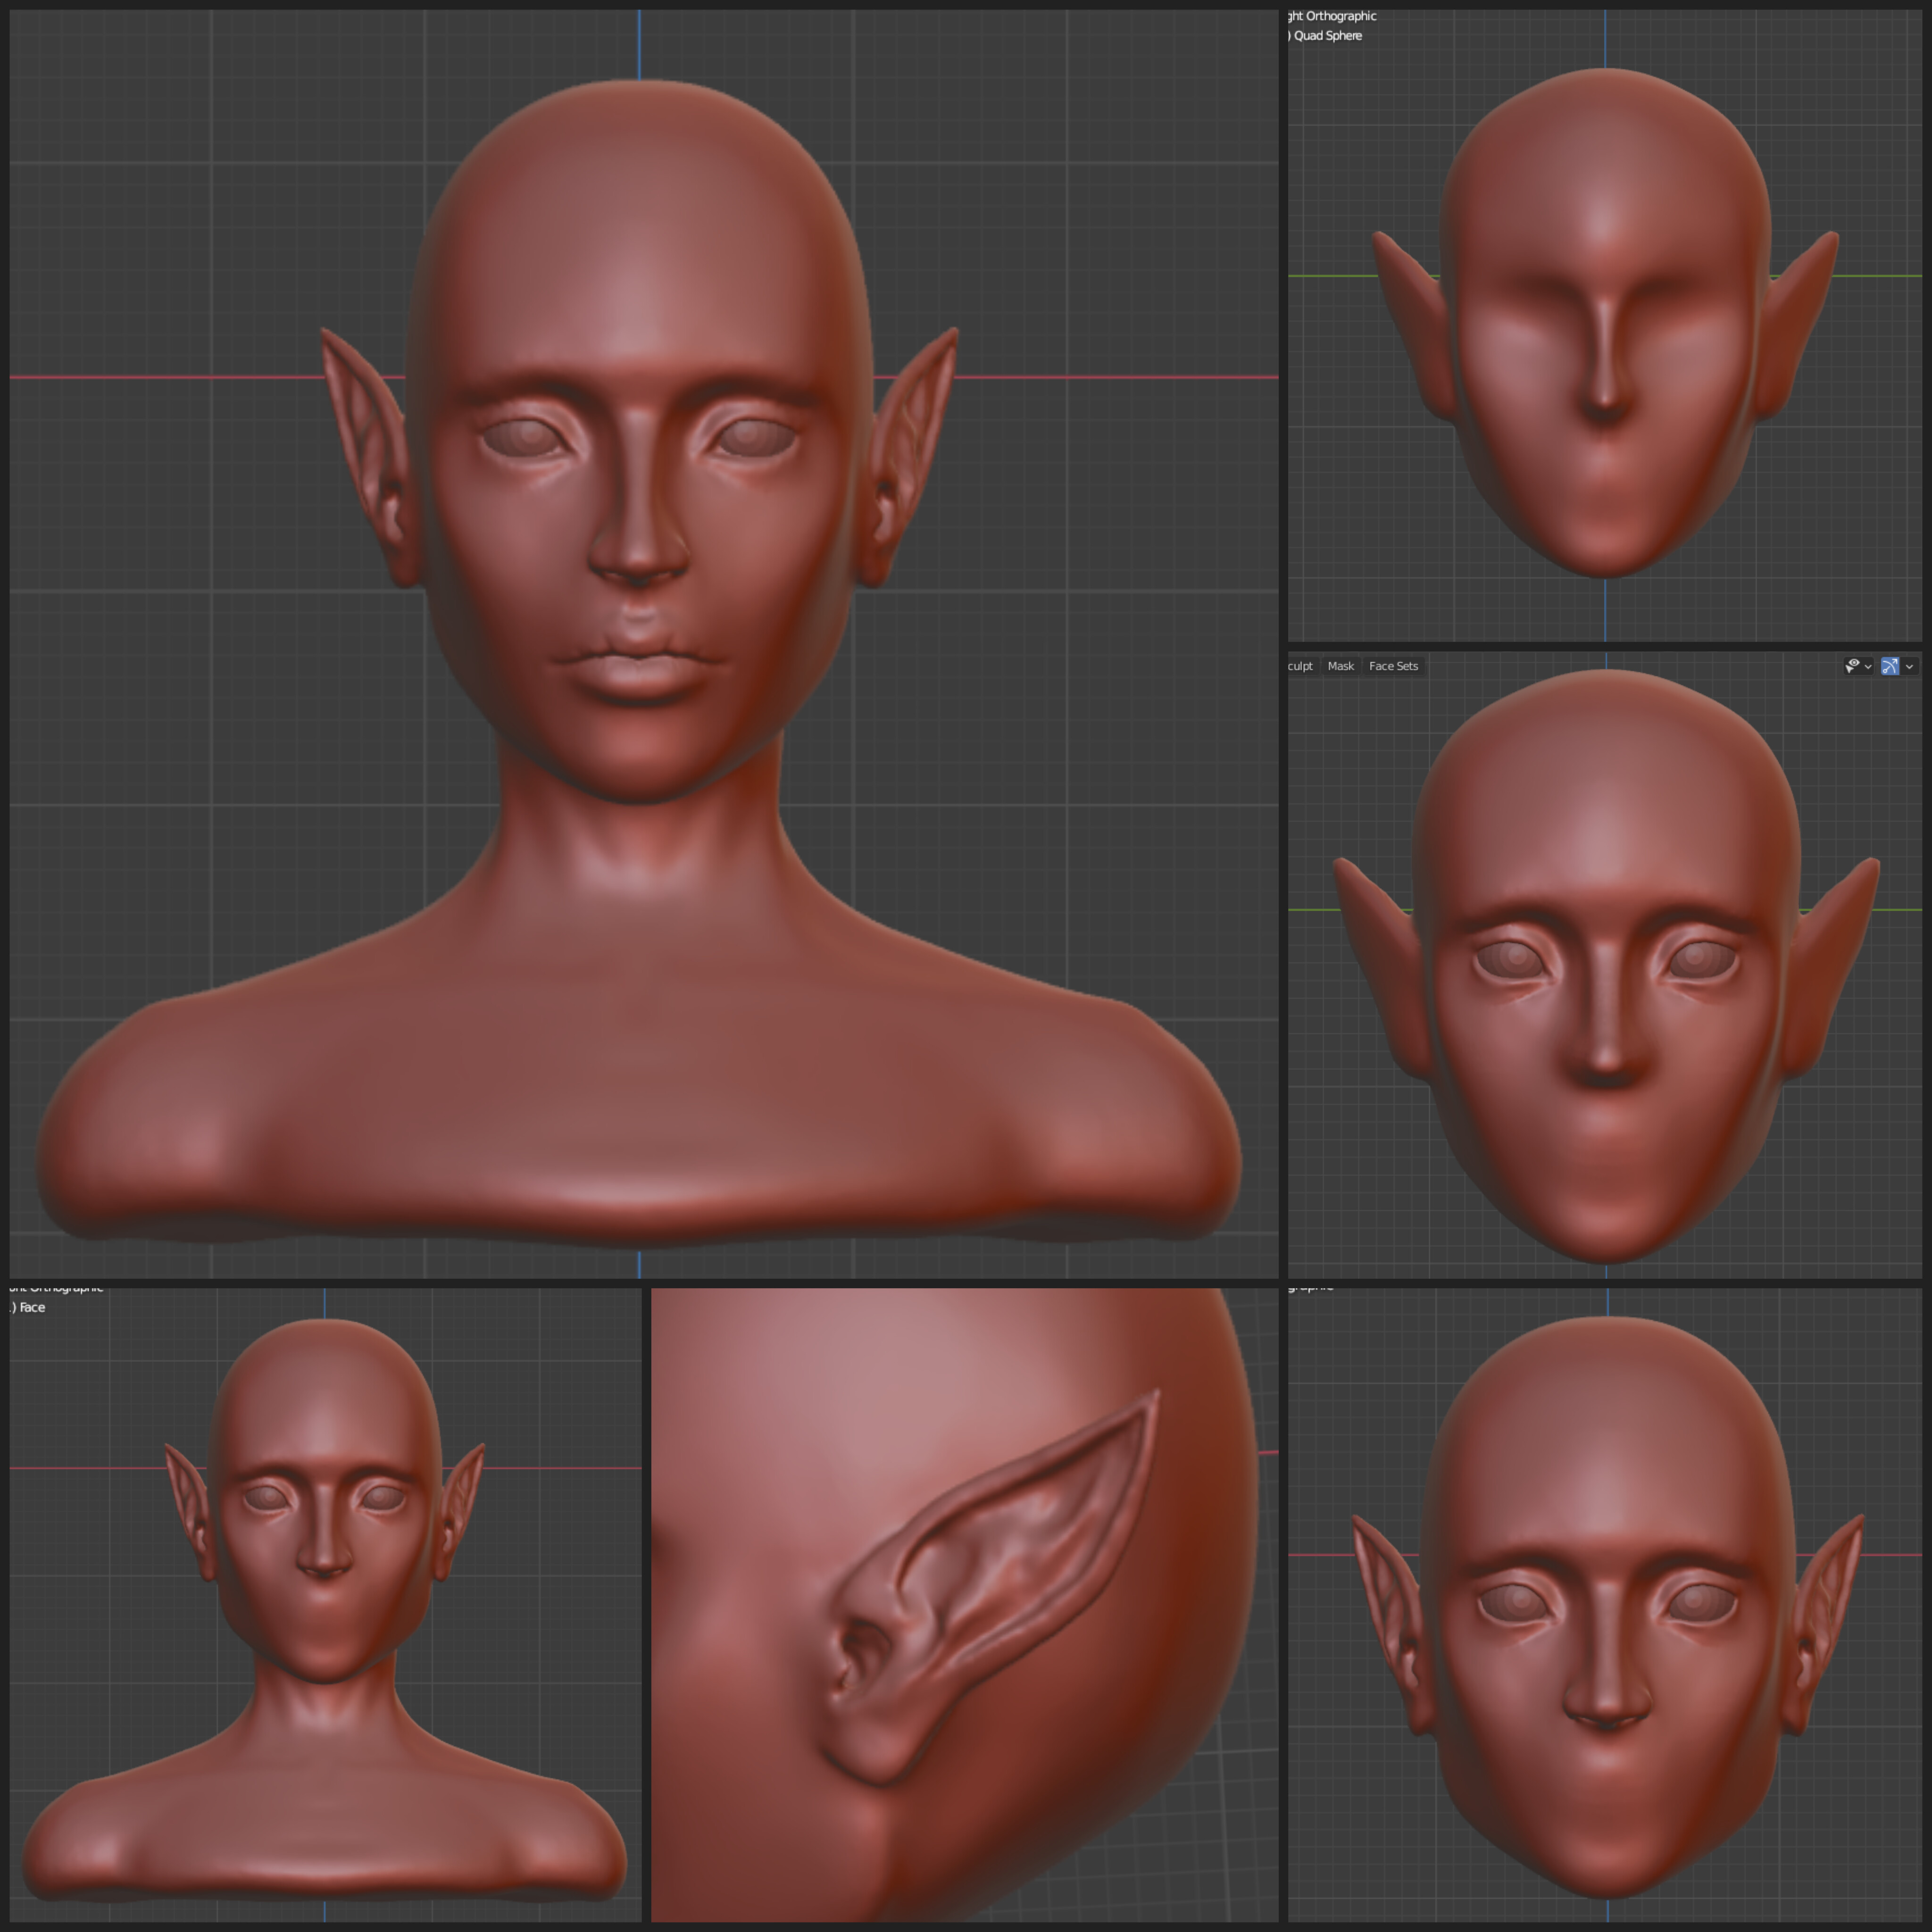
I decided to make an elf. I experimented a lot with various nodes and realised that I will not be able to add pores and texture with such complex dense geometry. And I absolutely hated this “waxy” looking smooth perfect sculpt that I ended up with. That’s how I found out what retopology is! lol I got a free addon RetopoFlow and did my first retopology. It was very satisfying and fun to do. I have no idea if my retopology is bad but it did the job. I was able to unwrap it, bake procedural textures, hand paint the face to make it look more realistic and add some skin imperfections and freckles with a stencil brush. My original retopology was around 2500 tris but then I changed it to 10k to regain the details of the original sculpt with the Multiresolution modifier. I am satisfied with the result as it is my first sculpt and I hope the next one will be better.
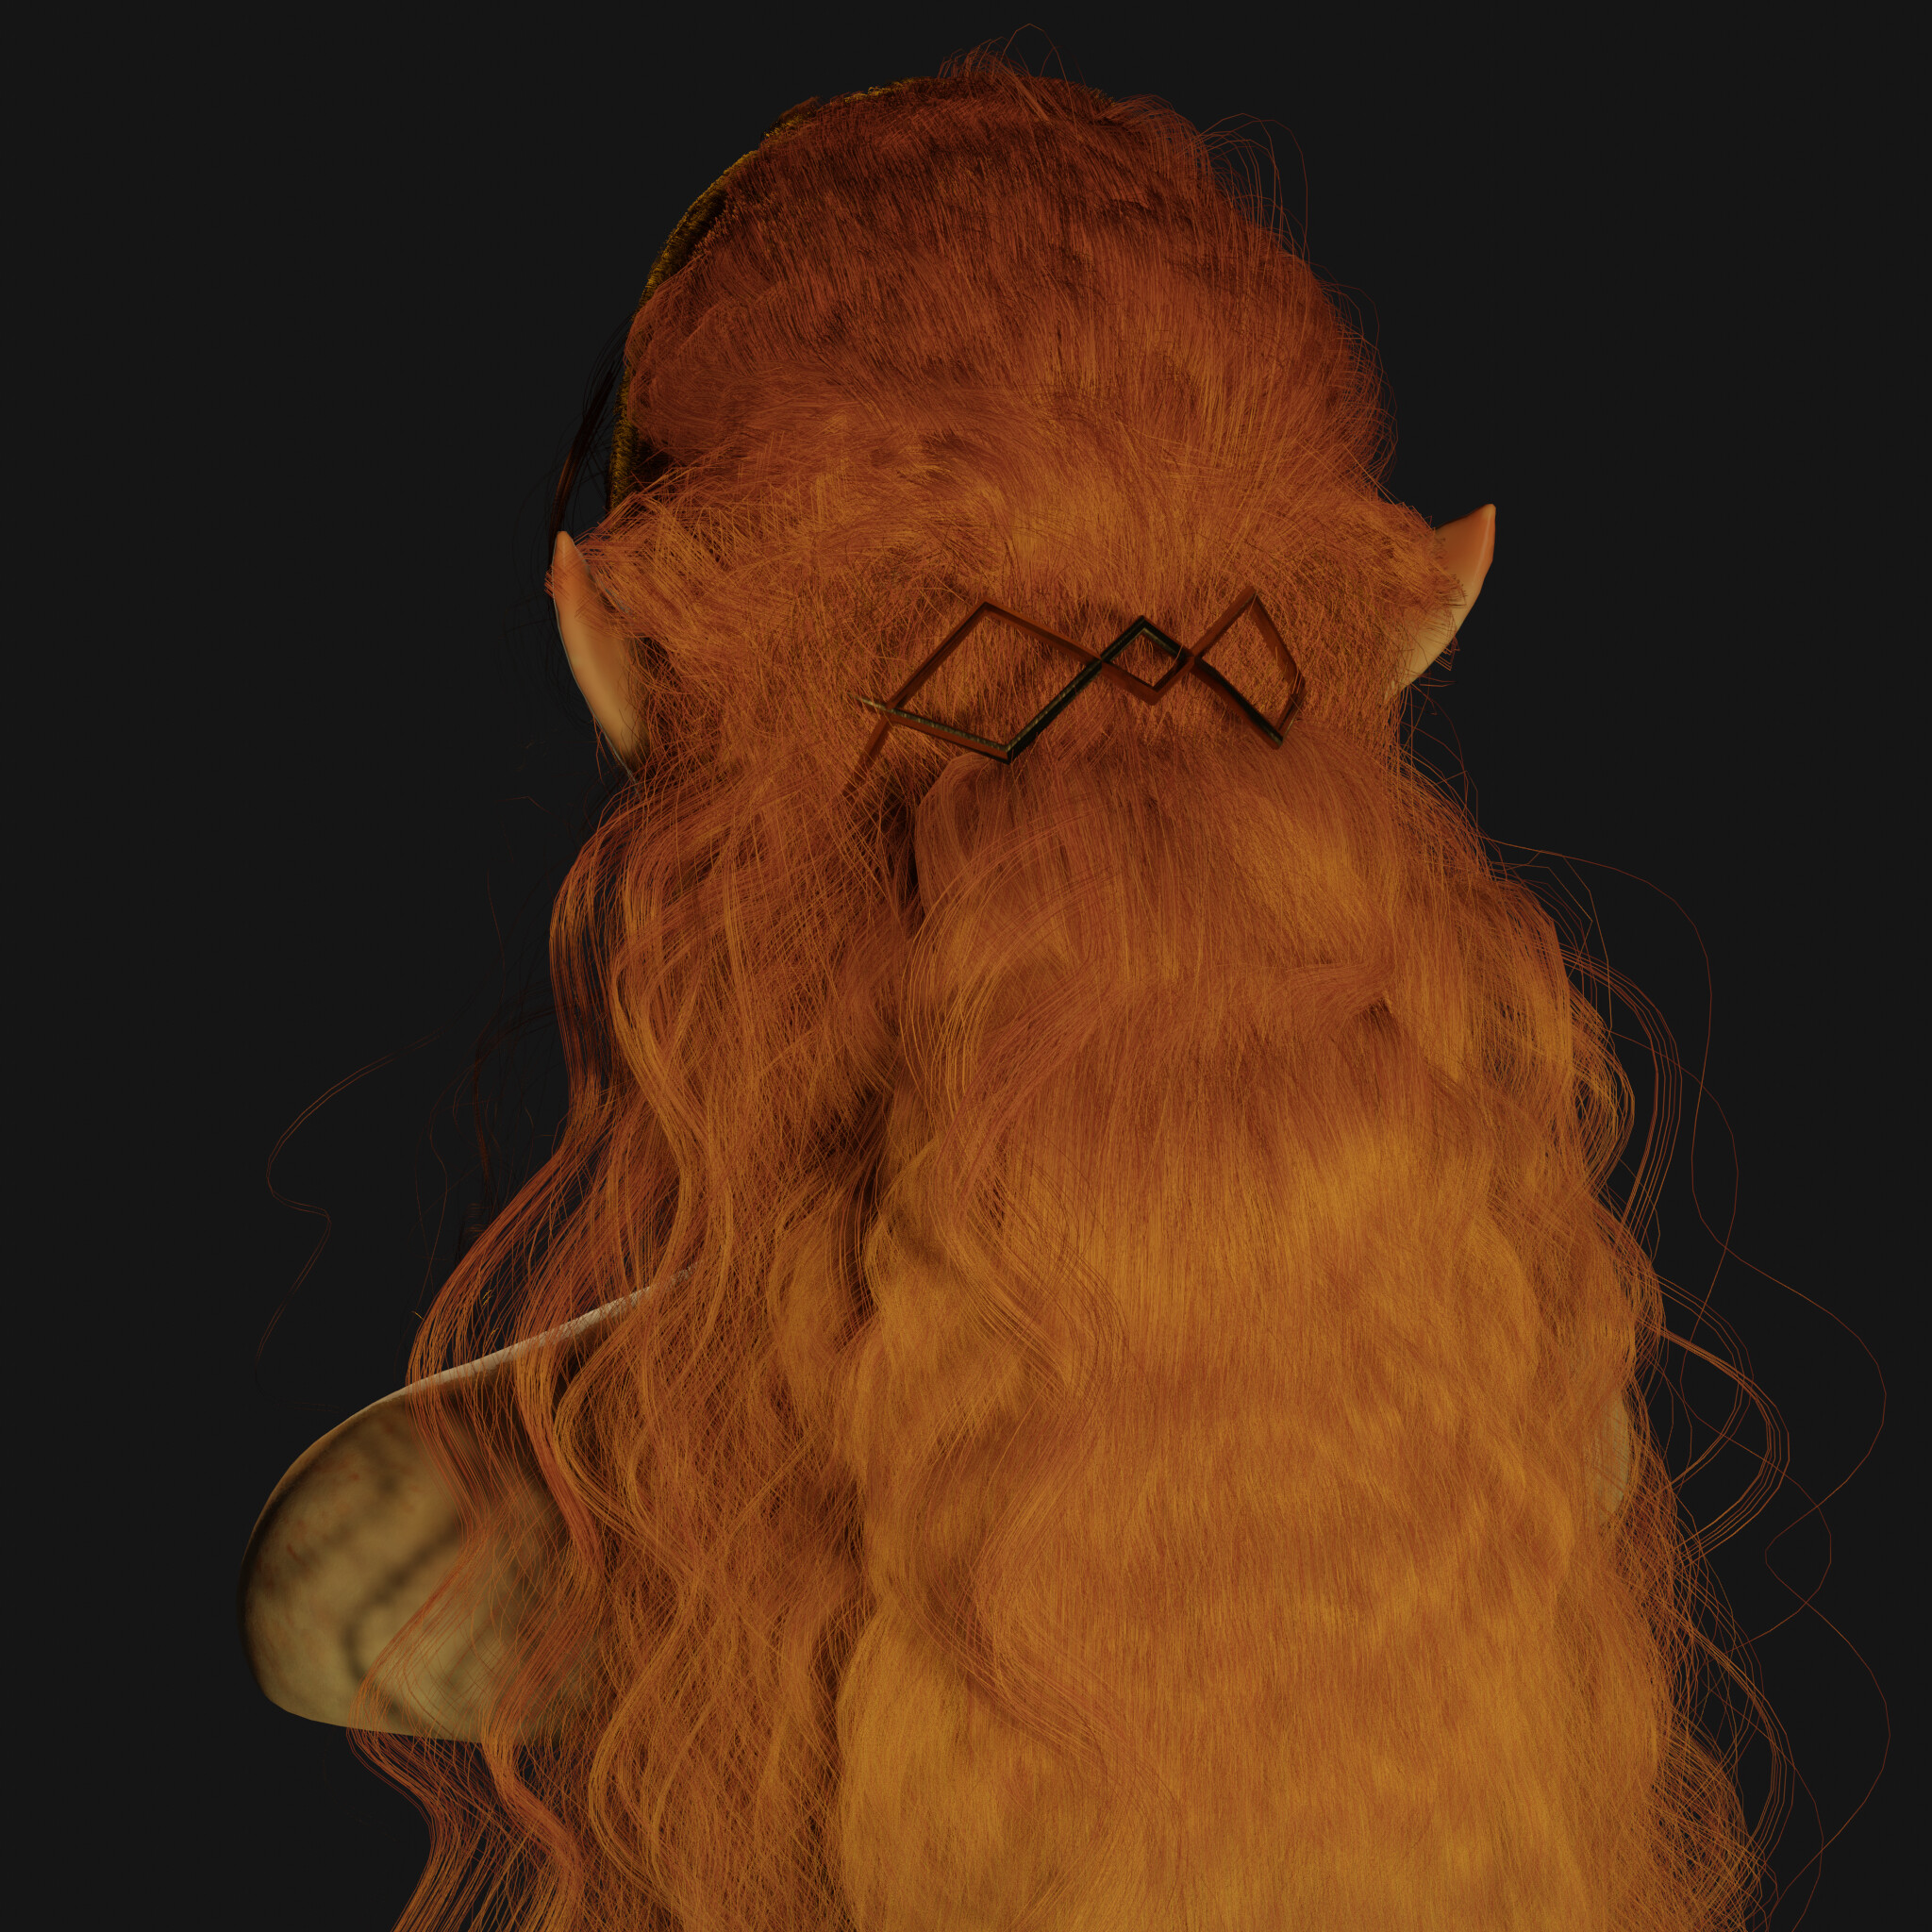
Ok, this long part is for those who really struggled with hair particle system! I had to redo the hair 6 times as I couldn’t groom it properly. In case there are other people like me, here’s what really helped:
make hair root diameter thin enough as that what makes it look way more realistic (for me it was from 0.2 to 0.4 depending on what part of the scalp I was working on);
work in sections (!!), for me personally it was easier to split the scalp into a few parts as I needed different particle systems for certain areas (for example baby hair that frame the face had to be much shorter and thinner). or just hide sections that you already groomed before adding new ones;
don’t be afraid to toggle Deflect Emitter on and off to place hair strands exactly where you need them to be;
I think that for more complex hairstyles where you need hair strands to be in a very particular position it’s better to have a lot more particles than children as you can’t really control the placement of children. At first I had a lot of children and they all just went through the ears and shoulders.
in the upper right corner, in the options, you can uncheck Root Positions and it will allow you to move roots. It’s very useful to create loose hairs, face framing strands etc
to spread out a lot of already groomed particles or shape them I scaled them on the X axis (or Y depending on your set up) with Proportional Editing on (Connected Only checked). Just select a row of keys that you need to scale and choose the area of effect with a mouse wheel.
the more keys you have the easier it is to mess up your hair especially if it’s straight! Instead just subdivide the roots a couple of times so the hair “hugs” the scalp nicely. Rightclick → select roots-> Ctrl + Numpad plus ->Rightclick-> Subdivide->Ctrl + Numpad minus-> Rightclick → Subdivide.
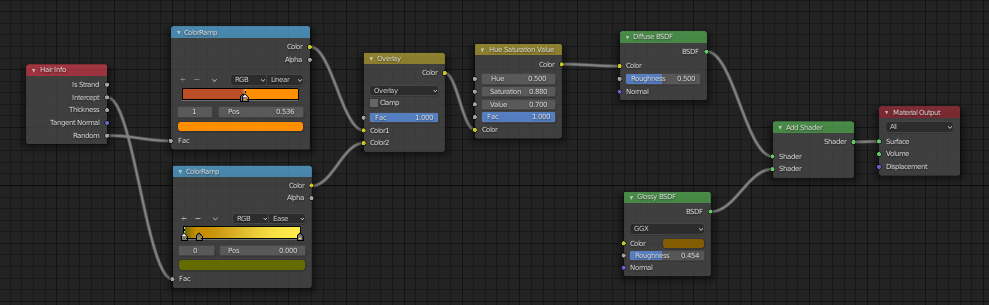
if you don’t have a powerful machine or don’t want to wait for Cycles to render for a long time (it takes ages if you have complex procedural textures on other objects in the scene), it is possible to make Eevee hair look somewhat realistic. There’s no Hair BSDF in Eevee so you can just use a Diffuse BSDF, Add Shader and Glossy BSDF. I’ll share my set up just in case. And the most important step is to go to Render Properties tab, find Hair and change it from Strand to Strip.
I am really sorry if I mentioned some very obvious things, just hope it helps others like me. It took me 4 days of experimentation and watching YouTube to come up with these tips.
My hair is far from perfect but it is 1000000% better than my first 5 attempts! haha
You did a great job on the elf sculpt. I haven’t really tried sculpting, but certainly want to.
As for the hair, I’ve been experimenting with the Particle Hair system, though for now, just on a prop (UV Sphere) rather than a character’s head. My issue is I’d like to eventually convert to mesh so I can export it, and then use it in another 3D app I usually use for final rendering. So I’m still experimenting, but I’m going to keep some of your tips handy.
Thanks a lot! I’m sure yours was great! Yeah, I painted portraits when I was younger. I never learned it professionally, it was just a hobby. Never did digital art either but it’s still similar to painting so this experience definitely gave me an advantage haha To be honest, even if you can’t paint I think it’s possible to make a realistic face fully with a stencil
Well done, the picture itself portrays your experience with portraits. It almost looks like a rustic painting, yet it is not. A very good style in my opinion. One that I think will take you far in your 3d career if you choose to go that route. Kudos to you!
@NP5 Thanks for pointing this post out. I have bookmarked this post for future hair consideration. But the picture alone was worth being pointed to.
@Cathy_N what did you do for the skin texture? Is some of that hand drawn, or was it mostly nodes? If nodes, would you care to share your process?
Just make a red haired elven cat! You have two of the three things down to perfection already.
This is so wildly cool and inspiring. Hope to get closer to this level of plausibility in my own sculpts - I’m very much enjoying making creatures in Blender, though only recently having a go at humanoids.
Thank you so much! I didn’t expect a response like that! There is a lot to learn I’m just dipping my toes into that
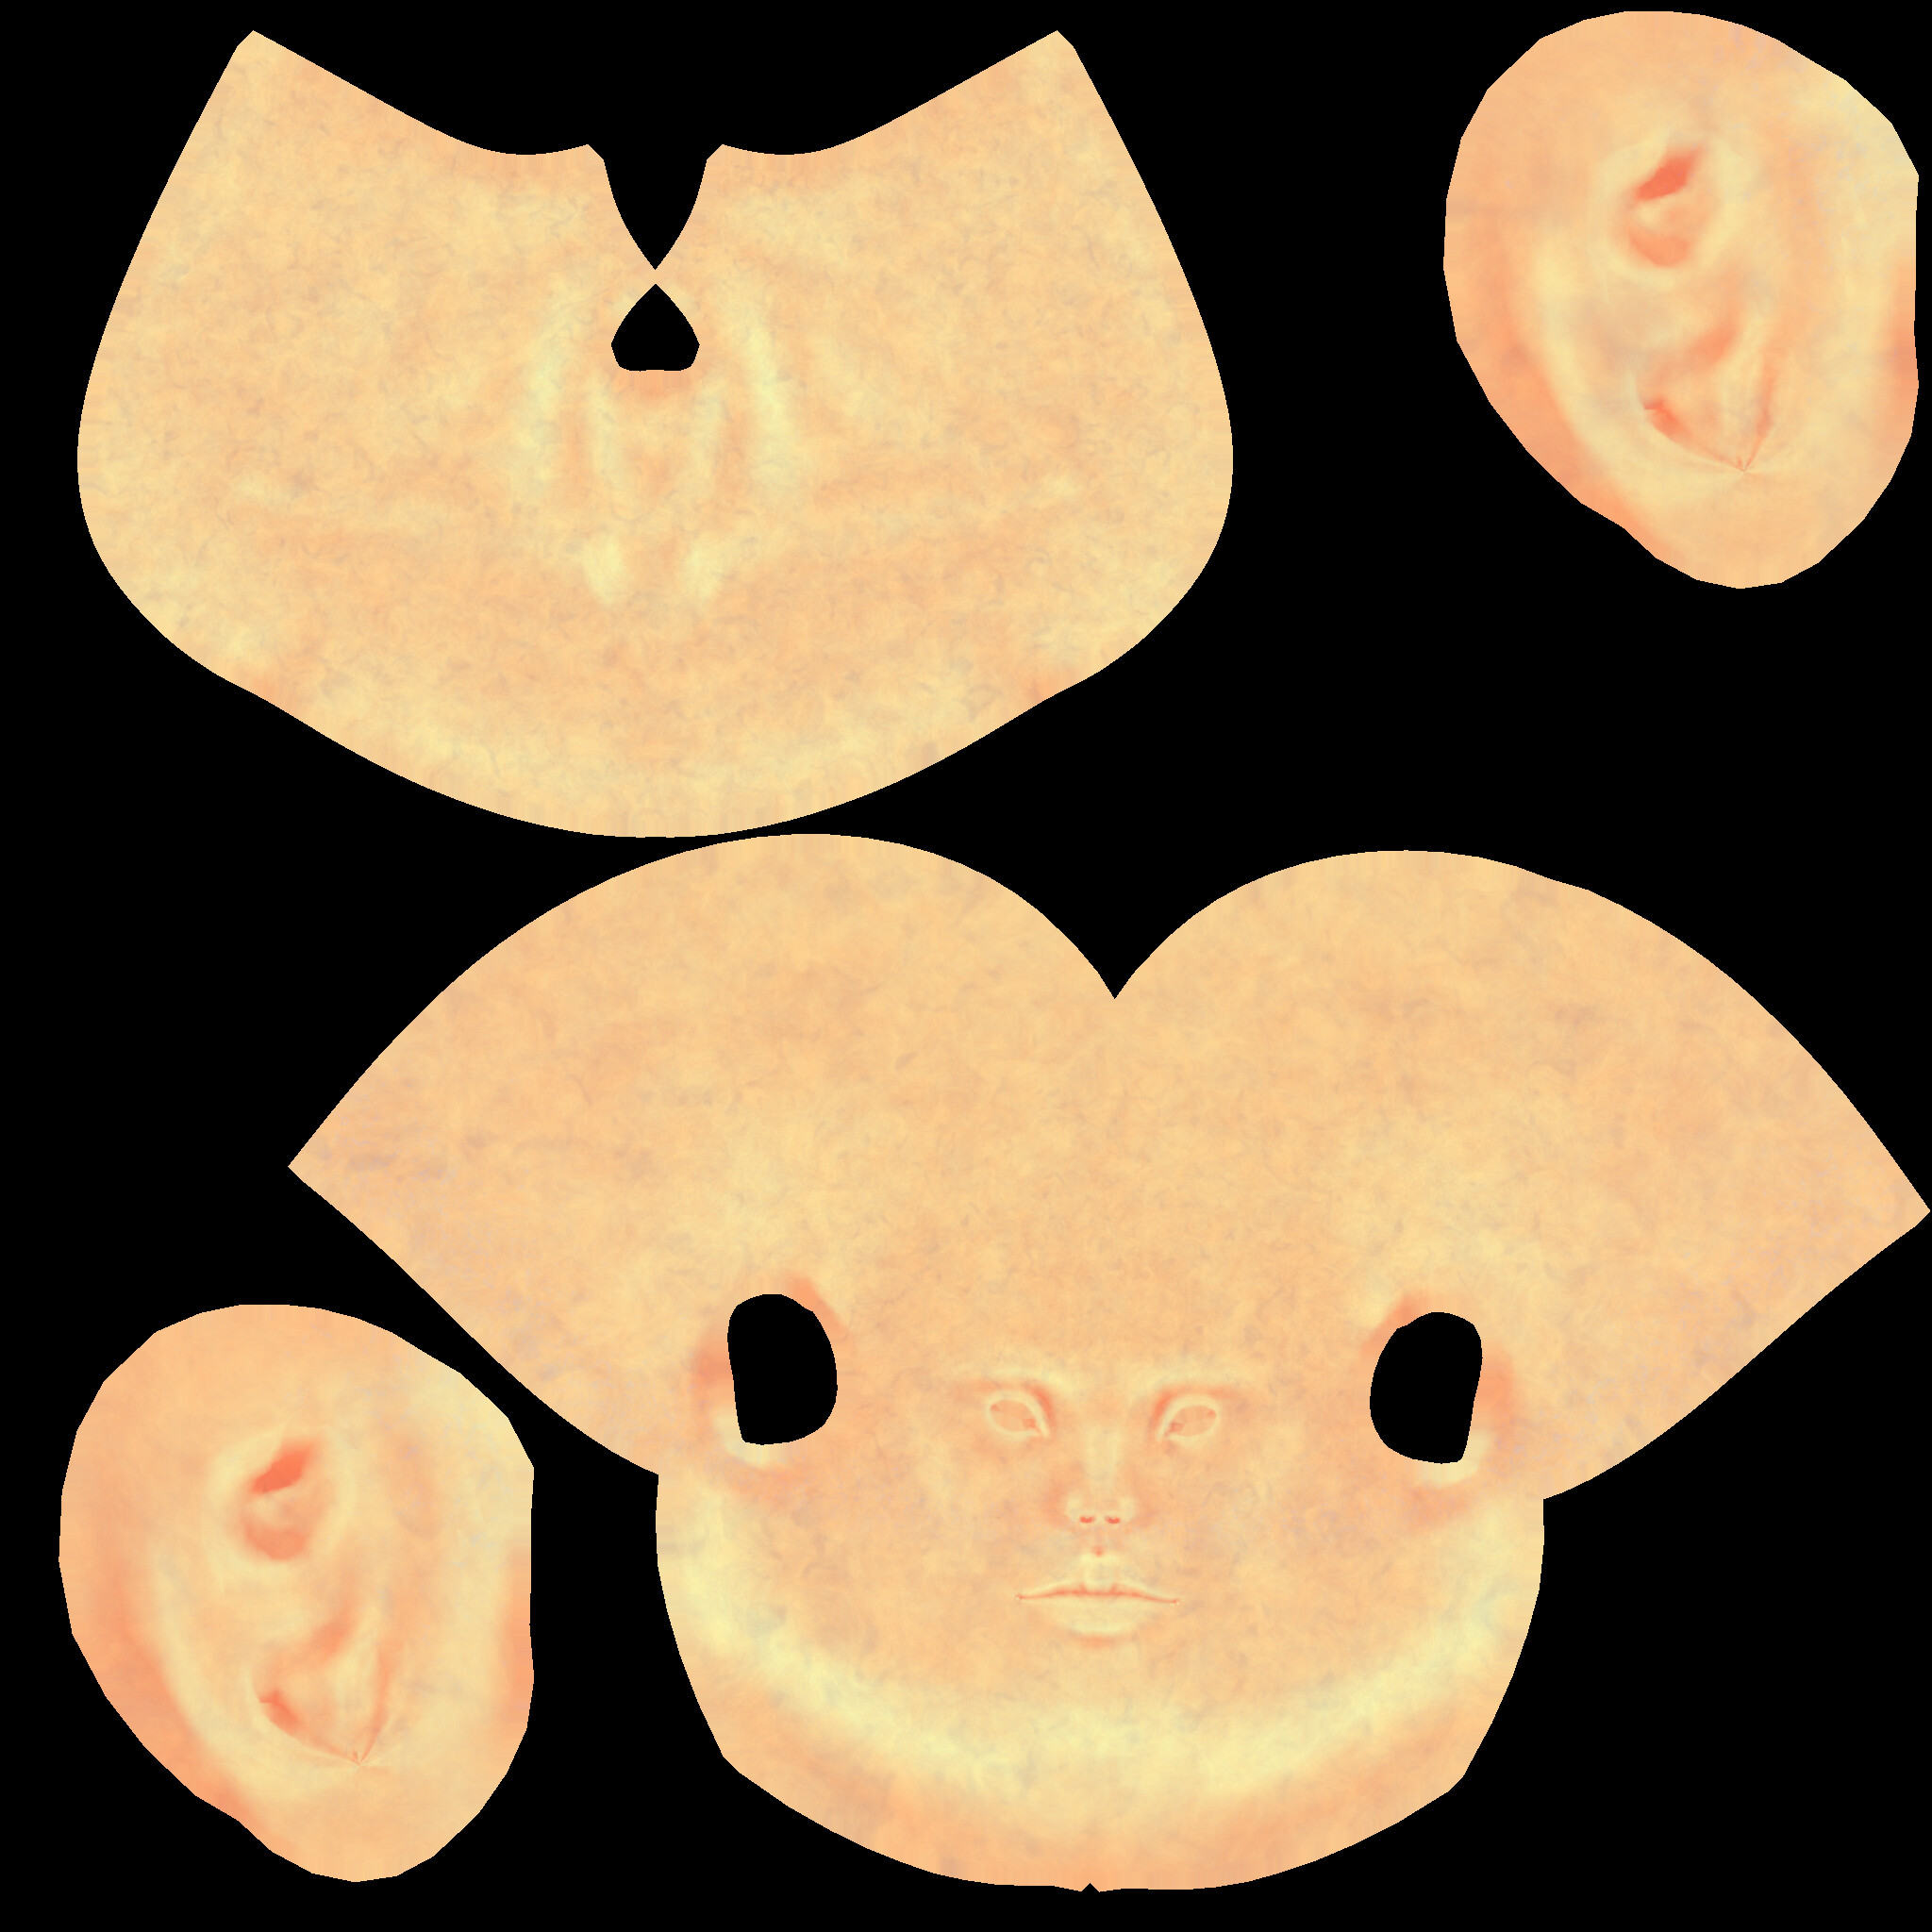
I’ll go into detail on what I did with the skin since quite a few people liked it. I did 3 things: nodes, hand painting and texturing with stencils. Basically I followed a tutorial to make a procedural skin texture. It is a massive node tree and I don’t think you will be able to see anything in the screenshot so here’s the video.
So my colour setup is exactly the same as in this video. You could just download this guy’s blender files but I suggest you watch the whole video and follow it step by step as it really shows how nodes can be used to create complex textures. I baked the colour with flat lighting (white world, no light), and I used that texture to paint it. Here’s what I got.
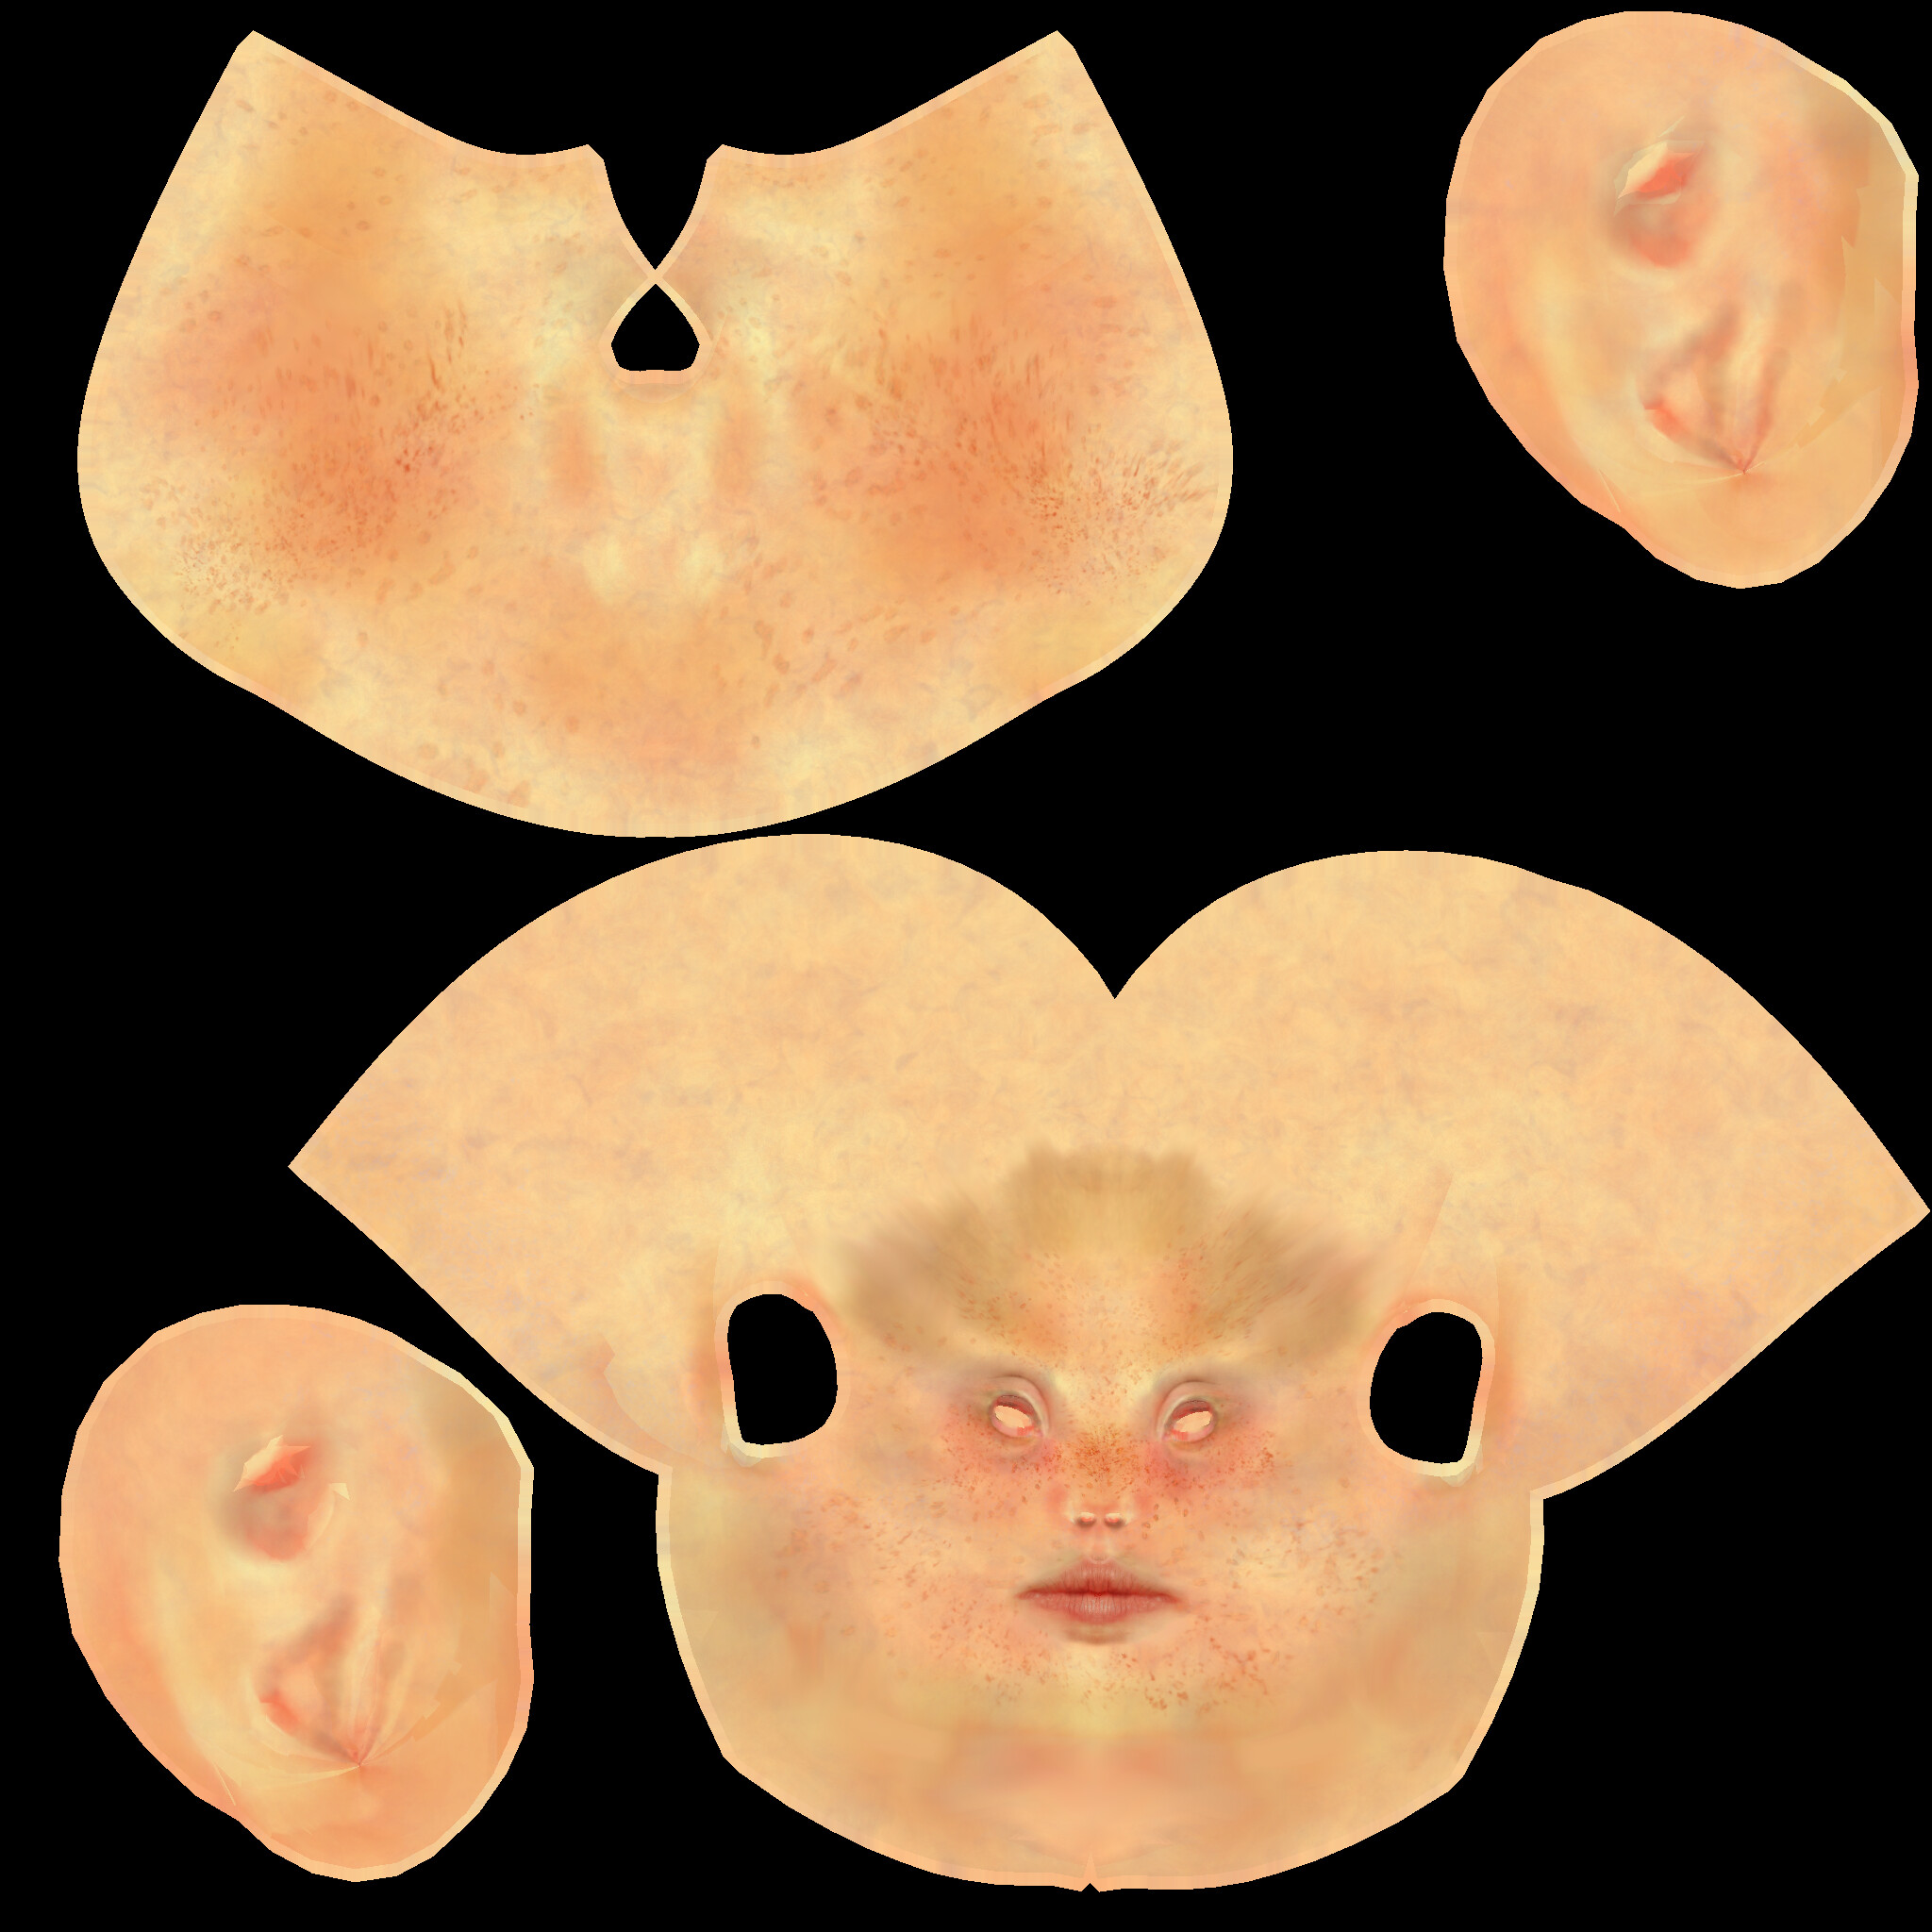
I painted eyelids, lips, and all the facial features. I don’t have a drawing tablet, all done with a mouse. Then I added a ton of freckles with a stencil ( there are a lot of free transparent pictures of freckles on the internet), I also used the same technique to add skin imperfections from stock pictures of random people. I realised that it’s not necessary to be able to paint at all because you can just use stencil to literally add all the facial features. It’s easy to blend it if you use stencil on really low strength and you can always add detail by hand on top of it. If I knew that before I started painting I definitely wouldn’t have spent 5+ hours working on facial features lol Here’s the final texture.
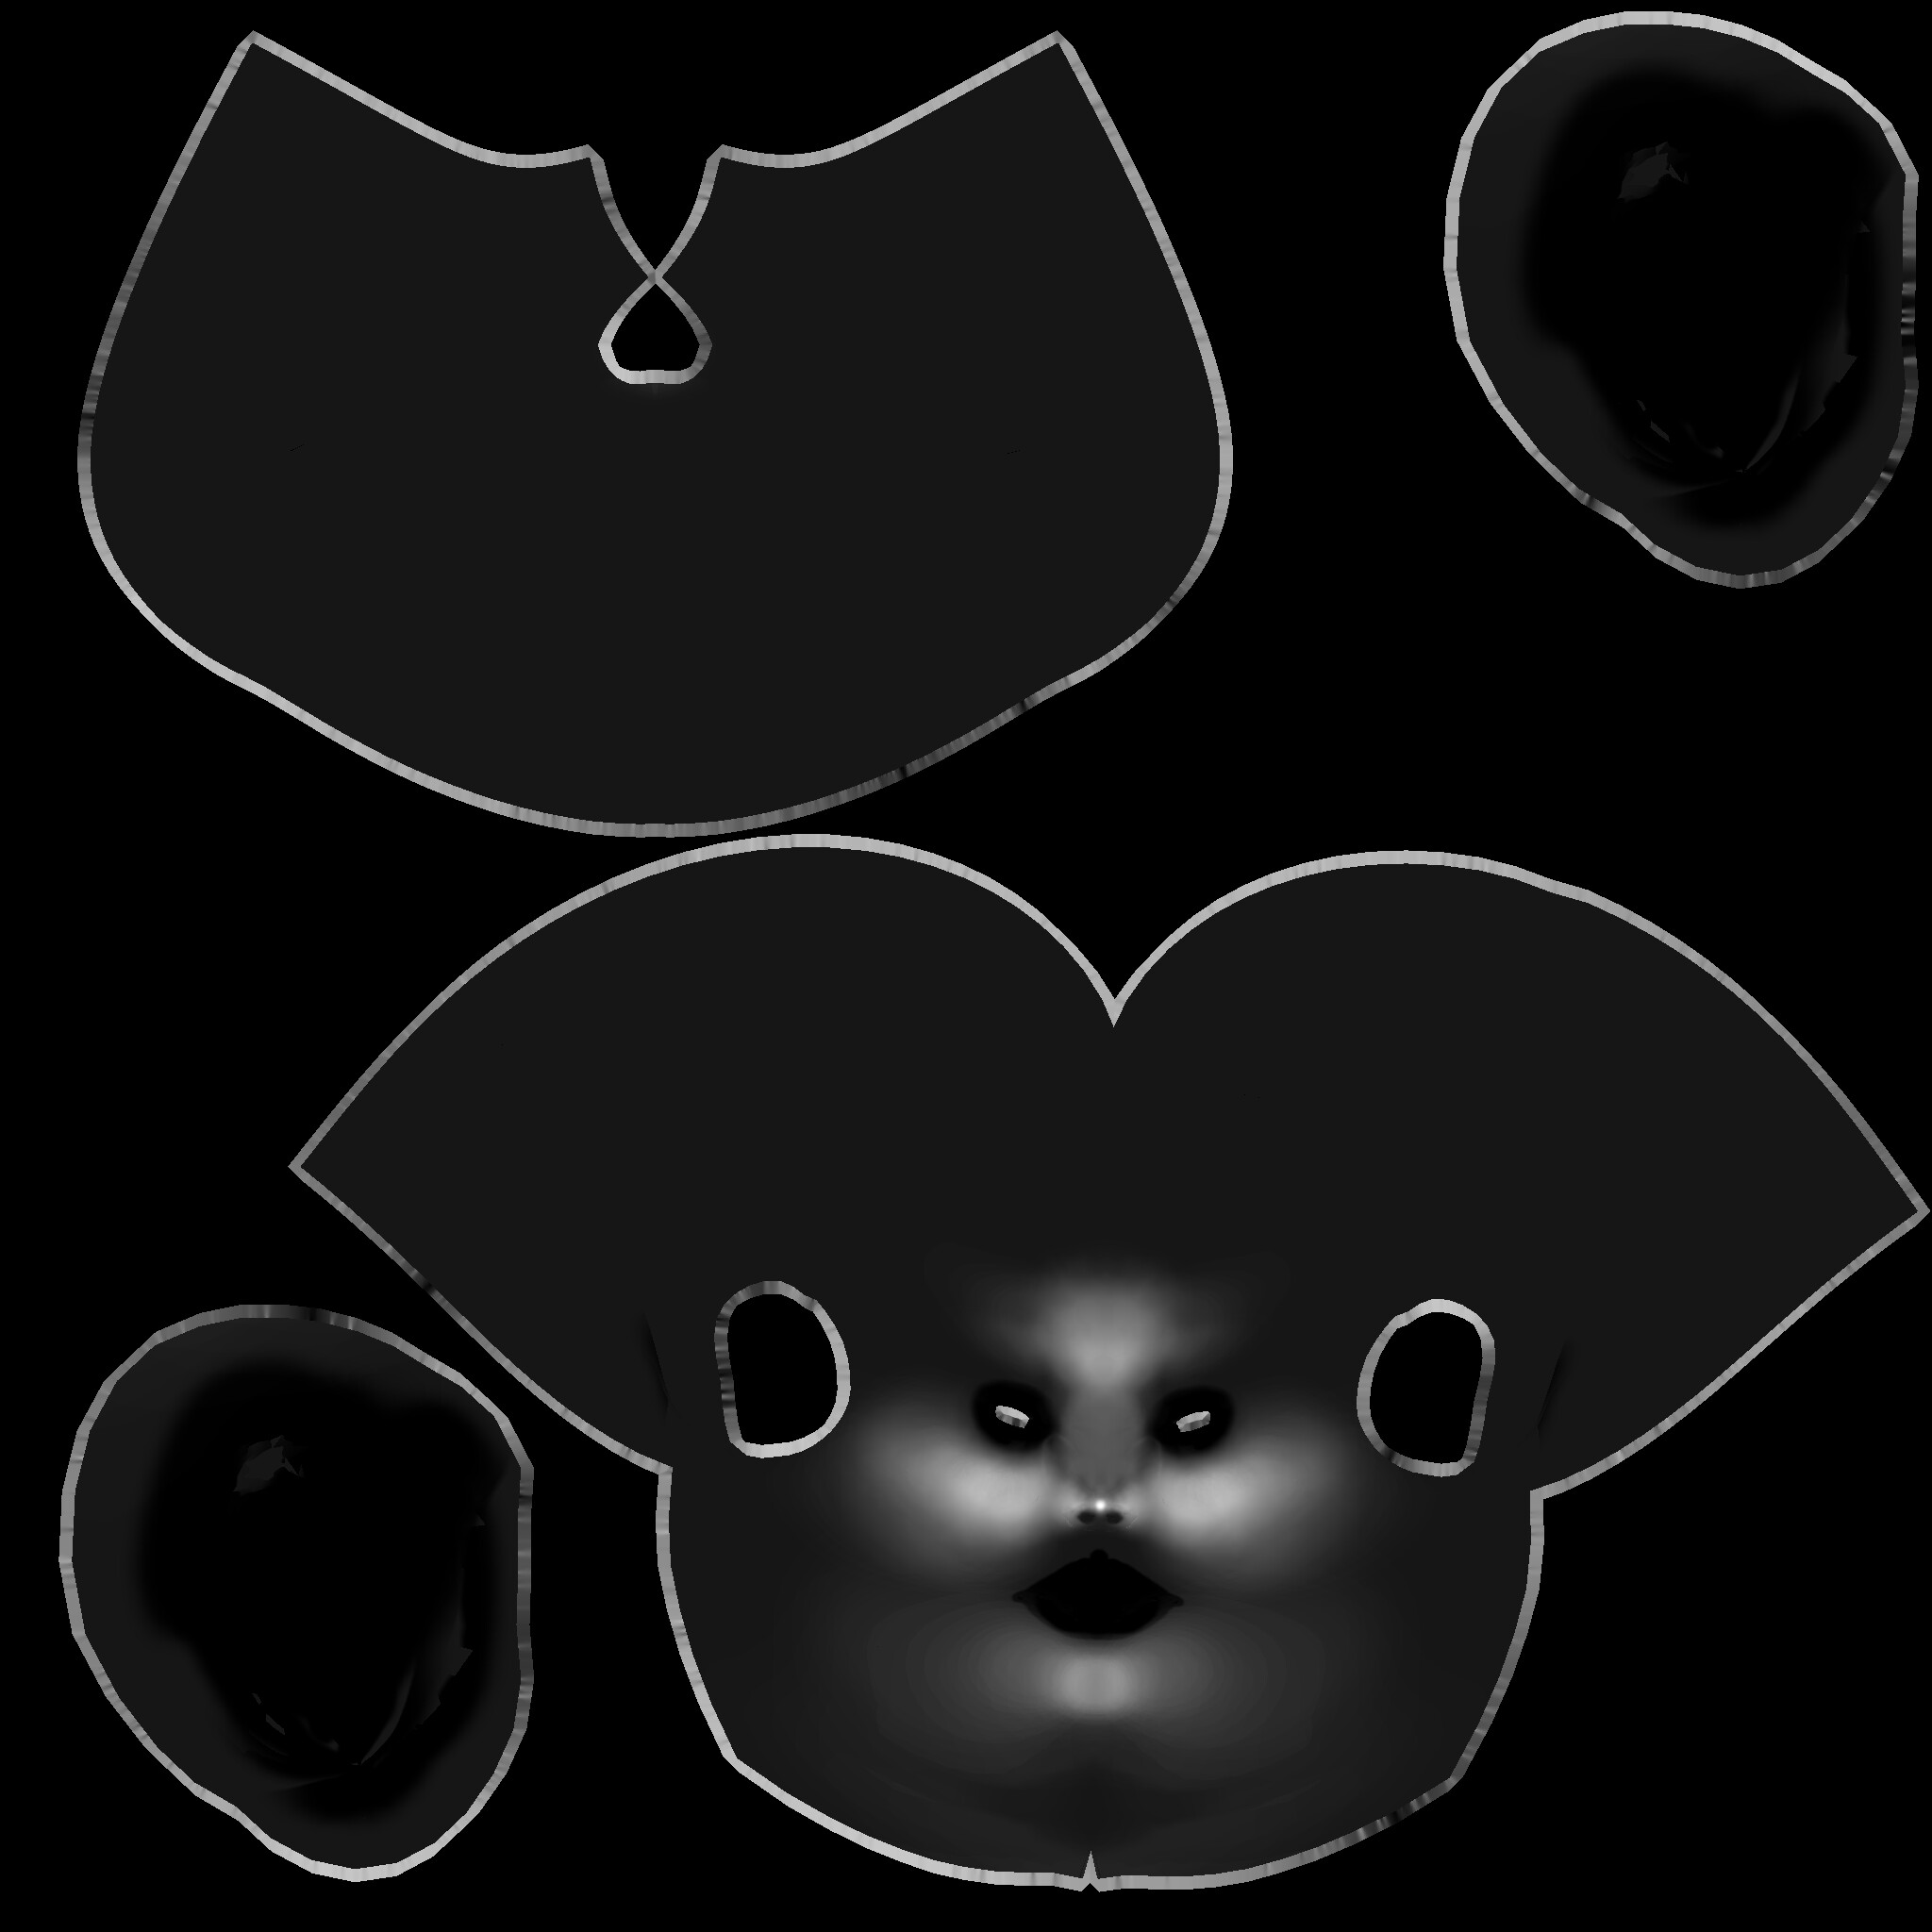
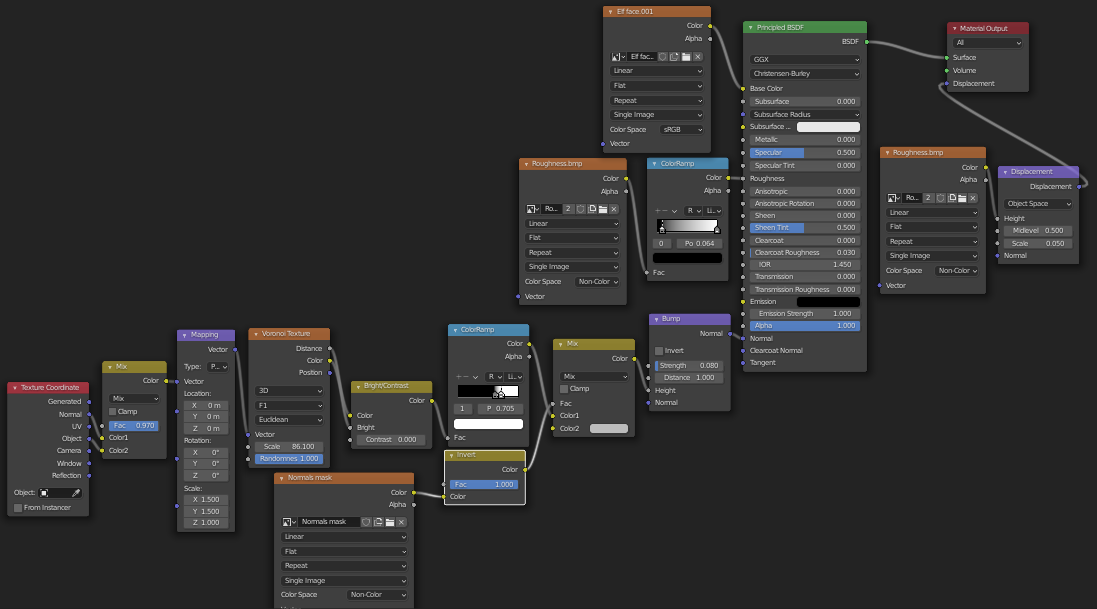
The guy from the skin texture video had a set up for wrinkles, fat distribution and pores. I only kept the pores as my character is young. I made a change that I came up with myself so I’m not entirely sure if that’s the proper way to do it but it worked. Basically I painted the areas that have the most exaggerated pores with white and excluded the lips completely. It turned out to be wrong so I added the invert node lol and I just plugged it into factor on my mixRGB node. I made a roughness map in Materialize. I really think it’s a must have because we don’t have consistent roughness on our skin and it made my sculpt look way more realistic. I also used the same roughness map to plug it into displacement and it added really nice texture to the skin although I had to use very low strength. So to sum it up, I had a colour map, roughness map, displacement map and pores set up plugged into Normal (which I did not bake for some reason). Here’s my mask for pores and final node tree.
Thanks a lot! I’m sure you will be able to sculpt really awesome humans with some practice! I had a skull with muscles for a reference to get the shape right. To be honest I am only good with humanoids because I used to paint portraits and I am absolutely terrified of the next challenge which is an animal sculpt. I will probably end up making something hideous
I don’t have a huge amount of art backdrop, but I do have a long history of fascination with stories and artwork related to speculative evolution/speculative fiction, so I’m fairly used to musing about anatomical maybes and hows, and some related quirks of art. So I guess I do have that going for me. A lot of it feels like a process of picking up the skillset of getting things from my brain and into the program. Always room to expand, though, and I’ll probably be musing up some anatomy-related readings to expand and refresh and further reference.
Edit: Sparking of musing up some readings, I have this whole thread bookmarked for future reference. Your explanations and thoughts are great.
Wow! She is really impressive - well done you! I recently found out that - some artists - just make hair, It’s such a complex thing to draw, I think you have done a really good job with this art work. xxx jess.


 Yeah, I painted portraits when I was younger. I never learned it professionally, it was just a hobby. Never did digital art either but it’s still similar to painting so this experience definitely gave me an advantage haha To be honest, even if you can’t paint I think it’s possible to make a realistic face fully with a stencil