Check out Magma Runner's ongoing development: Play the first demo

Hey guys! Finally got a quick DEMO you can try out. Real basic, just the first two levels (level 2 only partially done), and I have not finalized tweaking of damage and shield values. But check it out none the less.
Magma Runner V.01 Demo

LATEST UPDATE: New Shield and Health mechanics,
Have my Heat Shield and Lerping health/shield bars implemted. Pretty much done with my damage components.

So I have not even really completed the Rocket Boost lessons yet, but I have already had some great Ideas to push the concept further. I have been brainstorming ideas for a game called “Magma Runner”
The premise is detailed in a game design document linked HERE and in the Trello page. But in a jist:

“You are part of the Extrasolar Mining Corp, and your mission is to retrieve ultra rare minerals on select alien worlds through the cheapest means possible. This means no drilling, no large teams, no support. How is this accomplished? Through the V.O.L.K.E.N, “Volcanic Orbital Launched Kinetic Entry and Navigation” Vehicle. You are launched from orbit where you fly into the mouth of an active supervolcano. You must then navigate various hellish landscapes in search of payday.”

I have decided to share my Trello page with all of my notes, outlines, TODO lists, etc. for anyone looking for their own inspiration or ideas. Just try not to directly copy me, it’s rude :slightly_smiling_face:
Magma Runner Trello Board

Feel free to click around, look at my cards. Since much of my external work (mockups, docs) are live documents in Google docs, i uploaded static images and files anyone can see to the cards.
The most recent video of the first level

Level one concept (half implemented in Unity and seen in video above)

I am obviously ways away from a complete game, and much of what I have ideas for I need to learn how to implement, so it will be a all around learning experience. Doing one off tutorials here and there are great ways to get interested in Unity, but until you set a project up and learn to make it real, then I don’t think you ever truly learn.

8 Likes

That is pretty awesome, great idea and the prototype looks great.

1 Like

Looking amazing! Keep up the great work! (Or be sure to come back to it later!)

1 Like

I put in a customizable fuel mechanic with a quick text based display for testing, normalized to start at 100%. Customizable fields are for max fuel, fuel burn(unit per frame), and weight per unit.

Weight?
Yup. I add the total fuel mass to the starting (empty) mass of the rocket, and as fuel is consumed it lowers the total mass, thus increasing thrust to weight and dynamically changing how the rocket “feels”. Still needs fine tuning, and I plan to implement an upgrade system.

If anyone is curious how I implemented it I can post it for criticism, discussion or for others to take inspiration from.

1 Like

Of Lava Geysers and Thrusters

As seen in the updated video in the main post, I have finally added that lava geyser from the Level 1 block out.
It actually went through two iterations:

First, I made a box primitive, attached the same lava shader I used for the background (free from Asset Store). This actually forced me to learn a little about shaders, as since the shader asset was designed to be use globally controlled (If i changed the speed of the lava flow for one object it was attached to, it would change them all). This forced me to not only duplicate the shader, but to also go in and make minor edits to it in the code, so that it would be it’s own independent shader(basically had to change the variable names in the file, and link them in a separate script). This allowed the “ground” lava to move horizontally, while the geyser lava shader “shot upwards”. The actual rising of the geyser was done with an animation played on a loop. The timing of the geyser was baked into the animation, making it hard to change. While it looked decent enough, it was too…square. I really wanted to do something with particles. But how? I wanted that rock to shoot up and down with the lava geyser, and I wanted collisions.

The end result was a lot of work. I made two particle effects. The first was a small “bubbling” effect that let the player know the geyser was about to fire(as well as a sound cue). The second was the firing geyser particles. I kept the original box shaped geyser in, but hid it’s mesh but kept the collision shape. I then adjusted it’s animation so that the collision box would match the particles of the geyser. This was a tedious process. It involved creating key frames in the animation and matching the top (and even the bottom…you fly under the geyser as it shoots up and starts to fall down) with the particle mass.

A long with this I also decided I wanted to control the firing of the geyser outside of it’s animation. So the animation of the collision box was just one cycle,and animated and timed to match with one cycle of the particle effect.

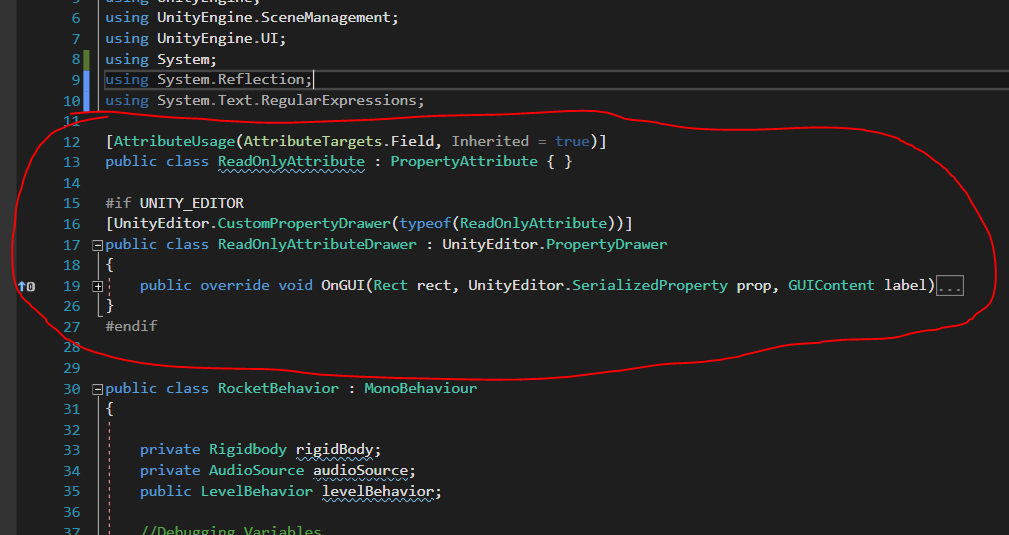
The real challenge for me was the timing. While I knew about InvokeRepeating, that did not solve the issue that I had two particle effects that had to be played one after the other. This is where I learned about Coroutines. Through some trial and error, and some frustrated google searches I came up with this that allowed me to control the time between the lava firing (with out it spamming it which kept happening in different variations of my code)

void Start ()
    	{
    	    audioSource = GetComponent<AudioSource>();
            InvokeRepeating("LavaGeyserTimer", 1f, timeBetweenBursts);
    	}
    		
        void LavaGeyserTimer()
        {
            StartCoroutine(LavaActivation());
        }

        IEnumerator LavaActivation()
        {
            // Start bubbling effect and sound
            lavaGeyserWarmup.Play();
            audioSource.PlayOneShot(lavaGeyserBubbleAudio);

            yield return new WaitForSeconds(1);

            //Stop bubbling effect and start main geyser effect/sound and collision box animation 
            lavaGeyserWarmup.Stop();
            lavaGeyserCollider.Play();
            lavaGeyserMain.Play();
            audioSource.PlayOneShot(lavaGeyserShootingAudio);

            yield return new WaitForSeconds(3);

            lavaGeyserMain.Stop();
        }

What this does is on Start(), it InvokesRepeating the method that starts a Coroutine. The Invoke controls the timing between the geysers (adjustable from the editor), and the Coroutine is what does the timing to start and stop the effects in order, as well as the audio for each effect. So it starts the warmup(bubbling effect) which is 1.2 seconds long. After one second it will stop the bubbling effect and fire the geyser, which lasts three second, it then stops the effect. Since stopping the effect does not destroy the particles, the geyser naturally falls back to earth(gravity modifier on particle effect).

The actual particles are a lava texture I opened in Photoshop and feathered the edges then made a particle material in Unity.

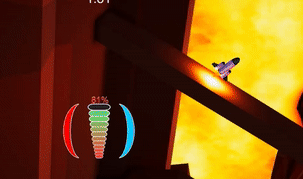
A quick GIF of the geyser.
com-optimize (2)

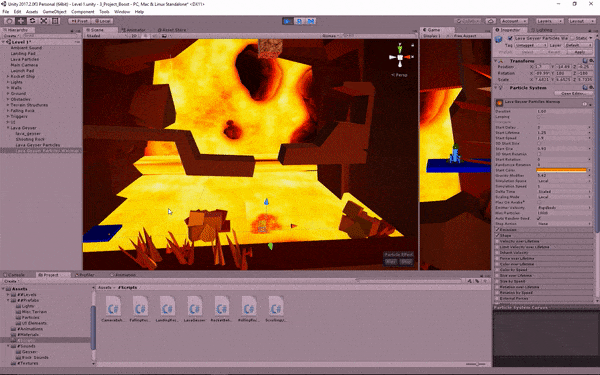
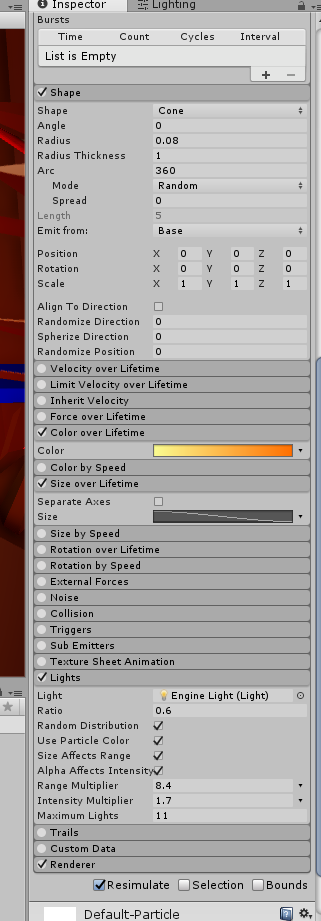
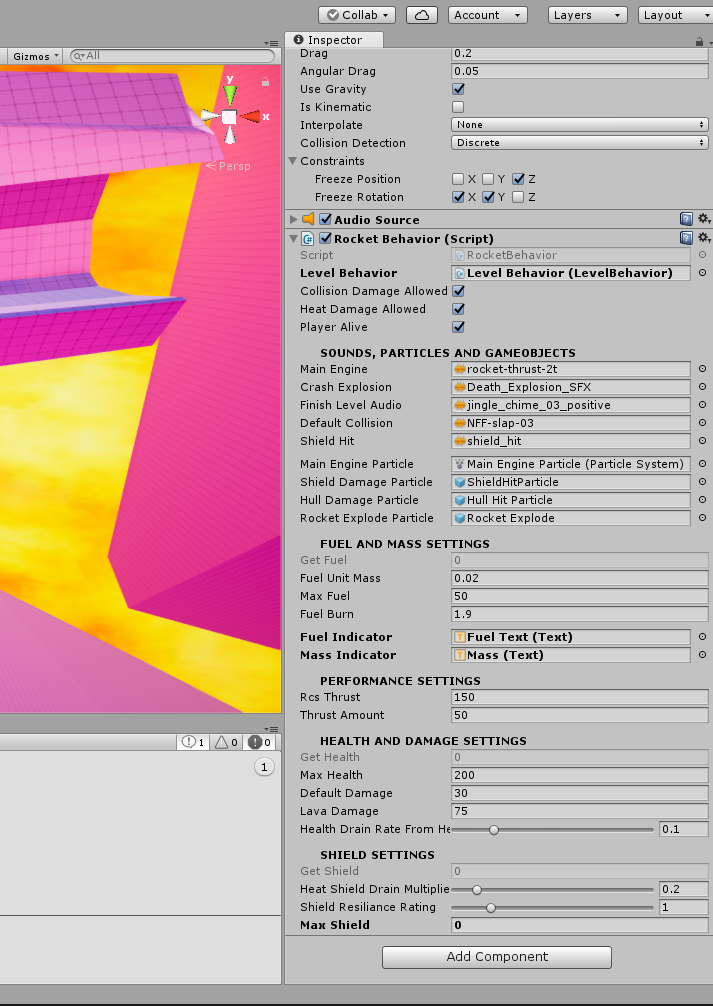
Since I am on the topic of particles, I also added my rockets thrusters. Mine is made with everything you have in Unity, no special stuff. But to get that nice point, you need to use the Size Over Lifetime to get it to dimish to a point, and have a very narrow radius cone with about 100 particles over time. I then created a light at attached it the particle gameObject, and turned off the light (unchecked it) in the component screen. Then using the Lights section I made it so the engine made a flickering light on the rocket and surrounding terrain… You can see it in the video in the main post. Here is a screen shot of my settings.

Hope you enjoy. I plan to have a prototype of the first two levels playable soon for everyone.

1 Like

BARS galore (Health and Fuel)

Finally implemented a graphical health and fuel bar, (well actually did not even have health in before so did that too).

Fuel Bar: For the fuel bar, I actually broke the original fuel bar I had I made into a 12 image sprite sheet. One for each “pip”.


I then created an empty gameObject named Pips in my UI canvas, and created 12 UI images, naming them 1 through 12 and attached a pip to each one. To code them I attached a script to my Canvas, I then created a GameObject array (public GameObject fuelArray[];) and in the inspector made it a size 12 array and dragged my game object “pips” to it. I then used my already created fuel mechanic and normalized the it to between 1-12 (since I had 12 pips).
Capture
I then wrote the following method to calcuate when a pip should be deleted, and ran it with an InvokeRepeating

void adjustFuelGuage()
    {
        if (currentFuel > 0)
        {
            for (var i = 11; i > 0; i--)
            {
                if (i <= currentFuel)
                {
                    fuelArray[i].GetComponent<Image>().enabled = true;
                }
                else
                {
                    fuelArray[i].GetComponent<Image>().enabled = false;
                }
            }
        }
        else
        {
            for (var i = 0; i < 12; i++)
            {
                fuelArray[i].GetComponent<Image>().enabled = false;
        }
    }
}

The code essentially just checks to see if the normalized fuel (0-12) is less then each individual array number and enables or disables the pip as needed.

For Health
Setting up the health bar was at once super easy (way easier then figuring out how to get the fuel) but I still spent HOURS working on it. Simply put, I can not figure out how to get it to smoothly transition from one value to another. I know the basics of what needs to happen, but not sure how to implement it. Though I tried many times (even locking Unity in a infinite loop, forcing me to have to break it out of the loop with some interesting Visual Studio debugging process I googled).

To get the health bar to simply take a chunk out when health gets depleted, I had two images created, the empty and the full. When I created the UI Image for the full ‘red’ health bar, I set it as type; Filled, fill method: Vertical. Since image fill is between 0-1, I had to normalize the health values I was receiving from my Rocket Behavior script ( I was using get methods to pull fuel and health info from RocketBehavior.cs into UIBehavior.cs) to match.

I then simply created an method called from Update with the following line.healthGuage.fillAmount = currentHealth;

A quick gif if the two in motion. You can see the second fuel pip dissappears at the beginning of the gif, and I hit a wall to show health loss. I also made it so lava takes far more damage out. Also note Shields (blue bar) are not yet implemented.

com-crop (1)

2 Likes

Darn, I’m just running off to brunch and can’t fully digest this right now… but I’m wondering why you decided to do InvokeRepeating rather than process the code in an Update() frame… Neat stuff though!

Honestly, trying to figure out why I didn’t. I had some reason in my head. I might have been thinking I wanted to adjust how often it checks to adjust the pips. Since the actual fuel management code is done in the rocket script, I already have realtime determination of when fuel runs out and cuts thrusters. But since each pip of the fuel on the UI only disappears at specific fuel quantities, I don’t have to check every single frame because the majority of the frames nothing needs to be changed. I have my InvokeReapting set at about .1 seconds but could probably going even higher without affecting reliability of the fuel Guage.

I think arrays are fairly well optimized, but then I also haven’t spent a lot of time thinking about things like mobile optimizations. I have a class that maintains an array of particle systems, and every single update it iterates through them to “recycle” the ones that have run their course (and make them available for the next time/place a PS is needed). It doesn’t seem to cause any performance hit with what I’ve got in my scene so far…

Just for personal interest, I fired up the Profiler and I see:

39.4% Render
22.3% Physics
13.9% seems to be on GUI Layout
7.7% seems to be memory management / garbage collection
2.0% on some particle system things
…
…
my EffectPool made 2 calls for 0.0% CPU…

1 Like

So as quick update for everyone, no fancy pictures or videos this time. Sorry.

I finally have a near fully functioning Shield/Health mechanic complete with a level heat mechanic.

The basics work like this:

Heat Shield
Each level has it’s own “Heat Index”, or how HOT the level is(you ARE in a volcano). This heat will slowly drain the players heat shield (the blue bar). This drain is based on the current level’s heat index as well as the players heat shield resilience(The stat that will be up-gradable). I created a separate c# console program that allows me to input some test variables: three different heat indexes for levels and a heat multiplier. Using my heat drain formula the program spits out a table of heat drain per frame for 20 different player resilience stats from .05 to 1. This gives me a baseline on how much I should change the upgrades for players and each levels Heat Index values.

Also built into the heat shield is collision damage absorption. So as long as player has some heat shield left, collisions will lower this component first. However! IF you are not careful and burn away your heat shield (taking to long in a level, or hitting too many things…or both) then your HEALTH will drain due to heat as well. Since you have less health, this is a critical moment where you want to either: Finish the level, or use a shield regeneration ability(not yet implemented).

As a bonus, I also have add Lerp functions to both, so the health and shield bars smoothly decrease rather then disappear in chunks.

Now that I have the core damage functionality I can move on to working on the upgrade system.
I will try and get a good video soon.

2 Likes

Newest video:

This shows a little of level two, and the work I did in the previous post (smooth bar animations).
I also added some particle effects to shield and health damage, a new blowey up effect and sound effects.

The video has some tool tips to explain whats going on. Enjoy

2 Likes

NEW VIDEO

I have not been able to add a lot of stuff to the game recently, just picking on it here and there, but I did make some progress.

Recently, Unity teamed up with ProCore to include the ProBuilder tool (and some other tools of theirs) into base Unity. I have used the Pro Builder basic to make the first two levels seen previously, but it was limited. Pro Builder advanced (the pay to use version) has tons more stuff to prototype levels in Unity, and with it being now free, I had to try it out.

I pretty quickly blocked out much of a new level with it, and with that, I came up with an idea to have a mechanic that zooms the camera in or out based on triggers the player ship moves through. This would allow for me to create more complex level mechanics, but still give the player the “view” they need to react, or I can zoom in as players enter real tight spots.

This video shows this in action on Level 1 and the new level. The video is longer then all my rest, but I also show some of the serialized fields I use to adjust values in game for everything from the editor.

Take a look.

Woah! This is great work, really well done. And I love that you’ve created a design diagram for your level.

1 Like

So read into more about editor attributes (like [Range] and [SerializeField]) because I was starting to get annoyed with how cluttered my rocket behavior script was getting in the editor.

Originally I looked into custom editor drawers, but that is a ways off for now, however I did implement a [ReadOnly] attribute I found on Github that allows me to make my public fields (for use in other scripts) read only in the editor, but without having to tag them as hidden so I can still see them.

But the biggest thing I found was the [Header()] attrubute. Check out my rocket editor drawer, organized!

I also make use of the [Space()] attribute to spread certain variables apart.

Here is an excerpt of my code showing how I used the attributes.

    [Header("     FUEL AND MASS SETTINGS")]
    [ReadOnly] public float getFuel;
    private float currentFuel;
    private float totalFuelMass;
    private float totalVehicleMass;
    private float endingFuel = 0;
    private float emptyMass;
    [SerializeField] private float fuelUnitMass = .001f;
    [SerializeField] private float maxFuel = 25f;
    [SerializeField] private float fuelBurn = 2f;
    [Space(5)]
    public Text fuelIndicator;
    public Text massIndicator;

Here is the Github link to add the [ReadOnly] attribute

To use the [ReadOnly] attribute, copy all the code from the Github link EXCEPT the using directives (so you don’t overwrite any that you might be using). Paste that code between your current using directives and your class. In the image below the red circle is all the code I copied and pasted in. Providing you have no errors, you can now simply use the [ReadOnly] attribute before any public field you don’t want to be editable from the editor.

Have a good day.

1 Like

Digging into Custom Editors

Video Below the wall of text

So I have been spending the last week just digging into custom editor functionality. Why? Because it’s fun and can be powerful. And it turns out, useful!

I made a simple editor, that linked to a separate script attached to my rocket ( I did not want to override my rocket script yet…too many variables would have to be created in the custom editor).

This “RocketEditorBase” script takes info from various other scripts that are related to my rockets shield behavior, and it also does a lot of debugging tasks that don’t affect the rest of the game.

The actual editor script “RocketEditor” derives from the Editor class, instead of MonoBehavior.

With this editor, I can run the game (with all damage turned off) and manipulate shield stats and heat levels for all my levels. I can then choose a level from the drop down and get a quick visualization of how fast it depletes the ships shield, in real time. I also have a total time to depletion metric, so I can change a number and instantly see that it will take “this many seconds” to burn the shield down. In the future I plan to have a timer that runs when I test levels, so I can get good metrics for how long a level should take, and plan depletion from there.

Still more I want to do with the editor, especially have a in editor test of shield depletion (so I do not have to hit play). I also have a button that lets me reset the ships shields (so I don’t have to hit stop and play to do another test) and a button that will take the numbers I decide on and apply them to the appropriate prefab.

Here is a video showing it in action.

This is awesome man, gives me inspiration to keep on going!!

1 Like

Thanks! Ya I started doing the editor stuff after losing steam on the main project. Got me back into it. (too a long break to do part of the Blender course).

New MODEL!

The first draft of the new V.O.L.K.E.N is now in. I did it in blender, kept it fairly low poly. I also mocked up the “Orbital Insertion Pod” that carries the ship from orbit, drills through the volcanic layers and deposits the ship safely. You can see an animation of it below.

And of course here is a video of the new ship model in action, complete with new RCS particle effects.

shippng

1 Like

Very nice James, love the little legs! :slight_smile:

1 Like

DISTRACTIONS!

So not much progress lately. I did however start some re-texturing of the terrain. I also began exporting the copy-pasted-modified ProBuilder objects into Blender and created better scaled and UV mapped version. This allowed me to get rid of a lot of the texture stretching because I was using the same object but manipulated in bad ways to make the different terrain features. Read below for more that I did.

a few notable things:

  • I created a copy of the project and opened it up into Unity 2018.3 and got everything to still work!
  • I installed the lightweight Scriptable Render Pipeline and Shader Graph packages…and broke everything.
  • I then found out how to fix everything!
  • I made my first Triplanar shader in Shader Graph…that partial shader course I did helped a lot. This allowed me to fix all the stretched textures I had left. I found out about triplanar textures when trying to fix the extremly stretched textures created in the Argon Assault terrain lessons. I never found a solution to that, because creating terrain shaders is a whole different process. I fell in love with Shader Graph instantly…but was not a fan of Unity 2018 yet and the SRP.
  • I went back to Unity 2017, and took the plunge and bought the Amplify Shader Editor. Shader Graph(and Unity 2018) is just not quite ready for the big time. Can’t even find tutorials on it.

Whats next? I might take a break and work on other courses/projects for a bit. I am in the process of selling my house in California and buying/moving to N.C. so lots going on.

Oh and I bought the GameDev.tv RPG course… So now I have like 7 half finished courses?

Privacy & Terms