This is a note on the course’s video which explain how to setup the Targeting Group for a Cinemachine camera.
A small change was applied to the Cinemachine Targeting Group camera which makes the content of this video slightly incomplete. The behavior of the Cinemachine Targeting Group with a Body set as Transponder is not behaving as shown in the video (and subsequent videos) anymore.
I haven’t looked up when that change was added, but it’s present in the version 2021.3.13f1, but not in any of the 2020.x versions. The Cinemachine version installed in the video is 2.6.11, if it wasn’t updated after the Installation video at the beginning of the course, and the Cinemachine that I’m currently using is the latest available: 2.8.9.
The main change that was applied to the that Cinemachine camera behavior is that it doesn’t take the “Forward” position of the first object in the list of target as a reference anymore, meaning that using Transponder will result in the camera being placed so that the view is set in-between ALL target equally based on the weight set in the Targeting group. (So the point where, @5:00, it’s mentioned that the player is not visible due to the character rotation is wrong if you use an updated version of Cinemachine.)
If we follow 1-to-1 the explanation in the video, the camera, when in a targeting state, will not follow behind the player anymore and, in fact, will mostly not keep the player in the view at all due to the weight being only 0.25.
If you want a proper 3rd person auto-targetting camera behavior with the Cinemachine’s Camera Targeting Group, you got to apply a few changes:
-
The weight of both the player’s target must be at 1. This ensure that it’s are always visible in view while in a targetting state. (Especially later when the course disable the targeting state if out of view, this is essential.) Anything lower than 1 will result in the camera drifting away from the player.
If you want the targeting state to be on-point with the other target, you got to set that other target also to 1. This will result in a targeting state similar to the Legend of Zelda: Ocarina of time. -
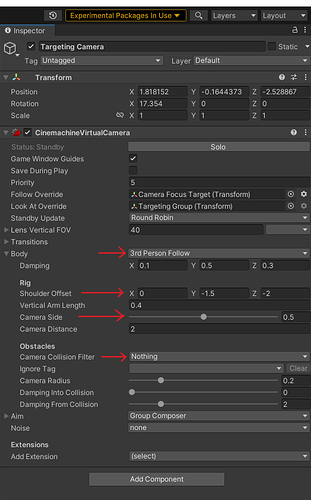
The Body (its dropdown option) as to be set as 3rd Person Follow instead of Transponder.
This was the change added that makes Transponder not working anymore as shown in the video.
Optional (but highly suggested), you can set the Shoulder offset of the Body (once set as 3rd Person Follow) so that the transition between Targeting and Freelook states feel seamless. Personally, I set the offset as (0,-1.5f, -2f) so that the camera move behind, but slightly above the player’s head/helmet so that the other target remains visible.
It’s possible to have some sort of dynamic for the shoulder camera to move between left, center and right by setting a relatively low X value to the Shoulder Offset (like 0.5f or 0.25f), the either setting or dynamically setting the Camera Side value between 0f (over left shoulder), 0.5f (centered above head) or 1f (over right shoulder). For example by having an option in the game’s setting that allows the player to decide which side they prefer or having a button that switch over left or right shoulder or even having some kind of function that updates the value based on the position of the target vs the player’s position.
Also, another note to consider about the 3rd Person Follow is that you need to setup the Camera Collision Filter. It’s kinda like the Cinemachine Collider previously placed on the FreeLook Camera, but with a few less option. If you want the camera to not clip through stuff, while in Targeting stuff, you got to set the Layers of your world’s assets properly and set the Targeting Camera’s Cinemachine camera’s filter to consider those layers. (Make sure that the player’s colliders are NOT in any the layers you enable as, otherwise, the camera will be stuck at the Camera Target position inside the player.)


