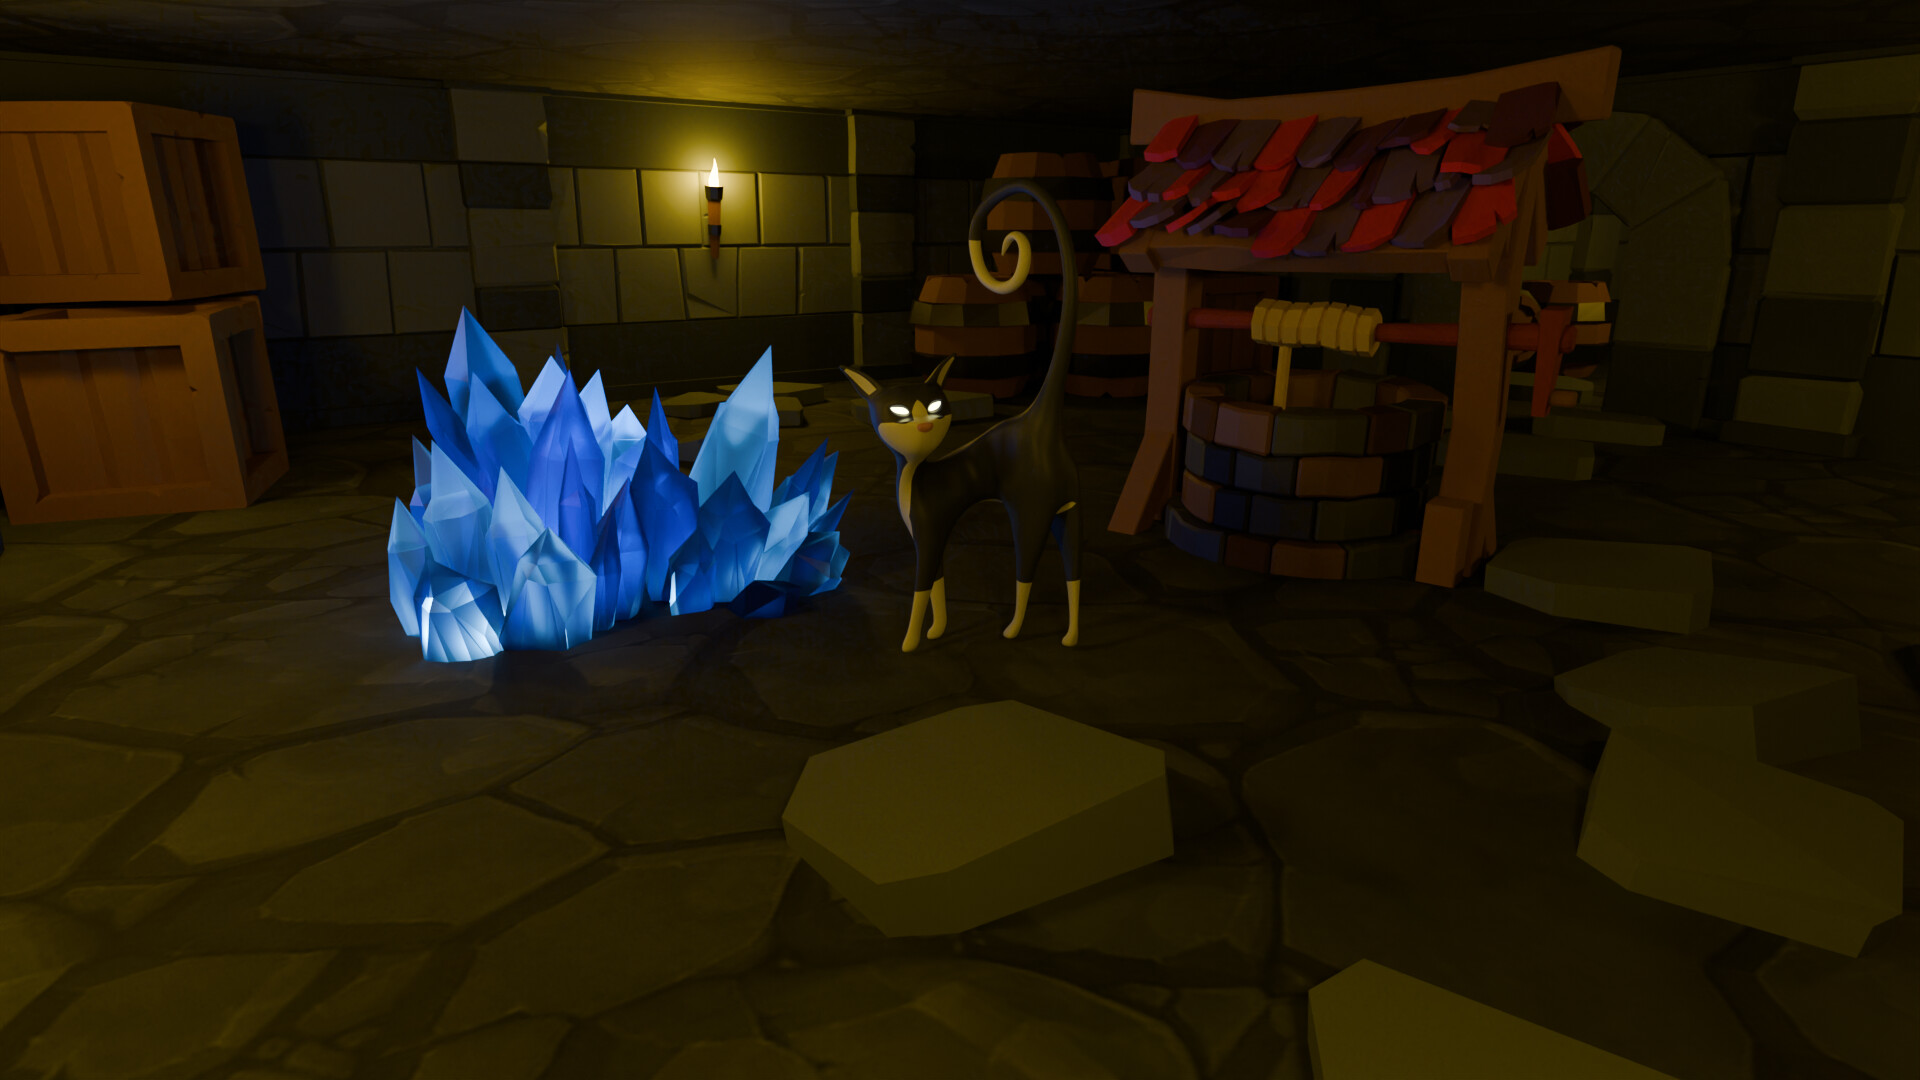
After completing Mini Dungeon section of the course I created this scene using other models I created with Grant Abbitt’s instructions, These can be found on his official YouTube channel @grabbitt.
The extra models are Well, Cat and Crystals.
I modified the models slightly for personal taste, added texture for floor tiles and arranged the scene to somewhat show what’s there. I tried to light the scene using crystals and torches, these are the only source of light out there. I also added tiles for ceiling, I like that light that flame from torch gives and so added ceiling tiles purposefully for that effect.
I would like some constructive feedback, does anything feels off to you? Maybe lighting can be improved? I would like to hear from you.
That’s a nice dungeon, though maybe the well with roof is a bit unexpected there. Maybe the light is a bit too halogen-like and less of a torch (maybe a bit more red is missing, and keep some shadow under the base of the torch - if you are using a point light around the torch, try to place it inside the torch and let physics do the rest). If you really want to show the crystals’ light, maybe you could limit the amount of light coming from your back and left, so that it does not make the impression that their light somehow comes from the outside (I guess there is another torch somewhere there, but for the still image I would recommend to use light sources you can see in this case). And I would try to make them somehow transparent so that they are better integrated into the scene.
The kitty is a nice addition, and thank you for the reference to Grant’s videos! Though if the eyes are naturally glowing due to reflected light, I would recommend making them a bit greener.
My main focus was to practice modeling with detailed instructions and I like Grant’s approach in that aspect so I created that extra 3 models and I wanted to show them but in some scene. The completed scene from course itself I wanted to show, but it looked empty and nothing interesting was happening. So the following scene is a result of single models that needed background and background that needed filling if that makes sense, so I understand that well having roof in this scene might come as unexpected. I will keep that in mind to plan my subjects more thought out.
When it comes to lighting and compositing I have less experience in that regard so your feedback gave me some ideas on areas where I could improve.
So about torches yes there are more in the scene as you can notice from light coming from the left, there is one more coming from the back but that could be harder to notice. The torch using 2 sources of light, the material emission and point light. The point light is in fact in the flame mesh of the torch, so you can see a shadow that look like extension of the torch. If you zoom in the picture on the torch base you can notice that, this may be confusing so perhaps I could modify the torch base so the shadow it produces is more distinct.
Also good suggestion about reducing overall light coming from the back so the light from crystals would be more prominent. I was trying to bring out the blue from the crystals, but didn’t thought that back source of light could be interfering.
The torch’s light colour is yellow, I tried to change it to more orange but it also makes the scene more darker, however I like the orange light colour better so that’s one thing I can work on to change.
The cat’s eyes have emission material that is light yellow, also the cat’s model is largely based the on the Video with the cat tutorial I watched, so it’s more stylised cat rather than it’s real counterpart. although I appreciate your suggestion regarding it’s eye colour.
If you know of any good learning resources outside of gamedev.tv, please share. I am open for suggestions.
I recently completed that course and my dungeon was not so well equipped, except for torches . I did not ask which rendering engine you are using (Evee, cycles). At that lesson I “still” used Evee, appropriate for my laptop and patience level . If you use the cycles option, it will take a bit more (well, it takes ages in my case) but you will get better results with emitting materials, transparent materials, materials with light inside… I reduce the size of the images and limit the number of cycles, but it is still worth it when there’s little light to play with; it manages it way better.
If you are taking these courses and want some extra practice, you may search for the Blender Collab in these forums. Very interesting and helpful!
So to render this scene I used Cycles, I have quite good pc so rendering is not much an issue, the rendering for this picture took around 2 mins. The scene is about 120 objects and 23k triangles from which Well takes 7k triangles, Cat takes 1k and Crystals around 3k. I myself was working once on budget pc so I know how it feels when renders take ages…
I tried to render this picture in Eviee and the crystals do not display as good as here, but other than that in Eviee this scene looks fairly similar.
Can you explain me a bit more about Blender Collabs? Have you partake in these yourself?
That thread also includes the instructions and the link to the current one, and the forum will suggest plenty of links to previous ones. I have participated twice, and I am in the process to prepare something for the current one. It is nice to have a great excuse to work on something out of your comfort zone and keep improving. This week’s one has a bit of extra conversation due to the current changes in the Gamedev.tv site, but there are some submissions in process already
Just answer the thread and show your work (blue Reply button to answer in the thread). Or just comment, exchange, look and think about it until you feel like sharing your ideas next week . As @FedPete explains, we are all learning!
One way to figure it out, or? My understanding is that the mentioned parameters require most compute time. Thus this should have an impact on every system.
The mentioned tweaks reduced render time on my machine from 2 minutes to under a minute. Yes, there are issues here and there, but you have to look carefully to see these. if you make animations, every second counts.
You know, I tried it out. And I only had one issue so far. I was able to reduce the render time but as soon as I changed the light path setting for total bounces the lighting was affected very much. Maybe you know the setting that improves the render time without drastically affecting the lighting in my scene? I don’t have much understanding of what each of the setting does, so if you could explain it a little or know the resource that explain it in easy to understand way then I would find that info helpful.
I am not new to blender, but I am not advanced user either. Btw do you change your output render setting each time depending on what you working on? Or you use mostly the same setting for everything? So far I am running on default setting and only change a setting when I am asked to in the tutorial or course I am taking.
I’m no expert in this either. If I recall from the video correctly, it is an iterative process. I have a default, similar to what was described in the video. However, I adjust it where needed. I added a glas material or volume the other day and changed some settings in the light path. I don’t think there is one combination of settings that fits all.
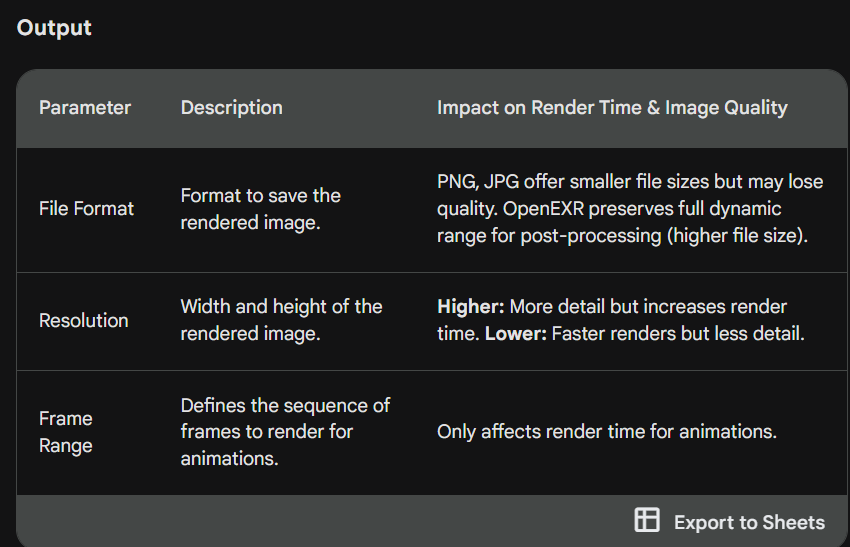
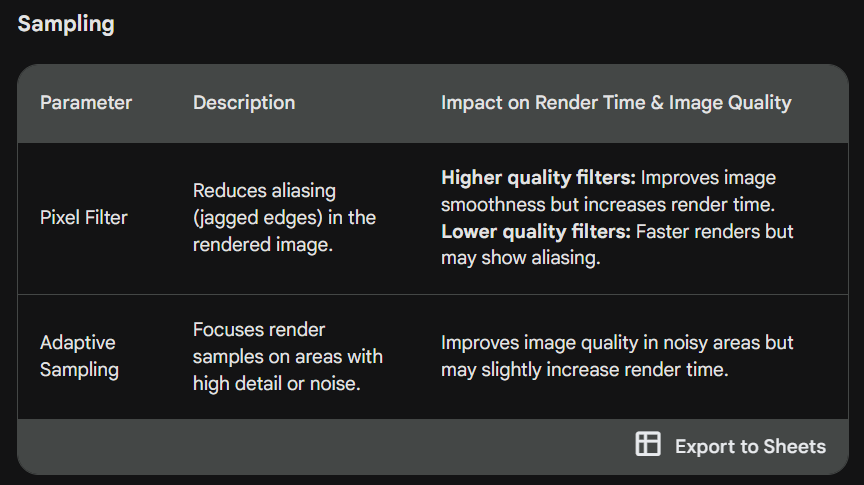
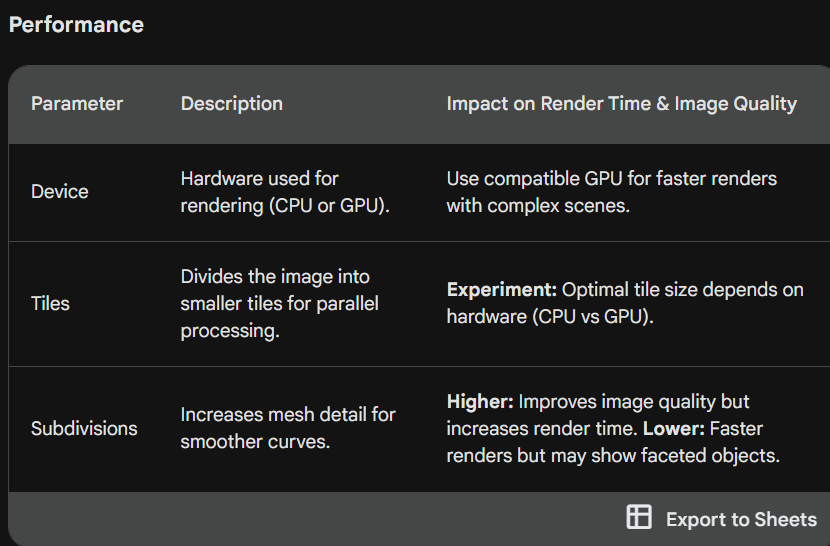
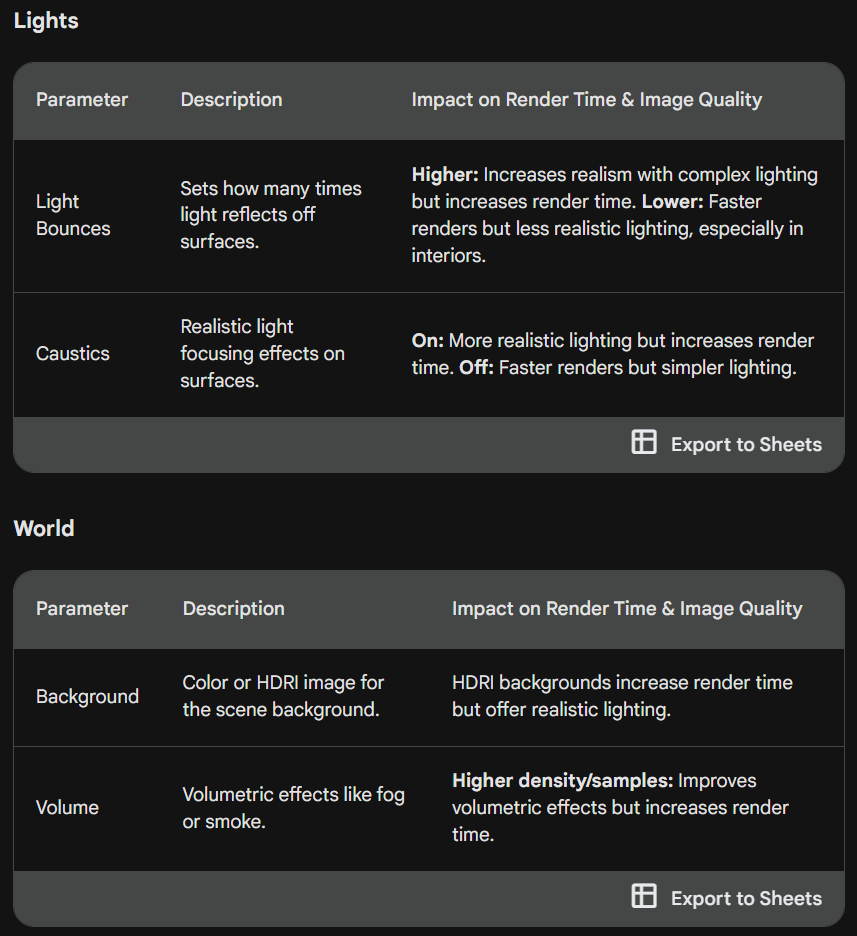
“The goal is to write a table that shows the impact of render settings and parameter on render time and render image quality, with the aim to minimize render time. Summarize the settings for cycles, Blender’s render engine. Write a table, the first column names the parameter, the 2nd column what this parameter does. The third column summarizes what chaining the parameter does, such as impact on render time or image quality.”
and then this prompt
“Please list and describe all settings and sub-settings that are available for cycle in the table format mentioned above.”
btw, I find using an AI search tool much quicker and more efficient than looking for videos. Maybe with the exception for Blender Secrets and the 1-minute videos
Wow so detailed! You know I am careful with the AI’s sometimes they lie so I take whatever they generate with a grain of salt, but yeah I do use AI to find info occasionally. I guess it depends on what kind of info I am asking it to find. But great suggestion, thanks!
Well, since this is fact driven, most likely on the Blender manual and other sources, this is fine.
You can tell Gemini if it doesn’t know the answer to say so. And adjust the “temperature” - how free or strict it should be - aka come up with shi* or not. AI tools are different from your typical google search. It’s more like a discussion with a person.
And you are right, the responses must be taken with a grain of salt.
I will and already have an idea what to make, I just don’t know if I complete it all in time. Thanks for introducing this to me! @Megane_Wang and @CoreyKnecht.
although I have one barrier that keeps me from making my own stuff, I wrote a thread about it in ask section so you can take a look at that if you want and think you can help.
Anyway, I will try to make it work somehow!
 . I did not ask which rendering engine you are using (Evee, cycles). At that lesson I “still” used Evee, appropriate for my laptop and patience level
  . If you use the cycles option, it will take a bit more (well, it takes ages in my case) but you will get better results with emitting materials, transparent materials, materials with light inside… I reduce the size of the images and limit the number of cycles, but it is still worth it when there’s little light to play with; it manages it way better.

 . As
. As