Hello. Anyway we can activate an extra rig (or both rigs) by activating the y-value ‘Speed’ parameter through code for a Freelook Cinemachine camera, or do I have to re-create one? Currently I have it locked to the middle rig, but I have special cases when I’d like to activate it through code, and then I want to deactivate it again (something for my personal Construction System, because my current camera is a bit of a nightmare for Construction to deal with. The top and bottom rig can be incredibly helpful for a case like this one) 
I’ll be honest, I’m just not sure on this one… it doesn’t look like the speed will have much to do with the rig selection, as the rig is selected based on the height of the camera… (useful with a FollowZoom extension). You could try adding a CinemachineCameraOffset, and adjust the Y offset based on the speed, which may trigger the rig change, but I’m not positive.
This may be a question better suited to the Unity Forums
ahh I’ll just do what I always did then. Create a second camera, and adjust its priority for when I enter a state, and deactivate it when I enter the previous state again (it’s how I’ve been creating freeze cameras for my Crafting State as one recent example, but these were Virtual Cameras)
Getting the buildings to snap to one another with sockets is a bit of a nightmare though (in gameplay. Design just takes a lot of time to properly set them up, and gameplay testing just shows you how behind you are…), so this camera will have to be accurate
Usually here’s how I do it, in case anyone needs the steps later:
- Create an Empty GameObject and give it a specific tag. For my personal case, I called mine “ConstructionCamera”
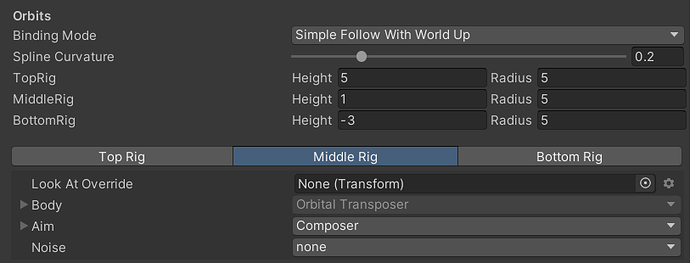
- Place a new Cinemachine FreeLook under that camera, and set it how you like. Personally, I want something wide, so I messed with the Rig Values as follows (it’s a rough example, mine still needs a bit of tuning to get it to work):
- In your code, go ahead and define the variable and initiate it in Start() or Awake() - when CACHE-ing the camera, obviously hunt down the child, as your camera is a child of the gameObject tagged “ConstructionCamera” (at least for my case):
private CinemachineFreeLook constructionFreeLookCamera;

// in 'Awake()' for my case:
    constructionFreeLookCamera = GameObject.FindWithTag("ConstructionCamera").GetComponentInChildren<CinemachineFreeLook>();
- Place the code wherever you want to get the camera to work. In my case, I’m making it work by messing with the ‘Priority’ variable, as follows (mine works for me, use it as an example for you):
                    constructionFreeLookCamera.m_Priority = 9; // turning it off by making its priority lower than my FreeLookCamera's... which is 10 in my case

                    constructionFreeLookCamera.m_Priority = 11; // turning it on by making its priority higher than my FreeLookCamera's... which is again 10
This topic was automatically closed 24 hours after the last reply. New replies are no longer allowed.


