Hello everyone, I was going through the Unity Turn-Based Strategy tutorial when I noticed that the camera controls had become a bit outdated with the more recent updates to both the Unity Input System and Cinemachine since the launch of Unity 6. So I thought to update the scripts left by @CodeMonkey to include these new features.
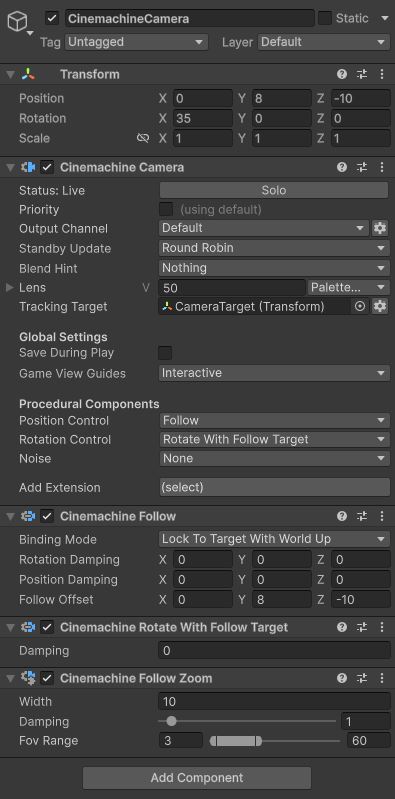
So to start off we will need to create an empty Gameobject and name it CameraTarget, similar to the original tutorial. This will be used as the Transform point, the camera will focus on, and we will change the X-axis rotation to 35 (or whatever angle you find comfortable with and we can also hard-code it into our script). Next we will add a Cinemachine Camera (no longer a Cinemachine virtual camera) and add the following settings. (Note the Cinemachine Follow Zoom component, as we will reference that in our new script).
Now we will add an input actions asset by right-clicking in our scripts folder (or any folder you deem necessary), assign it as “project-wide input actions,” and generate a C# script. I chose to name it PlayerControls. Open the input asset and add an Action Map called “Camera”. In the Action Map we will add an Action named “Move” with the Action type of “Value” and Control type of “Vector 2”, then add a left/right/up/down composite for WASD repectively (then also add a binding for the left stick for Gamepads). Then we add another Action named “Rotate” this time with the Action type of “Pass Through” and Control type “Axis”, and add a positive/negative binding labeled “QE” with the Composite type “1D Axis”, then bind “Q” to positive and “E” to negative (for Gamepad I chose the left and right shoulder buttons “L1” [positive] and “R1” [negative]). Finally, we shall add the Action named “Zoom” and it will be the same as Rotate (pass through, axis, etc.), but we will bind the mouse scroll up to positive and mouse scroll down to negative (for Gamepad I chose the Right Stick up and down). In the end, the Input Actions should look something like this (don’t forget to click the “Save Asset” button).

With that all finished, now we can move on to the coding section. We will create two scripts a Inputmanager.cs and a CameraInput.cs. The InputManager will hold our control scheme, where we will reference our input actions. Both InputManager and the CameraInput will be placed on our “Main Camera” object.
Our Input Manager.cs will look like this:
using UnityEngine;

using UnityEngine.InputSystem;


public class InputManager : MonoBehaviour, PlayerControls.ICameraActions

{

    public PlayerControls controls;

    public Vector2 MovementValue { get; private set; }

    public float RotationValue { get; private set; }

    public float ZoomValue { get; private set; }

    // Start is called once before the first execution of Update after the MonoBehaviour is created

    void Start()

    {

        controls = new PlayerControls();

        controls.Camera.SetCallbacks(this);


        controls.Camera.Enable();

    }

    public void OnMove(InputAction.CallbackContext context)

    {

        MovementValue = context.ReadValue<Vector2>();

    }


    public void OnRotate(InputAction.CallbackContext context)

    {

        RotationValue = context.ReadValue<float>();

    }


    public void OnZoom(InputAction.CallbackContext context)

    {

        ZoomValue = context.ReadValue<float>();

    }

}
Note: You may use this in the CameraInput.cs and make one script, but I find it safer (and better practice) to keep the two scripts separate.
Now our CameraInput.cs will look like this:
using UnityEngine;

using Unity.Cinemachine;


public class CameraInput : MonoBehaviour

{

    [SerializeField] private Transform camTarget;

    [SerializeField] private float moveSpeed = 10f;

    [SerializeField] private float rotateSpeed = 100f;

    [SerializeField] private int camAngleX = 35;

    [SerializeField] private CinemachineFollowZoom followZoom;

    [SerializeField] private int minZoom = 5;

    [SerializeField] private int maxZoom = 15;

    InputManager inputManager;

    void Awake()

    {

        inputManager = GetComponent<InputManager>();

    }


    // Update is called once per frame

    void LateUpdate()

    {

        HandleCameraMovement();

        HandleCameraRotation();

        HandleCameraZoom();

    }

    private void HandleCameraMovement()

    {

        if (inputManager.MovementValue != Vector2.zero)

        {

            Vector3 forward = camTarget.forward;

            Vector3 right = camTarget.right;


            Vector3 moveVector = forward * inputManager.MovementValue.y + right * inputManager.MovementValue.x;

            moveVector.y = 0;

            moveVector.Normalize();

            camTarget.position += moveVector * moveSpeed * Time.deltaTime;

        }

    }

    private void HandleCameraRotation()

    {

        if(inputManager.RotationValue != 0f)

        {

            camTarget.rotation = Quaternion.Euler(

                camTarget.rotation.eulerAngles.x,

                camTarget.rotation.eulerAngles.y + inputManager.RotationValue * rotateSpeed *Time.deltaTime,

                camTarget.rotation.eulerAngles.z

            );

        }

        Vector3 fixedRotation = camTarget.eulerAngles;

        fixedRotation.x = camAngleX;

        fixedRotation.z = 0f;

        camTarget.eulerAngles = fixedRotation;

    }

    private void HandleCameraZoom()

    {

        if(inputManager.ZoomValue > 0)

        {

            followZoom.Width -= 1;

        }

        if(inputManager.ZoomValue < 0)

        {

            followZoom.Width += 1;

        }

        followZoom.Width = Mathf.Clamp(followZoom.Width, minZoom, maxZoom);

    }

}
As you can see, this is where we reference the “CineMachine Follow Zoom” component from earlier, hence the use of “Unity.Cinemachine”.
After adding our scripts to the Main Camera object, we will now drag and drop our references so that it will look like this:
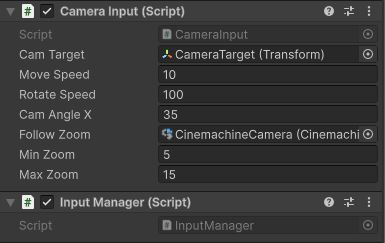
Feel free to change the move/rotate speeds and min/max zoom to fit to your liking.
And with that, we are finished with updating our Camera movement system to our Turn-Based Strategy Game or any other game that requires this kind of camera control/perspective.
Hope this helps anyone on their Game Dev journey, and once again, special thank you to the @GameDev.tv team & @CodeMonkey for all they do!