
Hello! It’s been a hot minute since I’ve shared anything in here, but I’ve recently begun this course and I decided it was about time to start sharing some of the models I’ve been making. I definitely followed some references of they pyramid at Chichén Itzá to get a bit of a more accurate pyramid (minus the color bit, that was all me) and I’m feeling really good about how it came out. Can’t wait to learn more about lighting though as well as getting to do more detail work.


6 Likes
Hey, If you are facing troubles with the lighting you can instead use a HDRI to help you with it.
Here’s how to do it.
Go to the shading tab → Chnage the data type from default ‘Object’ to ‘World’. Now press "Shift + A → Click on search → type 'environment texture. Click on open and now you can add images/HDRIs for lighting. Download different HDRIs online, you can get a ton of those for free. Here’s an image for your reference.
Pic 1
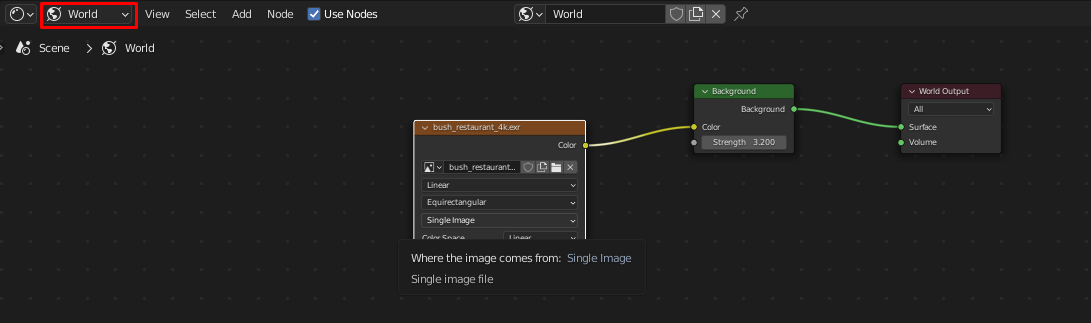
This will allow you to change the background HDRI so you can use natural lighting instead of having to place lights. Helped me a lot when I started out.
Also make sure you TURN ON the scene world and scene lights if you want the lighting of the HDRI.
Pic 2

This is how it’s going to look. You can adjust the lighting of the scene by increasing or decreasing the strength option in the ‘background node’ (refer pic 1).
Lighting bugged me first when i started out a while ago, but HDRIs work for me. Hope it helps you too.
You can also see a tutorial on 3 point lighting if your prefer to light your scene manually.
4 Likes
Hey thanks! It’s less so the style of lighting for me and moreso I want to learn the principles of it and how better to arrange my lighting and how to better take advantage of the different kinds of lighting so that it presents a more aesthetically pleasing/mood-appropriate atmosphere. I know this course has a couple sections later on that go into lighting more so I’m looking forward to that.