Hey there, thanks for taking the time to read this post.
I’m currently working on some rather large-scale ‘modular’ projects and have many modular wall pieces that I am trying to apply textures to and keep everything aligned. I’ve worked with several different methods with my relatively limited/new knowledge and I was wondering if anyone had any suggestions on how one could easily have a Brick* texture aligned across many objects of potentially different sizes (Within a scale of course…) or with windows/doors cut out etc. Also, to make things more fun/complicated, I’m building the project as a proxy with pieces linked from an external .blend file.
So far my best methods have been to use Smart Project and use a ‘Master’ Piece with a UV scale I liked to align everything else to, or to Project UVs from View. Id love to know if there are better or even just different ways to try!
And UV-Mapping is a big thing to learn correctly.
The scale of the mapping must be exactly the same on all objects.
And also the texture coordinates must match. That’s a big project.
For this Blender has some tools (and since 2.81 also new ones).
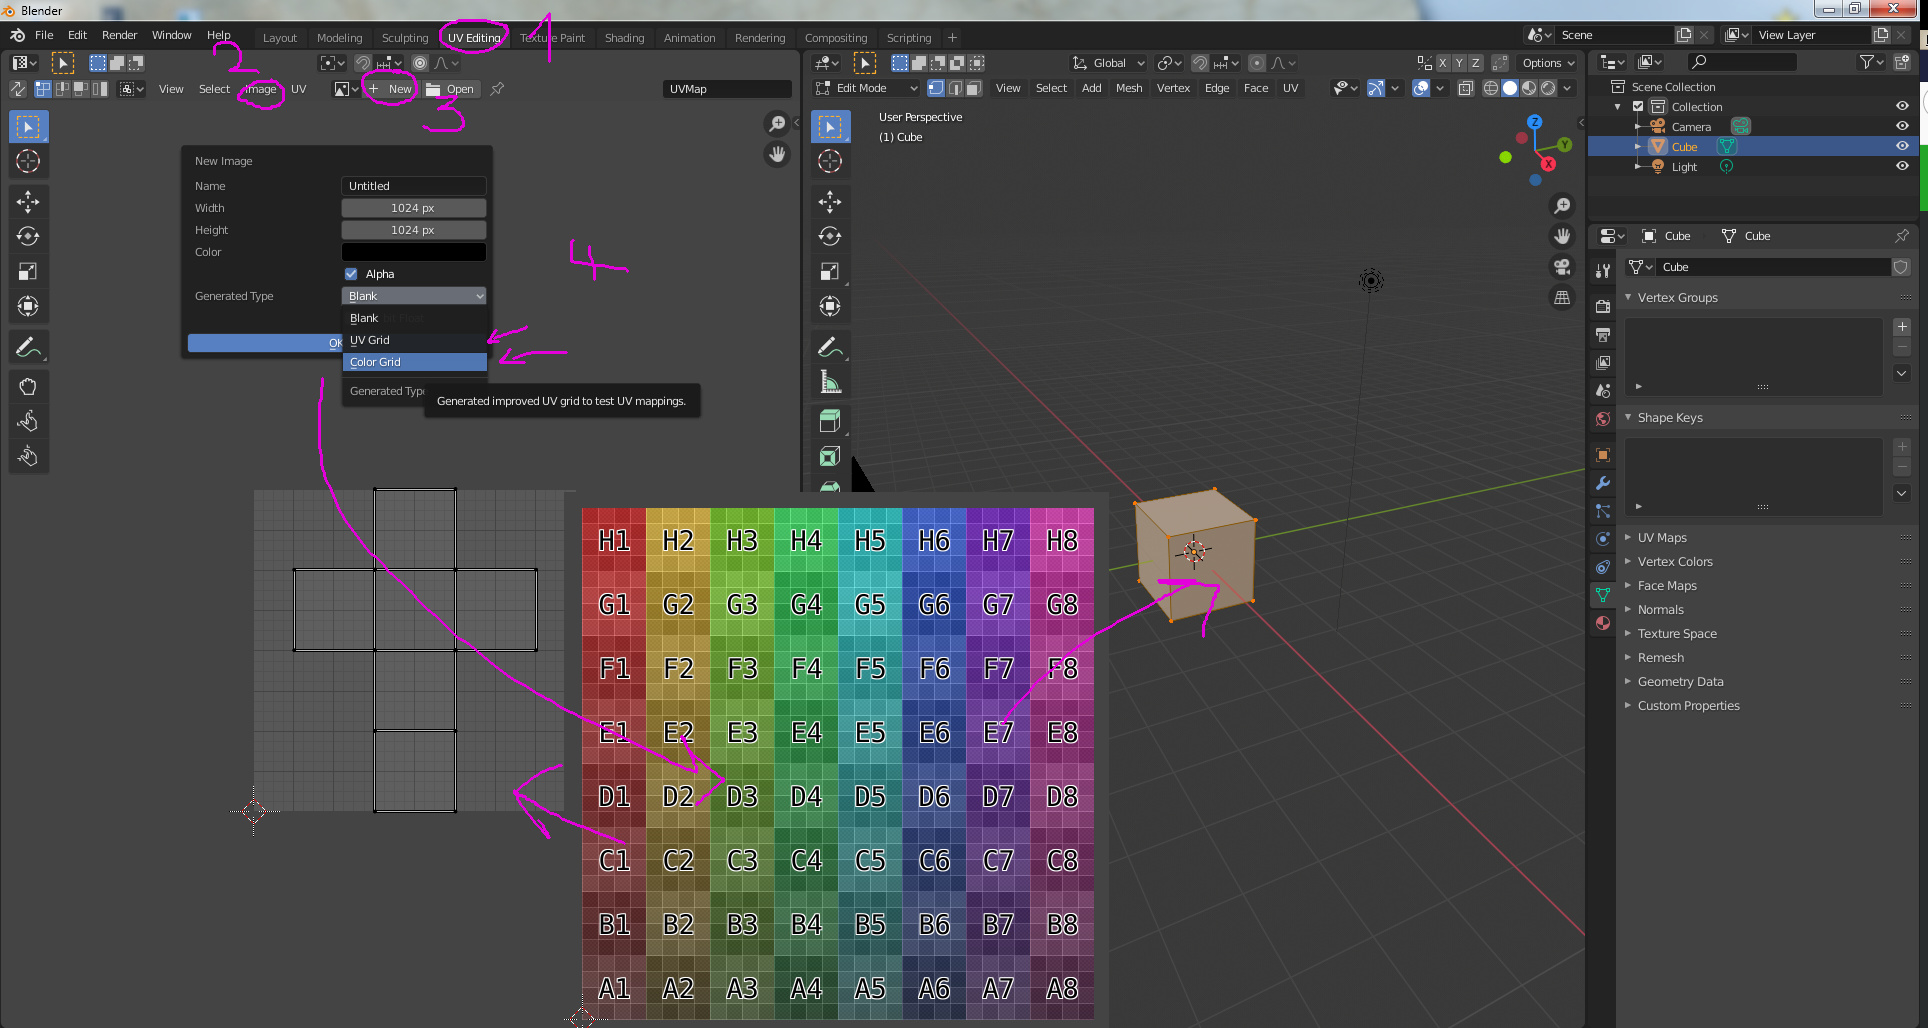
You can select “color grid” as a test texture, to manipulate (and understand) how the UVMap works in relatiov to your mesh. The mesh data in the UV Map, can be manipulated to fit the object.
This will be explained in the course.
Hey FedPete! Hope you’ve been well bud and thanks for replying eh!
Well this is somewhat helpful, I’m already familiar with using the black and white and the color grids to help with alignment. I understand the basics of UV mapping but I’m trying to find an easy way to align UVs of about 30 different modular wall pieces(preferably at once, or very easily - such as some trick with ‘Project UVs From View’ or something) so they connect seamlessly without having to do them individually.
I’ve tried manual alignment and sizing of UVs but it takes forever - or I’m just not any good yet lmao… I’ve got everything else done and even have the walls at a ‘Passable’ state. Id say im 60-70% happy with the current alignment, but I feel it could be done so much more ‘Professionally’, like perhaps im missing something that lets you easily align the textures of many ‘connecting’ models like this… Or perhaps I should have all of the models lined up appropriately and project from view that way? I dunno… All of it is a lot of work and I’m just fishing for possible better ways from the experts before I spend too much time on something stupid lol.
Edit: If anyone can possibly suggest an Add-On that I can learn to use that would help with this, it would be hugely appreciated!
In big tripple AAA 3D companies. There are people, busy the whole day doing UV-Mapping of the mesh. There is no automated process in this. Or all you meshes and objects do follows some strict design rules. So at the beginning of your mesh design, you must think (design) in terms of how does my texture fit.
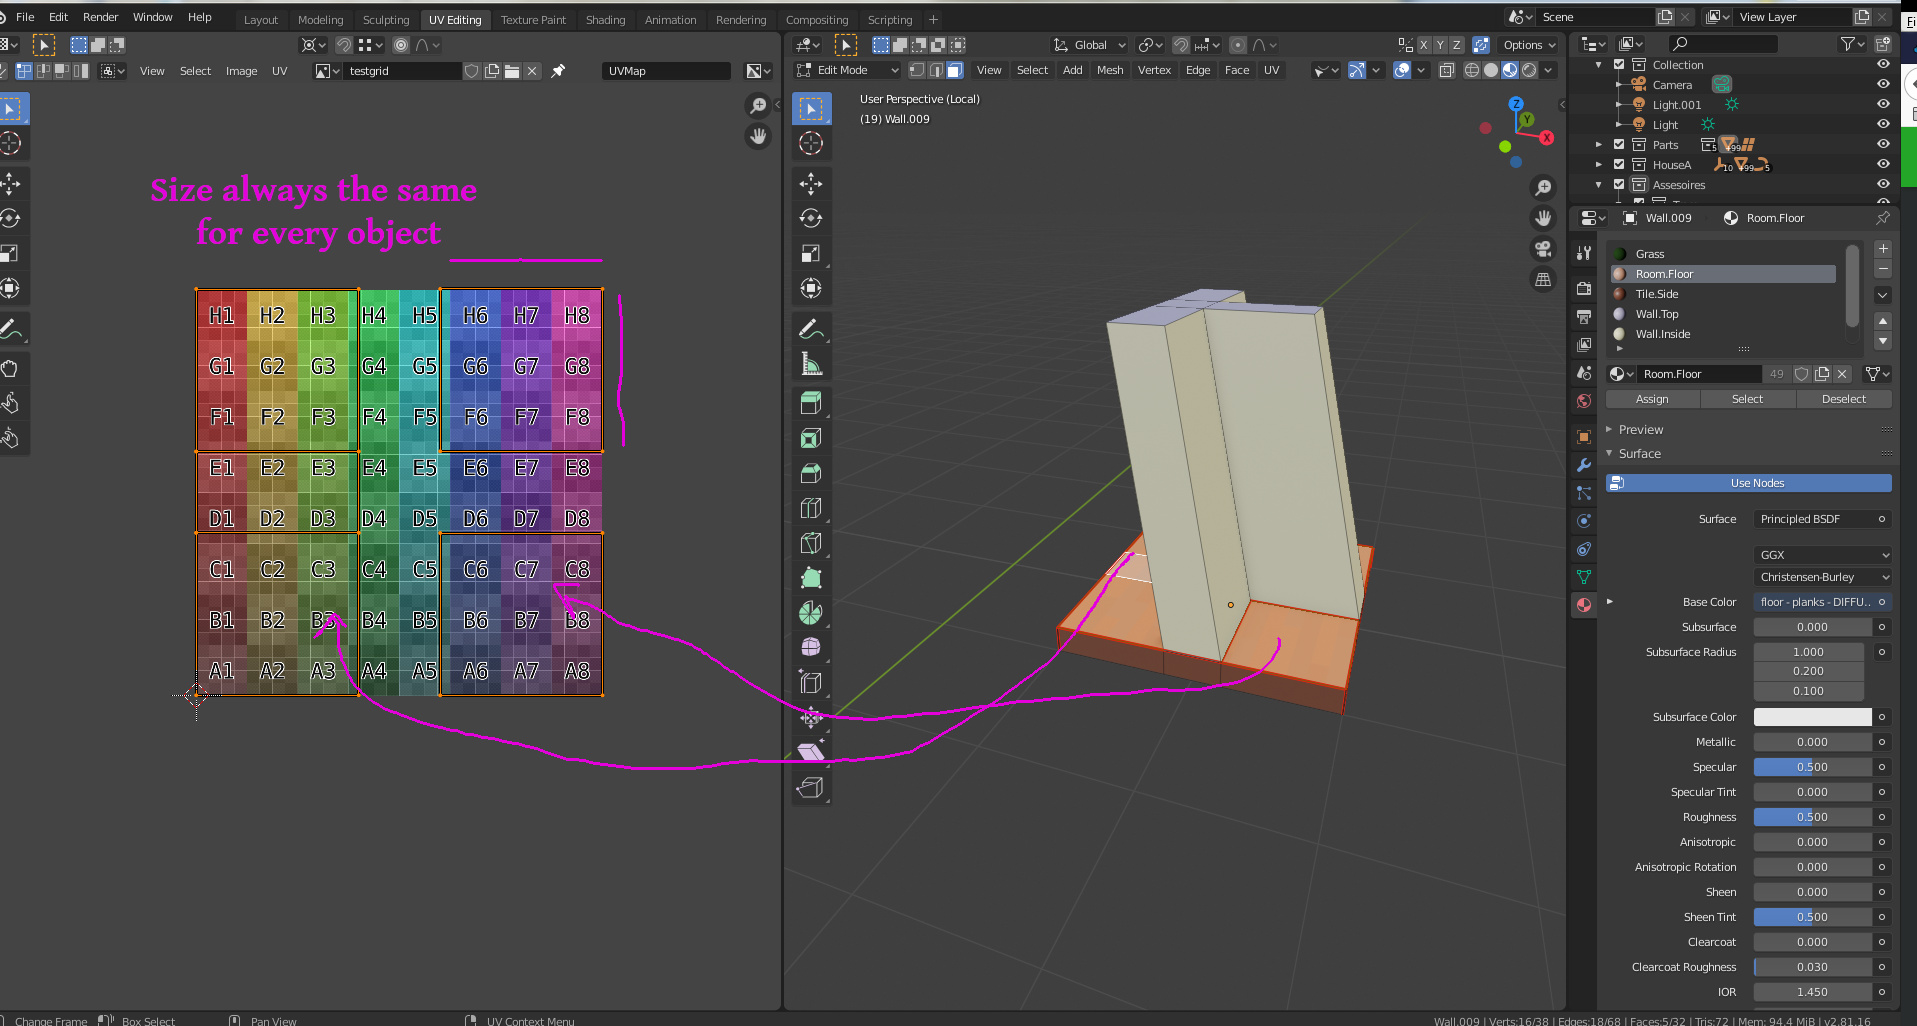
I have currently a project with many modules. But to overcome this problem of matching textures, I use always the same basic ground shape. So my UV-map has also the same dimension and or level of detail, for every object. But I must say, it took me several iterations, to understand this process.
Because my base is square and also my texture. I can easily match textures. By scaling the faces and positioning them. When I duplicate an object, my basic UV-map setting are correct, which saves me time.
I didn’t plan ahead well enough haha, it makes sense to keep the UV the same size like that… Ill have to try making something that way to see the difference. But for now I’m stuck with this mess… it IS possible to redo them all since they are just basic walls… Id just keep the same UV size for all the pieces as I go… Or perhaps… I wonder if its possible to join all my current walls into a single object, edit the UVs that way to get the correct size then split them back up after? Naming will be a bitch though… I guess I’ll give both a shot.
BTW
Heres where Im at so far with these walls…
Hey FedPete, I’ve been playing around with your method and I think I understand how you created the floor the way you did. However, what about texturing and aligning the walls extruded from those floors, or potentially walls of different sizes but all within a specific scale? Such as the corners, stair walls, or shorter/higher walls I have in the pictures above… Im sure I’ve got myself into some complicated territory lmao, but I’m confident there’s a way to figure this out. Im just not understanding it well enough yet…
Also, any videos on it you might know of would be awesome too. Thanks again for the help eh
Yes, It’s a difficult territory. But I wonder if it’s a problem that some parts don’t fit (not aligned)?
It’s an old building, so many different stones, building techniques. etc.
As you mentioned already, try merging two object into one mesh. Create a UVmap. And Apply this map to the two individual objects. You can do this, but never tried or even knowing what the problems are then. But I think, it’s still a lot of manual work …
If you do the Blender course, you only know how to use Blender (superficial). Now you need to develop your own skills!
Sadly, not much help on the internet. For more specific project workflows. Many video clips on how to rotate the cube. But on project management insights, no info.
A year ago I bought an Udemy course from Rob Tuytel, because of his style. I didn’t finish the course yet.
He also uses a lot of these stone textures. This in combination with nodes shaders and I mean a lot of nodes.
All of the pieces fit, everything is made in even whole numbers at either 6, 8,10 and 12. Any extras like parapets and round towers I am not concerned about at the moment. It’s just the main wall mesh UVs, which are just rectangles - with the exception of a few angled pieces. Might seem like a weird scale, but it works and everything fits together exactly as I expected in my blueprints… except a few of the wall textures, obviously lol.
I’ve manually aligned most of them to be passable for my current skill-level. Problem is, on some specific edges it just wont align nicely and if I manually try to fix it, it screws with other alignments… Like a rubix cube haha. I might try another texture with perhaps less detail and more repeating patterns to keep it simple… I also have a few other possible cheat ideas I might use so I can move on lol, spent too much time on this already.
Funny you should mention Rob Tuytels course, I also brought that course back in December when I brought Mikeys courses and when I started getting addicted to Blender lol. I have a feeling Ill have to skip the first half of his course as it probably repeats most of what was covered by Mikey. That’s a good point though, I wonder if he has some sections on more advanced UV alignment on larger projects with many assets? As I’ve been through everything in the GameDev.Tv blender courses and Mikey gives an amazing foundation to build on, but now I agree with you, I’m now having to develop my own skills and seems like there’s less and less info on the web the more I learn lol.
Thanks for the heads up on that! Ill let you know if I come up with a reasonable solution eh.
But before I look into that course, I need a weekend off away from blender to refresh myself lmao. Going to play some ‘Borderlands 3’ which comes to steam on Friday!
Cheers
Here are my last comments, before your signing off
UV-Mapping and understanding the importance of it, I learn the most from the gameDev Environments course. But it’s also a repetition of Blender creator (how to use Blender in general).
Rob Tuytel, uses stone plaster and other objects to make it look nicer. But you can use this also to hide inconsistencies in the texture mapping.
I definitely am learning the importance of UV mapping and proper project planning. Have to say, I have a lot more respect for the professionals doing 3D work for games and CG, a damn lot more lol. I’m looking forward to continuing the learning journey and have huge respect and appreciation for GameDev and everything I’ve learned so far!
Haha, My last ditch effort was to cover up inconsistencies in the alignment by adding some wooden/metal beams or something like rocks, glad its a legit method! Ill make a post sharing the finished project soon (hopefully). Take care for now bud!
P.S. I managed to get it aligned a lot better (Still not perfect) by taking all my wall pieces and lining them up depending upon how they connect as best as I could, then using ‘Project From View’ and alter the size - constantly checking my proxy-build to see how it looks fully connected in a build. It took awhile, but I think that with hiding some misalignment’s with rocks or whatever will do the trick. Whos going to be inspecting a brick wall for an inconsistent bricks anyways?! Lol