Hello all, I am currently working on a project using the structure of both the Turn-Based Strategy course and the RPG course to hopefully create a Turn-based RPG similar to games like Final Fantasy Tactics or Tactics Ogre: Reborn.
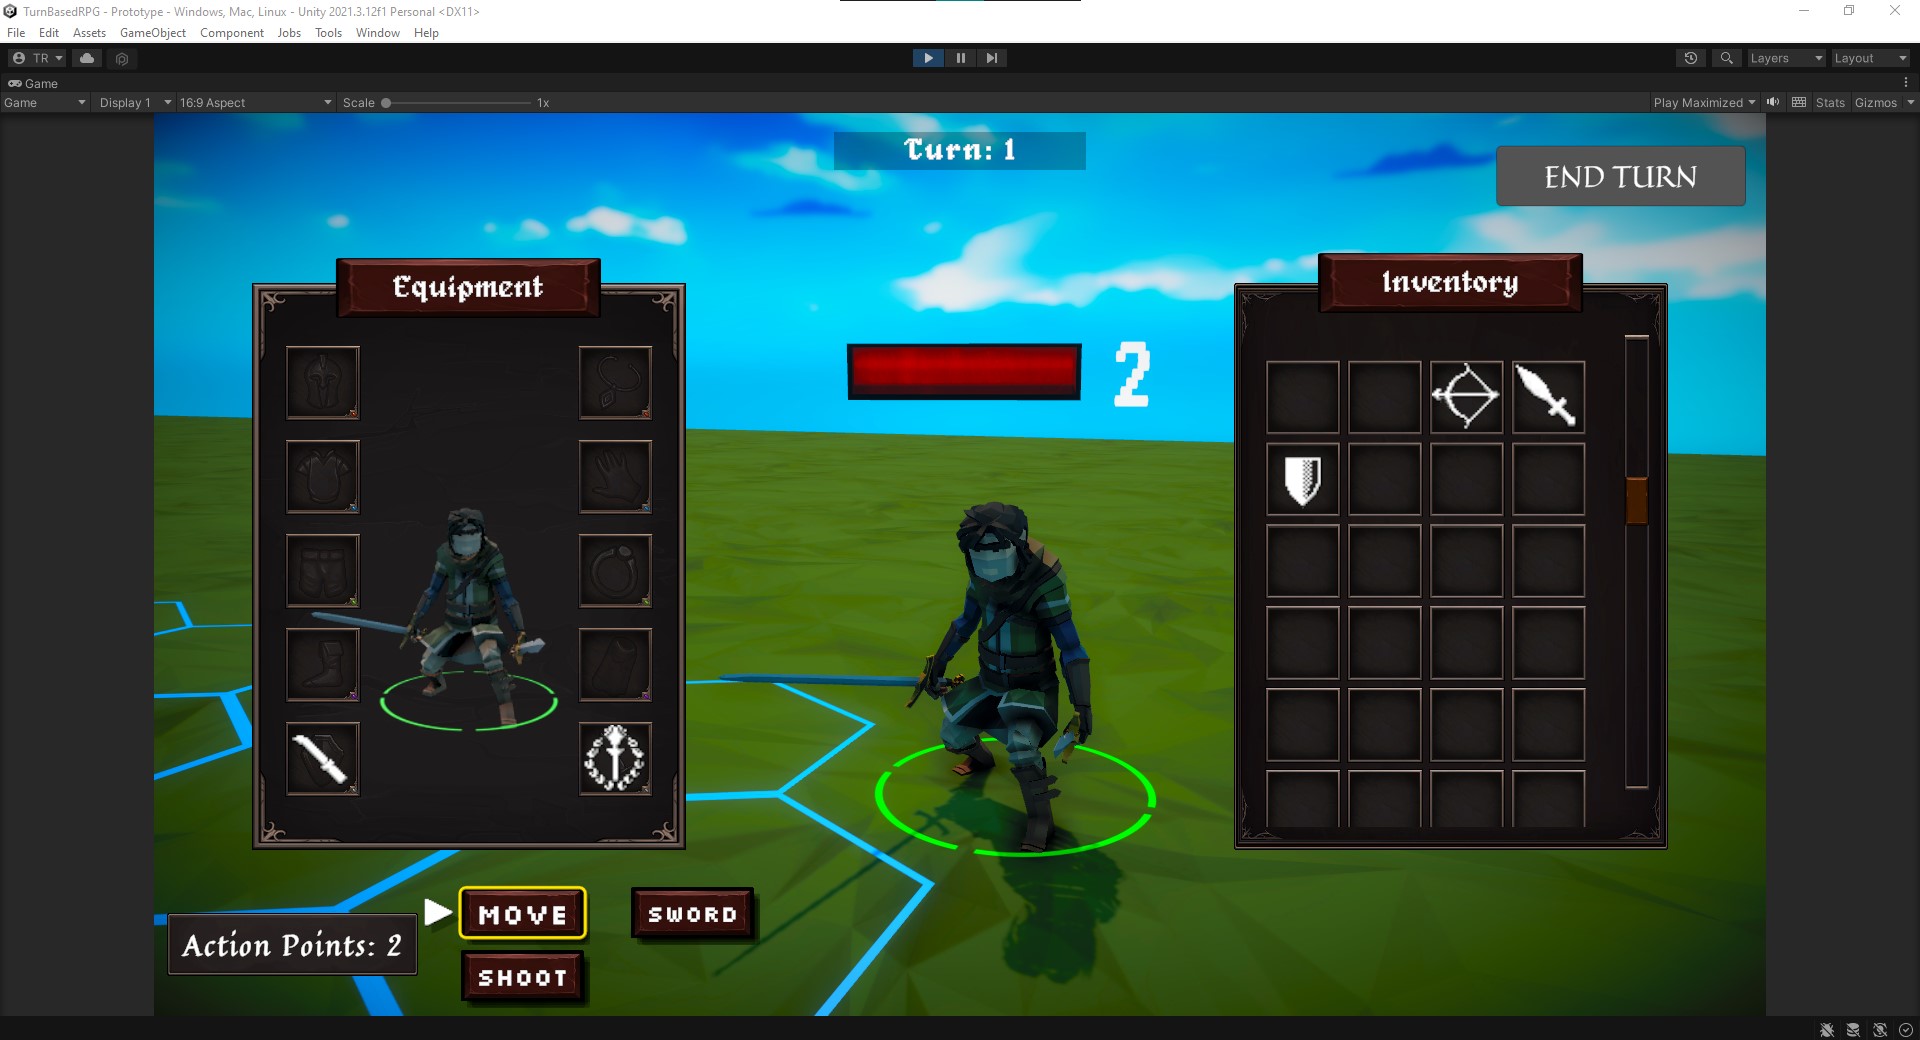
As such, I will be documenting my progress and showing my steps to anyone that would like to create a similar project in the future. By the end of this tutorial, you will be able to have your Unit(s) have Shields, Dual-wield offhand weapons, implement Two-Handed weapons logic, Customizable weapon damage & range, and look something like this:
If it isn’t apparent already this will require scripts from finishing both the Turn-Based Strategy & RPG (Equipment & Inventory) courses. With a little added inspiration from the Weapon Management & UI scripts from Sebastian Graves’s Dark Souls in Unity Tutorial.
(Note: This is the first part of a series and is not 100% complete as other added functions and quality-of-life fixes will be listed at the end and will be implemented in future parts.)
(For those working solely on the RPG course, there is a similar short tutorial here, however, it will soon be updated and expanded upon after this post.)
Part 1: Getting Started
- To start we will begin by opening the scene from the Turn-Based Strategy course. Then add the Gamedev.tv scripts from the Equipment & Inventory course into the project assets under the Scripts folder so this will include the Saving, Utility, UI, and Inventory scripts.
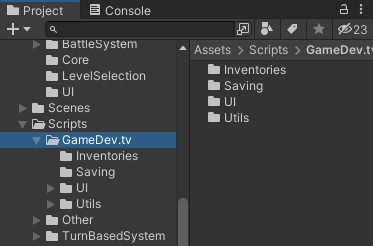
(Note: I’ve placed all of the Turn-Based course scripts under a TurnBasedSystem folder for organization purposes).
You will also need to import the Stats.cs & IModifierProvider.cs scripts from the RPG course.
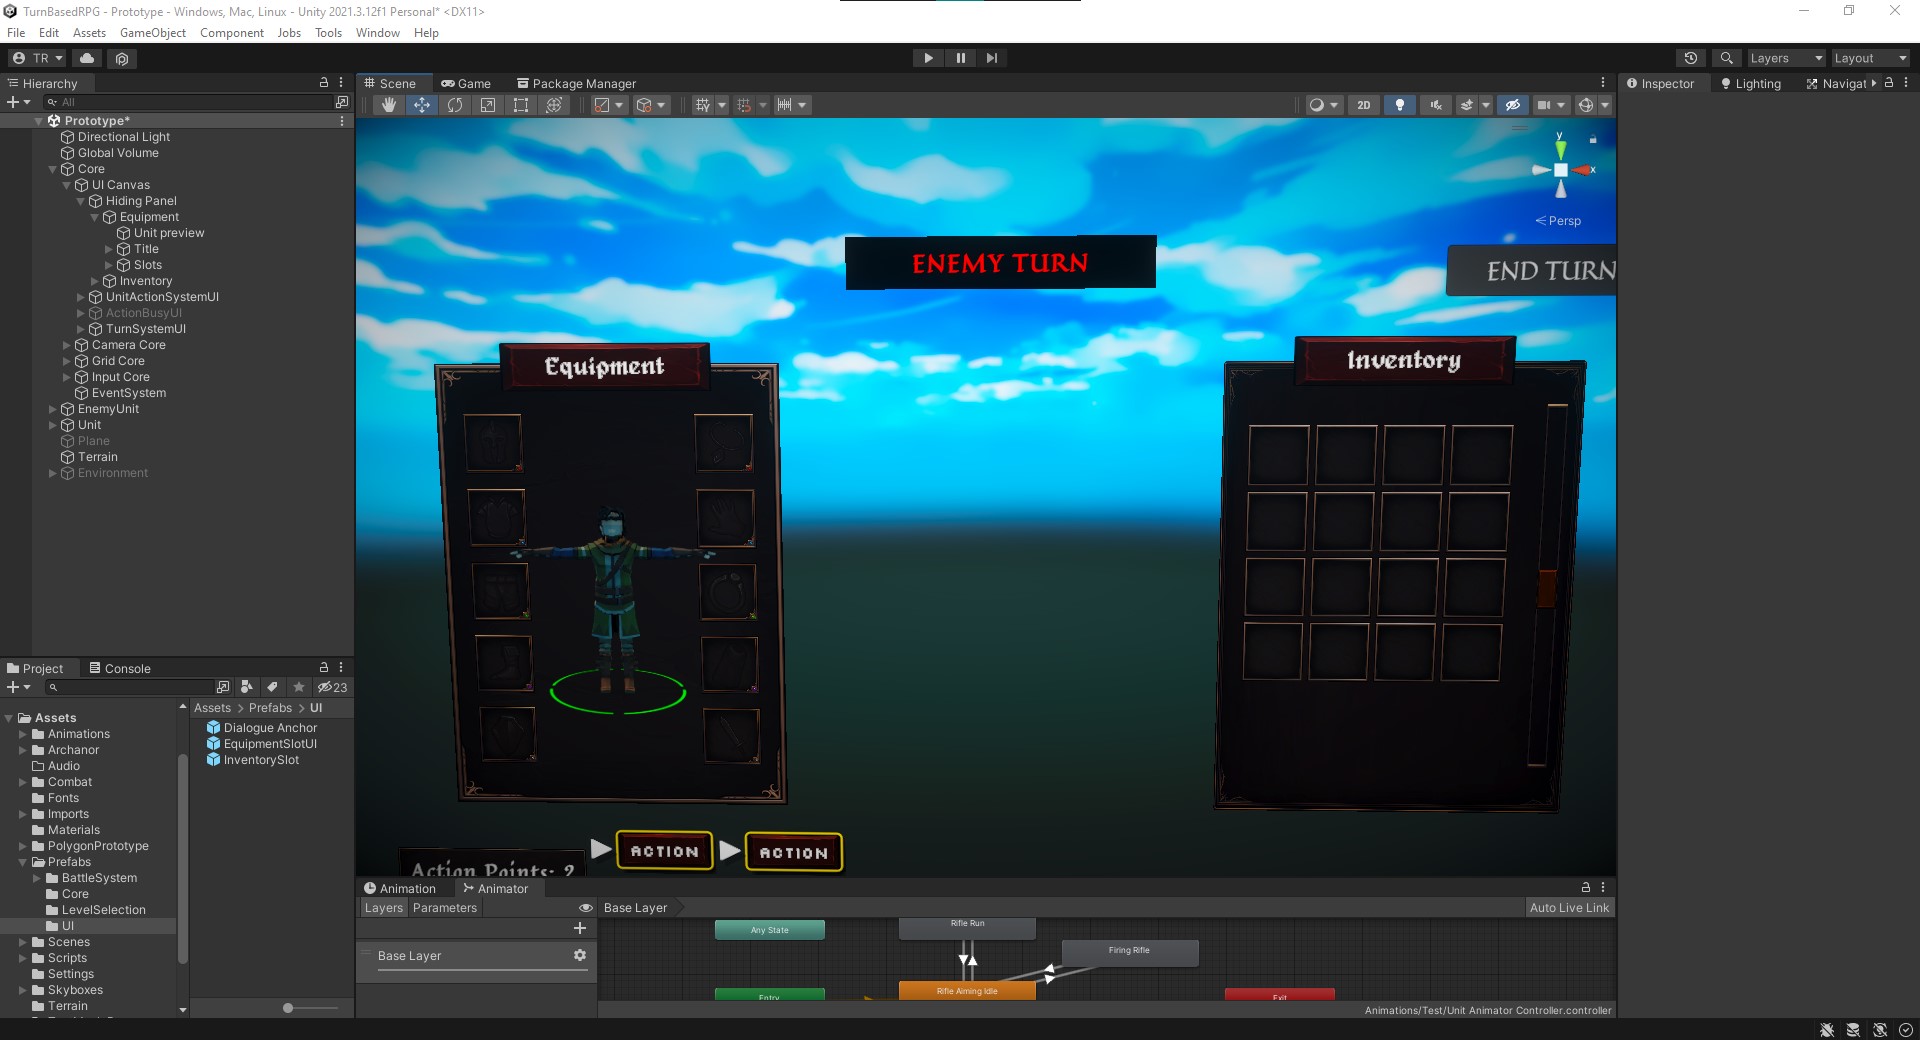
Part 2: Setup Equipment & Inventory UI
- You’re going to make the Equipment & Inventory panels as you would in the RPG Inventory course under the UI Canvas. Recreate the EquipmentSlotUI and InventorySlot prefabs from the RPG Inventory course.
Open up the EquipLocation.cs script and add a “Left Weapon” location as I have named “WeaponL”. Don’t forget to assign the left weapon slot to the Equipment UI.
namespace GameDevTV.Inventories
{
    /// <summary>
    /// Locations on the player's body where items can be equipped.
    /// </summary>
    public enum EquipLocation
    {
        Helmet,
        Necklace,
        Body,
        Trousers,
        Boots,
        Weapon,
        WeaponL, // << Left Weapon Slot Location
        Gloves,
        Ring,
        Cape,
    }
}
Now add the Inventory.cs script onto a selected Unit prefab and the StatsEquipment.cs respectively. (Don’t forget to change the tag on the core unit prefab to “player”)
Finally, open the EquipableItem.cs and add another returnable EquipLocation labeled “otherAllowedLocation”.
using UnityEngine;

namespace GameDevTV.Inventories
{
    /// <summary>
    /// An inventory item that can be equipped to the player. Weapons could be a
    /// subclass of this.
    /// </summary>
    [CreateAssetMenu(menuName = ("GameDevTV/GameDevTV.UI.InventorySystem/Equipable Item"))]
    public class EquipableItem : InventoryItem
    {
        // CONFIG DATA
        [Tooltip("Where are we allowed to put this item.")]
        [SerializeField] EquipLocation allowedEquipLocation = EquipLocation.Weapon;
        [SerializeField] EquipLocation otherAllowedLocation = EquipLocation.WeaponL;
        // PUBLIC

        public EquipLocation GetAllowedEquipLocation()
        {
            return allowedEquipLocation;
        }
        public EquipLocation GetOtherEquipLocation()
        {
            return otherAllowedLocation;
        }
    }
}
Part 3: Creating Weapons
- This is where we start to go off the beaten path I recommend making these new scripts in a separate “Combat” folder under Scripts. First, we will make a WeaponItem.cs to replace the WeaponConfig.cs & Weapon.cs scripts:
using System.Collections.Generic;
using GameDevTV.Inventories;
using UnityEngine;
using RPG.Stats;

[CreateAssetMenu(fileName = "Weapon Item", menuName = "WeaponItem/New Weapon", order = 0)]
public class WeaponItem : EquipableItem, IModifierProvider
{
    [Header("Item Information")]
    public GameObject modelPrefab;
    [SerializeField] public AnimatorOverrideController animatorOverrideR = null;
    [SerializeField] public AnimatorOverrideController animatorOverrideL = null;

    [SerializeField] int weaponDamage = 5;
    [SerializeField] int weaponRange = 1;

    public bool isLeftHanded;
    public bool isShield;
    public bool isTwoHanded;

    public int GetWeaponDamage()
    {
        return weaponDamage;
    }
    public int GetWeaponRange()
    {
        return weaponRange;
    }

    public IEnumerable<float> GetAdditiveModifiers(Stat stat)
    {
        if(isShield && stat == Stat.Armor) // Add "Armor" to Stats.cs
        {
            yield return weaponDamage; // << using weapon damage int for damage reduction, recommend using different Serialized int.
        }
        else if(stat == Stat.Damage)
        {
            yield return weaponDamage;
        }
    }

    public IEnumerable<float> GetPercentageModifiers(Stat stat)
    {
        throw new System.NotImplementedException();
    }
}
- Then we will make a WeaponHolder.cs script and this will be assigned to our selected Unit prefab to indicate the Left & Right hands. (Ignore the WeaponManager.cs for now)
using GameDevTV.Inventories;
using UnityEngine;

public class WeaponHolder : MonoBehaviour
{
    public Transform parentOverride;
    public bool isLeftHandSlot;
    public bool isRightHandSlot;
    public GameObject currentWeaponModel;
    Equipment equipment;
    WeaponManager weaponManager;
    private void Awake()
    {
        equipment = GetComponentInParent<Equipment>();
        weaponManager = GetComponentInParent<WeaponManager>();
    }

    public void UnloadWeapon()
    {
        if(currentWeaponModel != null)
        {
            currentWeaponModel.SetActive(false);
        }
    }

    public void UnloadWeaponAndDestroy()
    {
        if(currentWeaponModel != null)
        {
            Destroy(currentWeaponModel);
        }
    }
   public void LoadWeaponItem(WeaponItem weaponItem)
   {
        UnloadWeaponAndDestroy();

        if(weaponItem == null)
        {
            UnloadWeapon();
            return;
        }

        GameObject model = Instantiate(weaponItem.modelPrefab) as GameObject;
        if(model != null)
        {
            if(parentOverride != null)
            {
                model.transform.parent = parentOverride;
            }
            else
            {
                model.transform.parent = transform;
            }

            model.transform.localPosition = Vector3.zero;
            model.transform.localRotation = Quaternion.identity;
            model.transform.localScale = Vector3.one;
        }

        currentWeaponModel = model;
   }
}
-
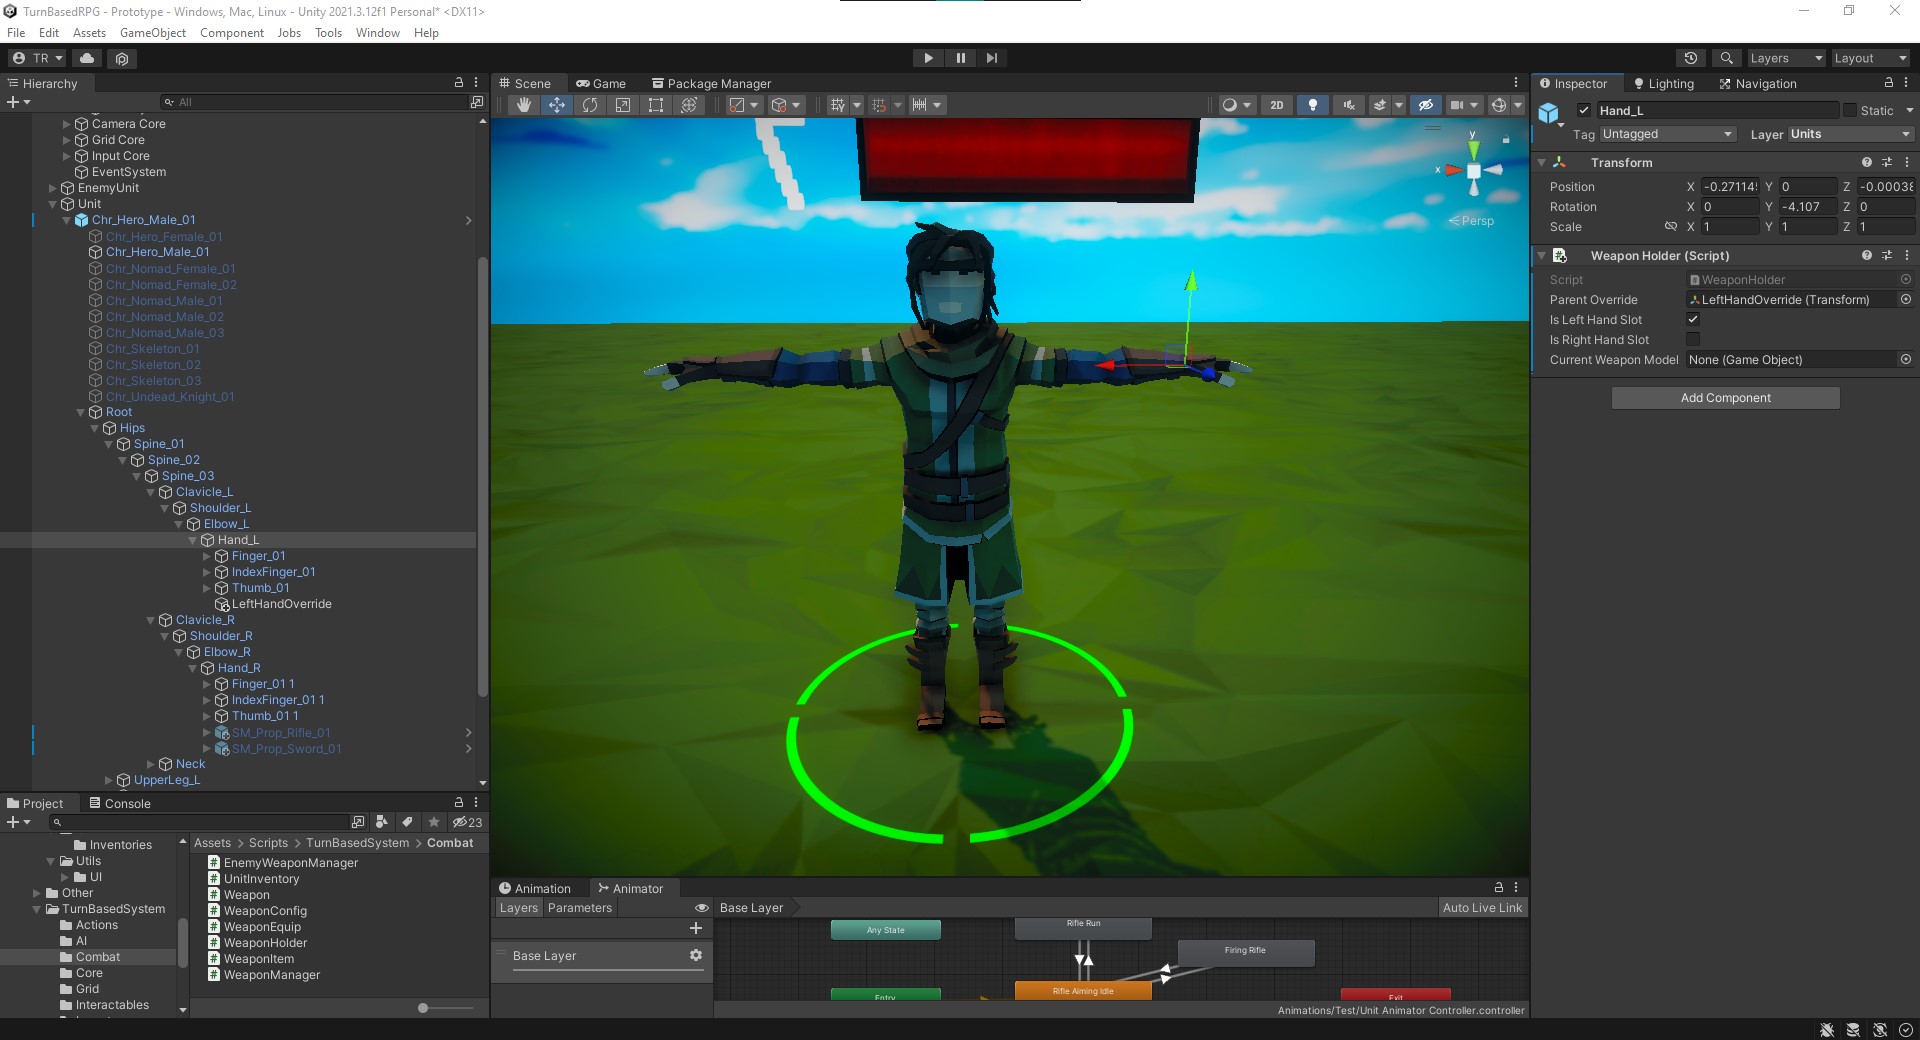
Now go back into the Unity scene view and inside the Unit’s Root hierarchy go down to the Left and Right Hand and attach the WeaponHolder.cs script to the respective hand. (Either turn off or remove the Rifle and Sword prefabs from the Turn-based Strategy course.)
Check off the bool the part belongs to and assign the parent override transform, for the Right Hand is the base transform, but for the Left Hand create an empty GameObject underneath the base and name it “LeftHandOverride” and assign it to the Left Hand WeaponHolder parent Override. Rotate the Left Hand Override GameObject transform by 180 Y rotation and -15 Z Rotation (differing models require different coordinates as long as the weapon prefab spawns in the correct rotation). -
Finally, we will make our WeaponManager.cs script:
using UnityEngine;
using GameDevTV.Inventories;

public class WeaponManager : MonoBehaviour //, ISaveable  << implement saving later?
{
    WeaponHolder leftHandSlot;
    WeaponHolder rightHandSlot;
    Animator anim;
    Equipment equipment;
    WeaponItem rightWeapon;
    WeaponItem leftWeapon;
    [SerializeField] public AnimatorOverrideController dualOverride = null;
    [SerializeField] public AnimatorOverrideController shieldOverride = null;
    [SerializeField] public AnimatorOverrideController defaultOverride = null;
    [SerializeField] public WeaponItem unarmed = null;
    private void Awake()
    {
        anim = GetComponent<Animator>();
        equipment = GetComponentInParent<Equipment>();

        WeaponHolder[] weaponHolderSlots = GetComponentsInChildren<WeaponHolder>();
        foreach (WeaponHolder weaponSlot in weaponHolderSlots)
        {
            if(weaponSlot.isLeftHandSlot)
            {
                leftHandSlot = weaponSlot;
            }
            else if(weaponSlot.isRightHandSlot)
            {
                rightHandSlot = weaponSlot;
            }
        }

    }
    private void Update()
    {
        EquipWeapon();
    }

    public void LoadWeaponOnSlot(WeaponItem weaponItem, bool isLeft)
    {
        if(isLeft)
        {
            leftHandSlot.LoadWeaponItem(weaponItem);
        }
        else
        {
            rightHandSlot.LoadWeaponItem(weaponItem);
        }
    }
    private void EquipWeapon()
    {
        var overrideController = anim.runtimeAnimatorController as AnimatorOverrideController;

        rightWeapon = equipment.GetItemInSlot(EquipLocation.Weapon)as WeaponItem;
        leftWeapon = equipment.GetItemInSlot(EquipLocation.WeaponL) as WeaponItem;

        if(rightWeapon != null && leftWeapon == null)
        {

            if(rightWeapon.isLeftHanded)
            {
                rightHandSlot.UnloadWeaponAndDestroy();
                LoadWeaponOnSlot(rightWeapon, true);
            }
            else
            {
                leftHandSlot.UnloadWeaponAndDestroy();
                LoadWeaponOnSlot(rightWeapon, false);
            }

            if(rightWeapon.animatorOverrideR != null)
            {
                anim.runtimeAnimatorController = rightWeapon.animatorOverrideR;
            }
        }

        if(rightWeapon == null && leftWeapon != null)
        {
            rightHandSlot.UnloadWeaponAndDestroy();
            LoadWeaponOnSlot(leftWeapon, true);
            if(leftWeapon.animatorOverrideL != null)
            {
                anim.runtimeAnimatorController = leftWeapon.animatorOverrideL;
            }
        }

        if(rightWeapon != null && leftWeapon != null)
        {
            LoadWeaponOnSlot(rightWeapon, false);
            LoadWeaponOnSlot(leftWeapon, true);

            if(leftWeapon.isShield)
            {
                anim.runtimeAnimatorController = shieldOverride;
            }
            else
            {
                anim.runtimeAnimatorController = dualOverride;
            }
        }

        if(rightWeapon == null && leftWeapon == null)
        {
            rightHandSlot.UnloadWeaponAndDestroy();
            leftHandSlot.UnloadWeaponAndDestroy();
            LoadWeaponOnSlot(unarmed, false);

            anim.runtimeAnimatorController = defaultOverride;
        }
    }
}
With the WeaponManager.cs we will attach it to the base of the prefab model underneath the Unit core GameObject. Here you will need to fill in the animator override controllers for when your unit has a shield, is dual wielding two different weapons, or is unarmed.
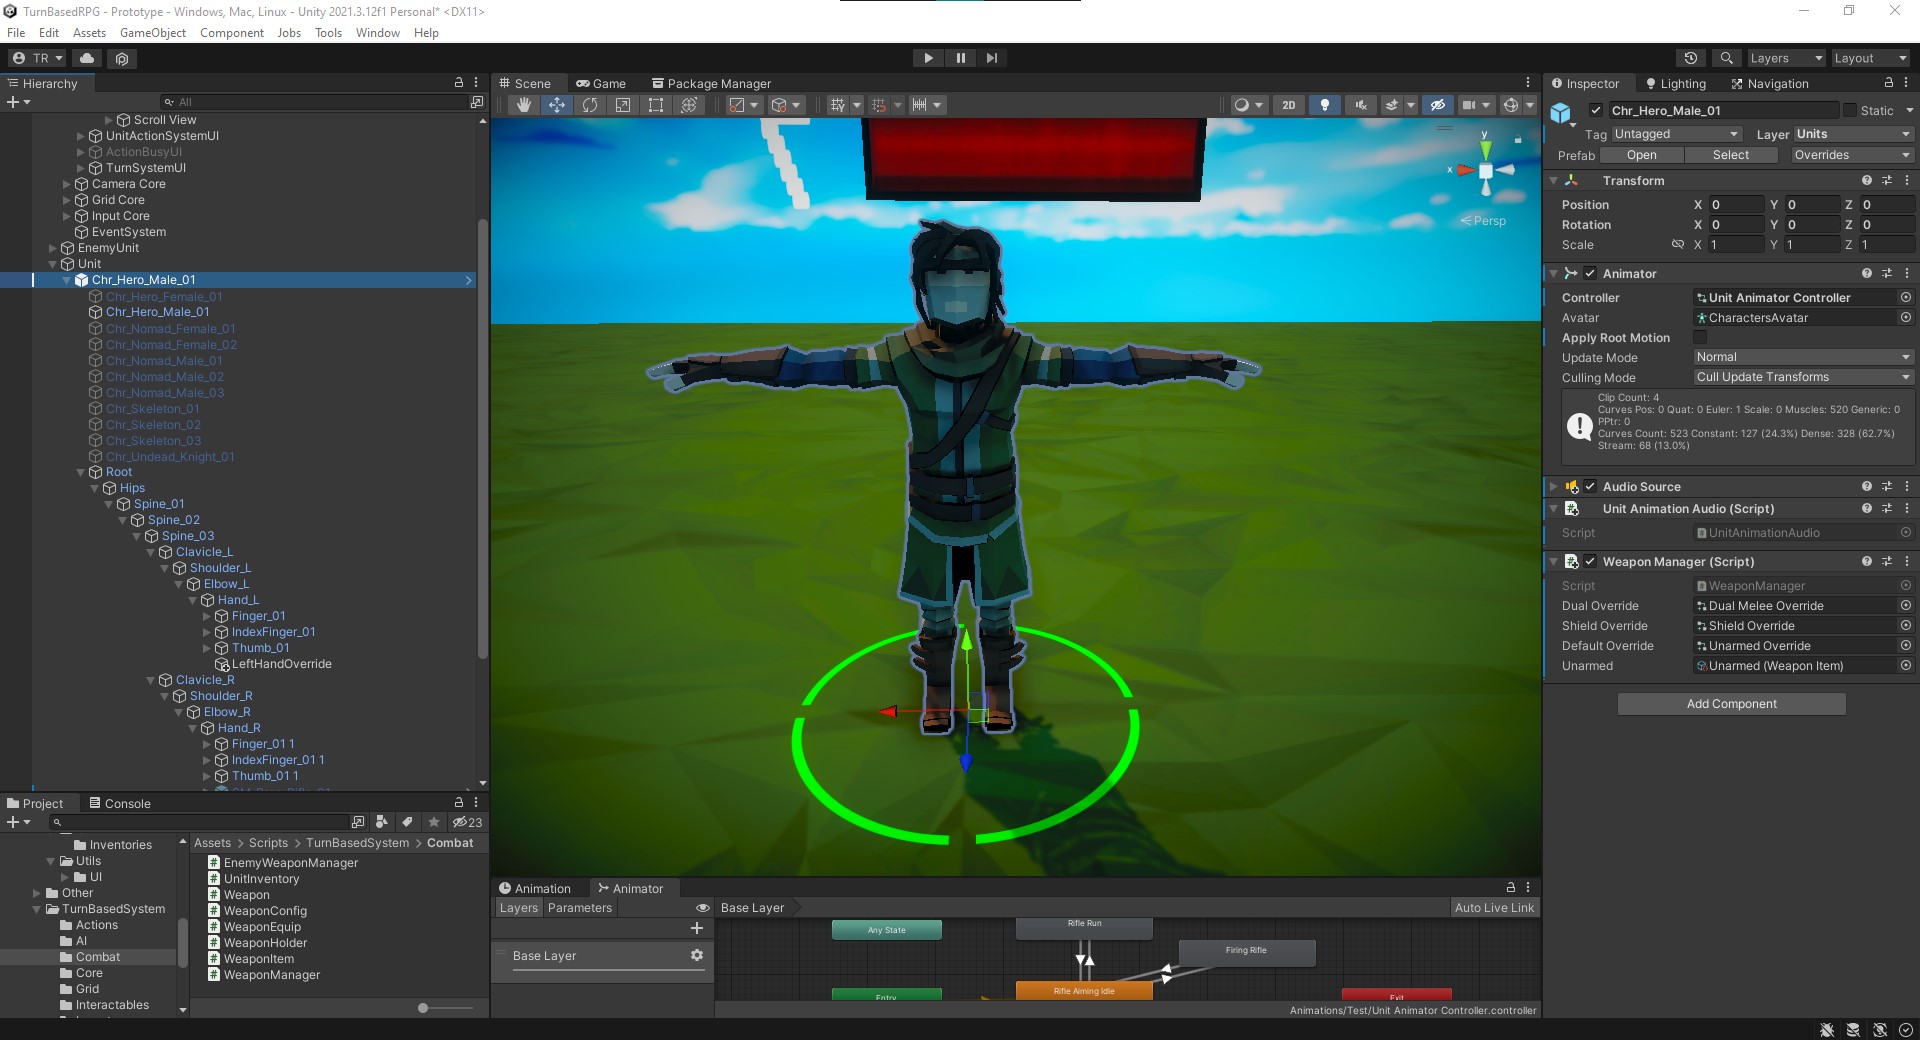
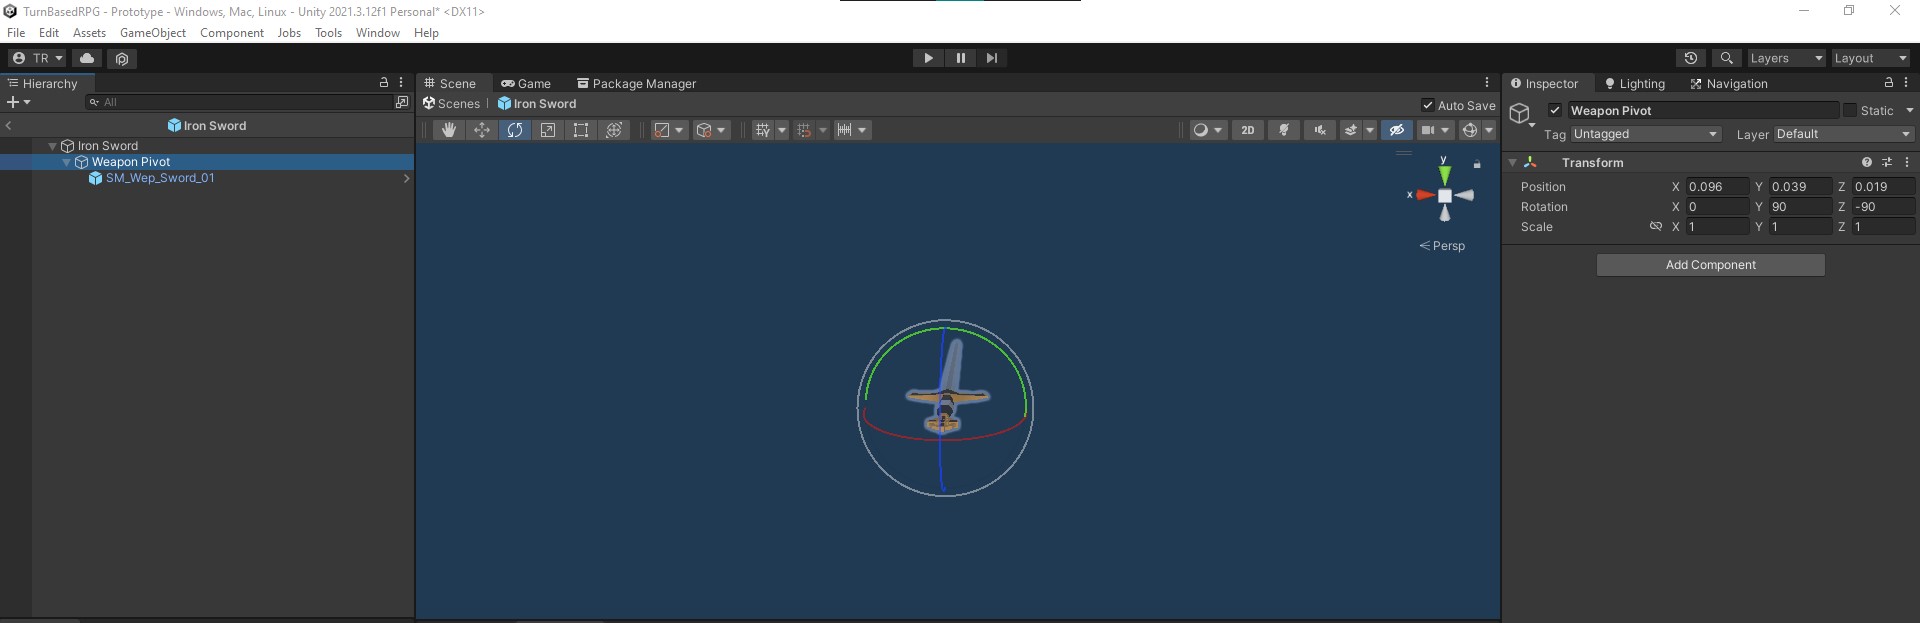
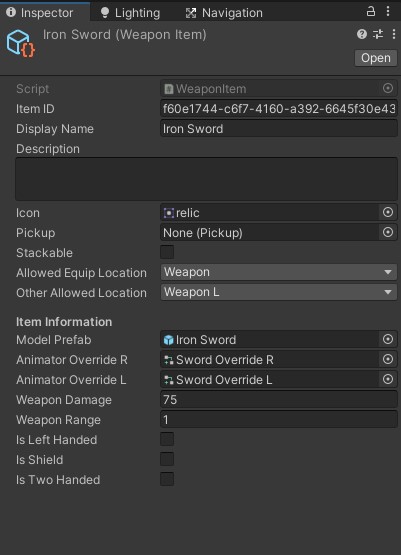
Create a “Weapons” folder with the project asset hierarchy if you do not already have a place to store your weaponitem scriptable object. Right-click and create a “Weapon Item” scriptable object. For the Model Prefab create a weapon as you would during the RPG course, in this example, I use an empty GameObject named “Weapon Pivot” to manipulate the childed weapon object prefab to get the correct Transform Rotation and placement on the Unit’s Right Hand.
Back to the Weapon Item scriptable object, you will need to fill out the Animator Overrides controllers. One for swinging the weapon in the right hand and one for the left. If you desire the weapon item to be wielded in both the left and right hand change the allowed Equip Location to “Weapon” and the Other Allowed Location “Weapon L”. Otherwise label both Allowed Location and Other Allowed Location as “Weapon” for right-hand slot only or both “WeaponL” for left-hand slot only.
Finally, for the EquipmentSlotUI.cs you will need to change the MaxAcceptable() function as seen here:
public int MaxAcceptable(InventoryItem item)
        {
            EquipableItem equipableItem = item as EquipableItem;
            if (equipableItem == null) return 0;

            if (equipableItem.GetAllowedEquipLocation() == equipLocation && item is WeaponItem weapon)
            {
                if(weapon.isTwoHanded && playerEquipment.GetItemInSlot(EquipLocation.WeaponL) != null)
                {
                    return 0;
                }
            }
            if(equipableItem.GetOtherEquipLocation() == equipLocation)
            {
                EquipableItem rightHand = playerEquipment.GetItemInSlot(EquipLocation.Weapon);
                if(rightHand is WeaponItem rightWeapon)
                {
                    if(rightWeapon.isTwoHanded) return 0;
                }
            }

            if(equipLocation != equipableItem.GetAllowedEquipLocation())
            {
                if(equipLocation == equipableItem.GetOtherEquipLocation() && playerEquipment.GetItemInSlot(EquipLocation.WeaponL) == null)
                {
                    return 1;
                }
                return 0;
            }

            if (GetItem() != null) return 0;

            return 1;
        }
This will allow you to drag and drop equipment into the left and right slots, but disallow it when two-handed weapons are present in the “Weapon” slot.
Part 4: Finishing Up
- To finish things up I created a small InventoryTest.cs to add inventory items into the unit Inventory to test equipping weapon items.
using UnityEngine;
using GameDevTV.Inventories;

public class InventoryTest : MonoBehaviour
{
    [SerializeField] InventoryItem[] testItems;

    Inventory inventory;

    void Start()
    {
        inventory = GetComponent<Inventory>();

        AddItemsToInventory();
    }

    public void AddItemsToInventory()
    {
        foreach (InventoryItem items in testItems)
        {
           inventory.AddToFirstEmptySlot(items, 1);
        }
    }
}
- To give the Enemy AI the same equipment capabilities as the player unit. Here’s an EnemyWeaponManager.cs to add to the Enemy Unit core prefab. Don’t forget to add the WeaponHolder.cs script to the enemy unit’s left and right hands.
using UnityEngine;

public class EnemyWeaponManager : MonoBehaviour
{
    WeaponHolder leftHandSlot;
    WeaponHolder rightHandSlot;
    Animator anim;
    [SerializeField] public WeaponItem rightWeapon;
    [SerializeField] public WeaponItem leftWeapon;
    [SerializeField] public AnimatorOverrideController dualOverride = null;
    [SerializeField] public AnimatorOverrideController shieldOverride = null;
    [SerializeField] public AnimatorOverrideController defaultOverride = null;
    [SerializeField] public WeaponItem unarmed = null;
    private void Awake()
    {
        anim = GetComponentInChildren<Animator>();

        WeaponHolder[] weaponHolderSlots = GetComponentsInChildren<WeaponHolder>();
        foreach (WeaponHolder weaponSlot in weaponHolderSlots)
        {
            if(weaponSlot.isLeftHandSlot)
            {
                leftHandSlot = weaponSlot;
            }
            else if(weaponSlot.isRightHandSlot)
            {
                rightHandSlot = weaponSlot;
            }
        }
    }

    // Start is called before the first frame update
    void Start()
    {
        EquipWeapon();
    }

    public void LoadWeaponOnSlot(WeaponItem weaponItem, bool isLeft)
    {
        if(isLeft)
        {
            leftHandSlot.LoadWeaponItem(weaponItem);
        }
        else
        {
            rightHandSlot.LoadWeaponItem(weaponItem);
        }
    }
    private void EquipWeapon()
    {
        var overrideController = anim.runtimeAnimatorController as AnimatorOverrideController;

        if(rightWeapon != null && leftWeapon == null)
        {
            leftHandSlot.UnloadWeaponAndDestroy();
            LoadWeaponOnSlot(rightWeapon, false);
            if(rightWeapon.animatorOverrideR != null)
            {
                anim.runtimeAnimatorController = rightWeapon.animatorOverrideR;
            }
        }

        if(rightWeapon == null && leftWeapon != null)
        {
            rightHandSlot.UnloadWeaponAndDestroy();
            LoadWeaponOnSlot(leftWeapon, true);
            if(leftWeapon.animatorOverrideL != null)
            {
                anim.runtimeAnimatorController = leftWeapon.animatorOverrideL;
            }
        }

        if(rightWeapon != null && leftWeapon != null)
        {
            LoadWeaponOnSlot(rightWeapon, false);
            LoadWeaponOnSlot(leftWeapon, true);

            if(leftWeapon.isShield)
            {
                anim.runtimeAnimatorController = shieldOverride;
            }
            else
            {
                anim.runtimeAnimatorController = dualOverride;
            }
        }

        if(rightWeapon == null && leftWeapon == null)
        {
            rightHandSlot.UnloadWeaponAndDestroy();
            leftHandSlot.UnloadWeaponAndDestroy();
            LoadWeaponOnSlot(unarmed, false);

            anim.runtimeAnimatorController = defaultOverride;
        }
    }
}
- To add customizable weapon damage and range we will modify the BaseAction.cs, SwordAction.cs, and ShootAction. For BaseAction.cs add
using GameDevTV.Inventories;

protected Equipment unitEquipment;

protected virtual void Awake()
    {
        unit = GetComponent<Unit>();
        unitEquipment = GetComponent<Equipment>();
    }
Then SwordAction.cs modify the NextState() and GetMaxSwordDistance()
using GameDevTV.Inventories;

    private void NextState()
    {
        switch (state)
       {
            case State.SwingingSwordBeforeHit:

                state = State.SwingingSwordAfterHit;
                float afterHitStateTime = .5f;
                stateTimer = afterHitStateTime;
                if(unit.IsEnemy())
                {
                    var weapon = GetComponent<EnemyWeaponManager>().rightWeapon as WeaponItem;
                    var weaponL = GetComponent<EnemyWeaponManager>().leftWeapon as WeaponItem;
                    if(weapon != null && weaponL == null)
                    {
                        targetUnit.Damage(weapon.GetWeaponDamage());
                    }
                    if(weaponL != null && weapon == null)
                    {
                        targetUnit.Damage(weaponL.GetWeaponDamage());
                    }
                    if(weapon != null && weaponL != null)
                    {
                       targetUnit.Damage(weapon.GetWeaponDamage() + weaponL.GetWeaponDamage());
                    }

                    targetUnit.Damage(weapon.GetWeaponDamage() + weaponL.GetWeaponDamage());
                }
                else
                {
                    var weapon = unitEquipment.GetItemInSlot(EquipLocation.Weapon) as WeaponItem;
                    var weaponL = unitEquipment.GetItemInSlot(EquipLocation.WeaponL) as WeaponItem;
                    if(weapon != null && weaponL == null)
                    {
                        targetUnit.Damage(weapon.GetWeaponDamage());
                    }
                    if(weaponL != null && weapon == null)
                    {
                        targetUnit.Damage(weaponL.GetWeaponDamage());
                    }
                    if(weapon != null && weaponL != null)
                    {
                       targetUnit.Damage(weapon.GetWeaponDamage() + weaponL.GetWeaponDamage());
                    }

                    targetUnit.Damage(weapon.GetWeaponDamage() + weaponL.GetWeaponDamage());
                }

                OnAnySwordHit?.Invoke(this, EventArgs.Empty);

            break;
            case State.SwingingSwordAfterHit:

                OnSwordActionCompleted?.Invoke(this, EventArgs.Empty);
                ActionComplete();

            break;
       }
    }

    public int GetMaxSwordDistance()
    {
       //Weapon range is determined by right-hand weapon
        if(unit.IsEnemy())
        {
            var weapon = GetComponent<EnemyWeaponManager>().rightWeapon as WeaponItem;
            return weapon.GetWeaponRange();
        }
        else
        {
            var weapon = unitEquipment.GetItemInSlot(EquipLocation.Weapon) as WeaponItem;
            return weapon.GetWeaponRange();
        }
    }
Finally ShootAction.cs modify Shoot() and GetVaildActionGridPositionList()
using GameDevTV.Inventories;

    //[SerializeField] int maxShootDis = 7;
    int maxShootDis;

     private void Shoot()
    {
        OnAnyShoot?.Invoke(this, new OnShootEventArgs
        {
            targetUnit = targetUnit,
            shootingUnit = unit
        });

        OnShoot?.Invoke(this, new OnShootEventArgs
        {
            targetUnit = targetUnit,
            shootingUnit = unit
        });

        if(unit.IsEnemy())
        {
            var weapon = GetComponent<EnemyWeaponManager>().rightWeapon as WeaponItem;
            targetUnit.Damage(weapon.GetWeaponDamage());
        }
        else
        {
            var weapon = unitEquipment.GetItemInSlot(EquipLocation.Weapon) as WeaponItem;
            targetUnit.Damage(weapon.GetWeaponDamage());
        }
    }

    public List<GridPosition> GetValidActionGridPositionList(GridPosition unitGridPosition)
    {
        List<GridPosition> vaildGridPositionList = new List<GridPosition>();

        if(unit.IsEnemy())
        {
            var weapon = GetComponent<EnemyWeaponManager>().rightWeapon as WeaponItem;
            maxShootDis = weapon.GetWeaponRange() ;
        }
        else
        {
            var weapon = unitEquipment.GetItemInSlot(EquipLocation.Weapon) as WeaponItem;
            maxShootDis = weapon.GetWeaponRange() ;
        }

        for (int x = -maxShootDis; x <= maxShootDis; x++)
        {
            for (int z = -maxShootDis; z <= maxShootDis; z++)
            {
                GridPosition offestGridPosition = new GridPosition(x,z);
                GridPosition testGridPosition = unitGridPosition + offestGridPosition;

                if(!LevelGrid.Instance.IsValidGridPosition(testGridPosition))
                {
                    continue;
                }

                int testDis = Mathf.Abs(x) + Mathf.Abs(z);
                if(testDis > maxShootDis) continue;

                if(!LevelGrid.Instance.DetectUnitOnGridPosition(testGridPosition))
                {
                    //grid position is empty, no unit
                    continue;
                }

                Unit targetUnit = LevelGrid.Instance.GetUnitOnGridPosition(testGridPosition);
                if(targetUnit.IsEnemy() == unit.IsEnemy())
                {
                    //Both Units on same "team"
                    continue;
                }

                Vector3 unitWorldPosition = LevelGrid.Instance.GetWorldPosition(unitGridPosition);
                Vector3 shootDir = (targetUnit.GetWorldPosition() - unitWorldPosition).normalized;
                float unitShoulderHeight = 1.7f;

                if(Physics.Raycast(unitWorldPosition+ Vector3.up * unitShoulderHeight, shootDir,
                    Vector3.Distance(unitWorldPosition, targetUnit.GetWorldPosition()),obstacleLayerMask))
                {
                    //unit sight is blocked by obstacle
                    continue;
                }

                vaildGridPositionList.Add(testGridPosition);
            }
        }

        return vaildGridPositionList;
    }
And that is all for this tutorial, you have hopefully added a fully functional inventory and equipment system to your Turn-Based Strategy game!
Fixes for the future:
-
More than one Unit Inventory & Equipment and switching between them when another player unit is selected.
-
Redrawing UnitActionSystemUI to recognize the difference between a Melee Weapon item and a Ranged Weapon item to provide either the “Sword” or “Shoot” respectively when equipment is switched.
-
a Unit changing equipment should also cost an action point (unless you wish to have your units change their equipment freely throughout the battle).
-
Need to implement a Saving system for Unit inventory and equipment.
Potential future Add-ons:
-
Multiple abilities/actions dependent on unit equipment and are scaleable by level proficiency. Example: A unit equipped with Sword and Shield has standard melee attack action (when the unit is at Level 1 in the “sword and shield” trait) and a “shield bash” action (added when the unit is at level 2), both cost different action costs.
-
Stackable/consumable inventory items with added actions. Example: Unit has 3 potions equipped and the “Use potion” action appears in the UI until all 3 are consumed. Can also be used for grenades or other thrown consumable items.
If anyone would like to help me with these future fixes or add-ons, it would be greatly appreciated.
Thanks for reading and I hope this helps people on their Game Dev journey.