Hello - I’ve searched online with this and edited my user preferences with no luck. I’d like my renders to stop going to a tmp file on my C drive (this is my Solid State drive, which I’ve installed Blender on, which if you know how they build SS drives these days you’ll know why I don’t want to use it as a temp disk.)
I’ve tried changing the User Preferences save locations but every render is still creating a new file on C; how do I swap this out for another drive?
Thanks,
Kyle
Have you tried this option?:
Yep - thanks for the reply but I’m looking for a way to set it so that’s no longer the default. I’d just rather not change it every time I open Blender, and the User Preferences don’t seem to change that location.
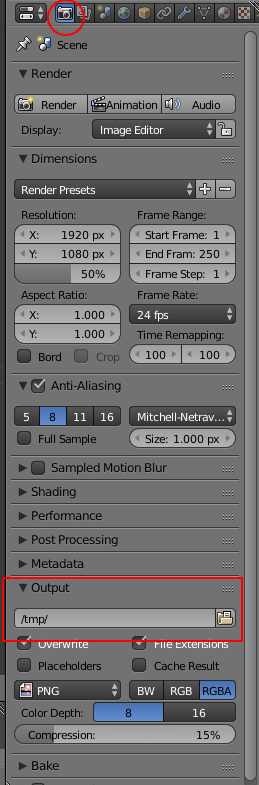
Hey! Have you tried changing it in the Output? It is under the metadata (you can find it under the render tab which Maxim showed you, but scroll a little bit down).
Yep - unfortunately for a new file it resets on me to the TMP folder; for a
saved file it remembers the altered location.
I’m wondering if there’s something I’m not seeing under User Preferences to
make all new files default their render location to somewhere else.
Well, by default it is set to the TMP folder (even to me), but it is not a big deal to change it after the work is finished. I don’t even know is it possible to save work in other folder by default.
I also could not find any settings in user preferences.
One way I found how this can be resolved is:
Create a file whatevernameyouwant.py with following content:
import bpy
scene = bpy.context.scene
bpy.data.scenes[“Scene”].render.filepath = “desired/folder/to/save/to”
You will have to run blender with additional argument as follows:
blender --python path/to/whatevernameyouwant.py
This will force blender to run script on startup and set your render save directory to what you want it to be.
I am sure there is a way to do this through a blender module, by my knowledge ends here 
Hope that helps you.
P.S This solution does not work if you later on click on File->New thou…
I am going to investigate on how to resolve it through modules later
Awesome Maxim - that’s a great workaround,
Thanks!
Kyle
I think I found a way to keep the file path consistent.
Put following code into a Python file and place it into ~/.config/blender/2.xx/scrips/startup/loader.py (replace ~/config/blender with %APPDATA%/Blender Foundation/Blender on Windows, and something along those lines on MacOS).
import bpy
from bpy.app.handlers import persistent

@persistent
def load_handler(dummy):

    bpy.data.scenes["Scene"].render.filepath = "/desired/save/folder/"
bpy.app.handlers.load_post.append(load_handler)
Note: Firstly my file name was ss2.py, and for some reason blender did not want to load it at startup until by accident I renamed it to loader.py, so I asume there are limitation on file name for scripts.
For me it was not required, but in case it doesn’t work, could be that you need to check a Auto run python scripts checkbox in User Preferences
This solution works even after you select File -> new from the menu.
If you are going to try this solution, please let me know if it worked.
Thank you
Fantastic - I’m going to try this tonight or tomorrow and let you know how
it goes!
I gave it a try on a computer here at work; I’m on Windows 7, so I tracked down the %appdata% folder and created a python file like the one you had, changing the file path (but nothing else from your example).
Unfortunately it didn’t work - on mine I had to create the folders Scripts and Startup, they didn’t exist by default. I tried copying the files to multiple folders in Blender just in case, and checked off the Auto Run Python option in User Preferences. Was there anything else I needed to change in your example code beside the render location?
There is a permanent way to this problem without having to do python scripting.
Open up a new blender file(standard cube, sun, ect), In the render tab go down to output, click on the little folder icon and change where you would like the photos to be rendered to. Next go up to file and save startup file.
This way everytime you start up a new project, it will render the images where you want them.
You can also do this for all of the different render settings which can save a lot of time down the road.
1 Like
Perfect - thanks to everyone for replying but I think this is exactly what solves my problem.
For anyone else whose a new as me (I had to look this up), the shortcut to save over your default file is CTRL+U, and can also be found as an option under the File menu dropdown.
That was so easy 
Thank you for posting this solution