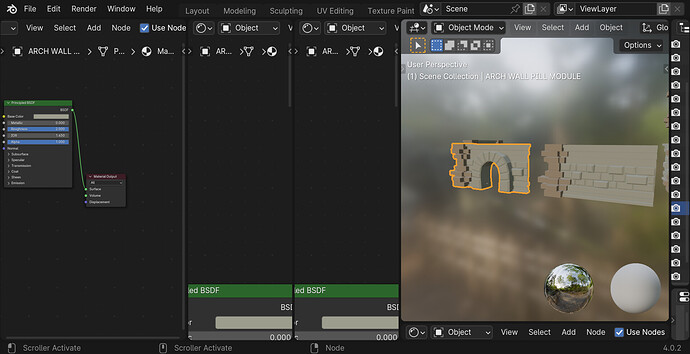
No worries, this can be quite confusing until you practice it.
- Mouseover one corner of the area you want to get rid of; your cursor should turn into a crosshair. Click and drag a short distance until your cursor changes again, and the shape of the cursor dictates what you would be doing:
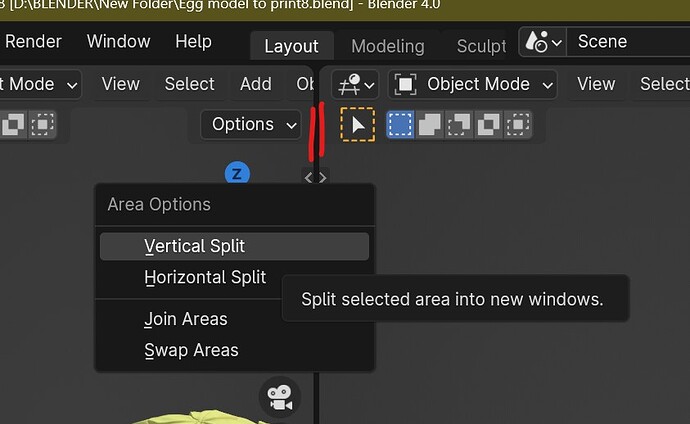
- When you hold LMB on one side of the boundary, then drag back into an area (ie not crossing over the boundary), your cursor will change to a “spread” shape that looks like this (see red outline), either vertical or horizontal. This is not what you want (at the moment) because it splits a area in two, and this feature is how you ended up with this problem.

- When you hold LMB on one side of the boundary, then drag across the boundary, your cursor will turn into a chevron, just like a dropdown arrow (see green outline below). While dragging, you can then move back and forth over the two areas sharing that boundary, and they will highlight differently to show that one area will extend into and overtake the other (the chevron arrow also changes direction). Use this feature to get rid of your extra areas.

- When you hold LMB on one side of the boundary, then drag back into an area (ie not crossing over the boundary), your cursor will change to a “spread” shape that looks like this (see red outline), either vertical or horizontal. This is not what you want (at the moment) because it splits a area in two, and this feature is how you ended up with this problem.
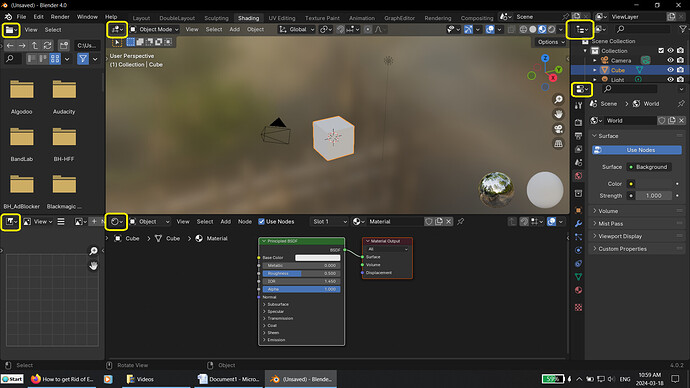
- If you accidentally delete too many, use the first feature I described to make a new area, then use the Editor Type dropdown to select the type of Editor to show in that area. In this case, you would be looking for the 3D Viewport, or the Shader Editor. I can also see that your Outliner and Properties areas on the far right need to be pulled out again, and you also have a Shader Editor with the same problem below your Viewport. The Editor Type dropdown is here, in the top-left of every area:
Even once you get this problem sorted out, I would highly recommend you practice this a little, simply because being able to change your workspace around is a super-useful feature =)
Or.
Right click on the dividing line between two windows and select join areas, mouse over the one you want to cover up.
Yes should have moved mouse to the join areas, but you get the idea.
Forgot about that one XD
Yes, this might be easier to get used to =)
Thanks !!! Played around with that … Lots of little things that catch you up in Blender … Now id better go back to light house shading and figure out what im doing wrong with my Dungeon Floor Modules … Then maybe some more Donut , 

- Mouseover one corner of the area you want to get rid of; your cursor should turn into a crosshair. Click and drag a short distance until your cursor changes again, and the shape of the cursor dictates what you would be doing:
- When you hold LMB on one side of the boundary, then drag back into an area (ie not crossing over the boundary), your cursor will change to a “spread” shape that looks like this (see red outline), either vertical or horizontal. This is not what you want (at the moment) because it splits a area in two, and this feature is how you ended up with this problem.

- When you hold LMB on one side of the boundary, then drag across the boundary, your cursor will turn into a chevron, just like a dropdown arrow (see green outline below). While dragging, you can then move back and forth over the two areas sharing that boundary, and they will highlight differently to show that one area will extend into and overtake the other (the chevron arrow also changes direction). Use this feature to get rid of your extra areas.

- When you hold LMB on one side of the boundary, then drag back into an area (ie not crossing over the boundary), your cursor will change to a “spread” shape that looks like this (see red outline), either vertical or horizontal. This is not what you want (at the moment) because it splits a area in two, and this feature is how you ended up with this problem.
- If you accidentally delete too many, use the first feature I described to make a new area, then use the Editor Type dropdown to select the type of Editor to show in that area. In this case, you would be looking for the 3D Viewport, or the Shader Editor. I can also see that your Outliner and Properties areas on the far right need to be pulled out again, and you also have a Shader Editor with the same problem below your Viewport. The Editor Type dropdown is here, in the top-left of every area:
Even once you get this problem sorted out, I would highly recommend you practice this a little, simply because being able to change your workspace around is a super-useful feature =)
[/quote]


This topic was automatically closed 24 hours after the last reply. New replies are no longer allowed.


