Section Intro - Warehouse Wreckage - We overview what we want from our game and what concepts we will cover.
Project Setup - We create a new project using the “Starter Content” and learn to use the Content Browser to open different Maps. We then learn to open the Level Blueprint Editor from a given map.
Blueprint Event Graph - We use the Level Blueprint Event Graph for the first time and print basic text to the screen in response to events.
Physics Simulation - We learn how to switch on Physics simulation and have a bit of fun.
Objects and References - We learn about Object, References and Components and use this knowledge in Blueprint to query objects in our scene and get info about them.
Adding an Impulse - We use Blueprints to add an impulse to an object in our scene. We see how to trigger this with a key press.
Blueprint Classes and Instances - We create a reusable Blueprint and see how updating it changes multiple instances.
Spawning Actors - We spawn an actor using our new blueprint and use the instance to add force.
Data Types - We look into the different data pin colours and see that they are Types. We see what Types are and how they constrain our connections.
Pawns and Actor Location - We see how the engine spawns a pawn for us to control at the player start. We see how to get access to the pawn in the Event Graph and use it’s Transform.
Control Rotation - We see how the Pawn’s Actor Rotation doesn’t help much. We find out how to get the control rotation and apply that to the ball.
Vector Addition & Multiplication - We learn how Vector addition, subtraction and multiplication work. We learn to do this with an arrow representation as well as coordinates.
Get Forward Vector - We look at what the Forward Vector is. We learn to multiply it to give us an impulse that launches our Projectile in the right direction.
Importing Assets - We see how to search the Marketplace for asset, especially free. And how to download and add these to our projects.
Geometry Brushes (BSP) - We create a new level and build some walls using additive and subtractive BSP brushes. We also bring our existing Blueprint functionality into the level.
Materials and Lighting - We learn to add materials to our Geometry brushes and adjust the directional lighting of the scene.
Actor Components - We add in meshes to our scene and see how components can be used to make more complex actors.
Collision Meshes - We see what a collision mesh is and we see how we can generate a simplified mesh to behave well with physics simulations.
Variables - We learn how variables can be used to store values. We see how to use Blueprint to set and get these values. We use this to keep track of our ammo.
Booleans and Branches - We learn how to use Comparison Operators to get true/false answers about a numeric relationship. We then use these “booleans” to execute different code using a Branch Node.
Functions - We learn why it’s important to write self documenting code. We see how we can use functions as a great alternative to comments. We also see how functions lead to code reuse by printing our Ammo in different cases.
Return Types - We see how to create functions from scratch in the My Blueprint pane. We also see how to add inputs and outputs.
Pure Functions - We learn what “side effects” are. We learn that a function without execution pins is “Pure” and how to mark a function as such.
Member Functions - We see how code can live in blueprint classes and have access to the instance. We use this to print a balls name and we move the “Launch” code there too.
Loading Levels & Delay Nodes - We see how to load a level from Blueprint and we can reload the current level by using Get Current Level Name. We call this functionality after a Delay.
Wrap-up and Recap - We review at all the concepts covered in this section and what could be extended in our game.
Edit: My mistake! This was addressed around the 4 minute mark in the video before the challenge.
For the Get Forward Vector video:
When creating the multiply node, the default pin type was a Vector, I had to right lick the bottom pin, go to Convert Pin and switch it to a float in order for it to work properly.
Hi, all!
A bit of feedback on what I’ve seen so far
In lectures 7 and 8 we start to work on projectile class, but looks like the definition of the projectile is kinda missing there. Would’ve been great to have a small one somewhere at the beginning;)
Everithing else seems great, thank you for the course,
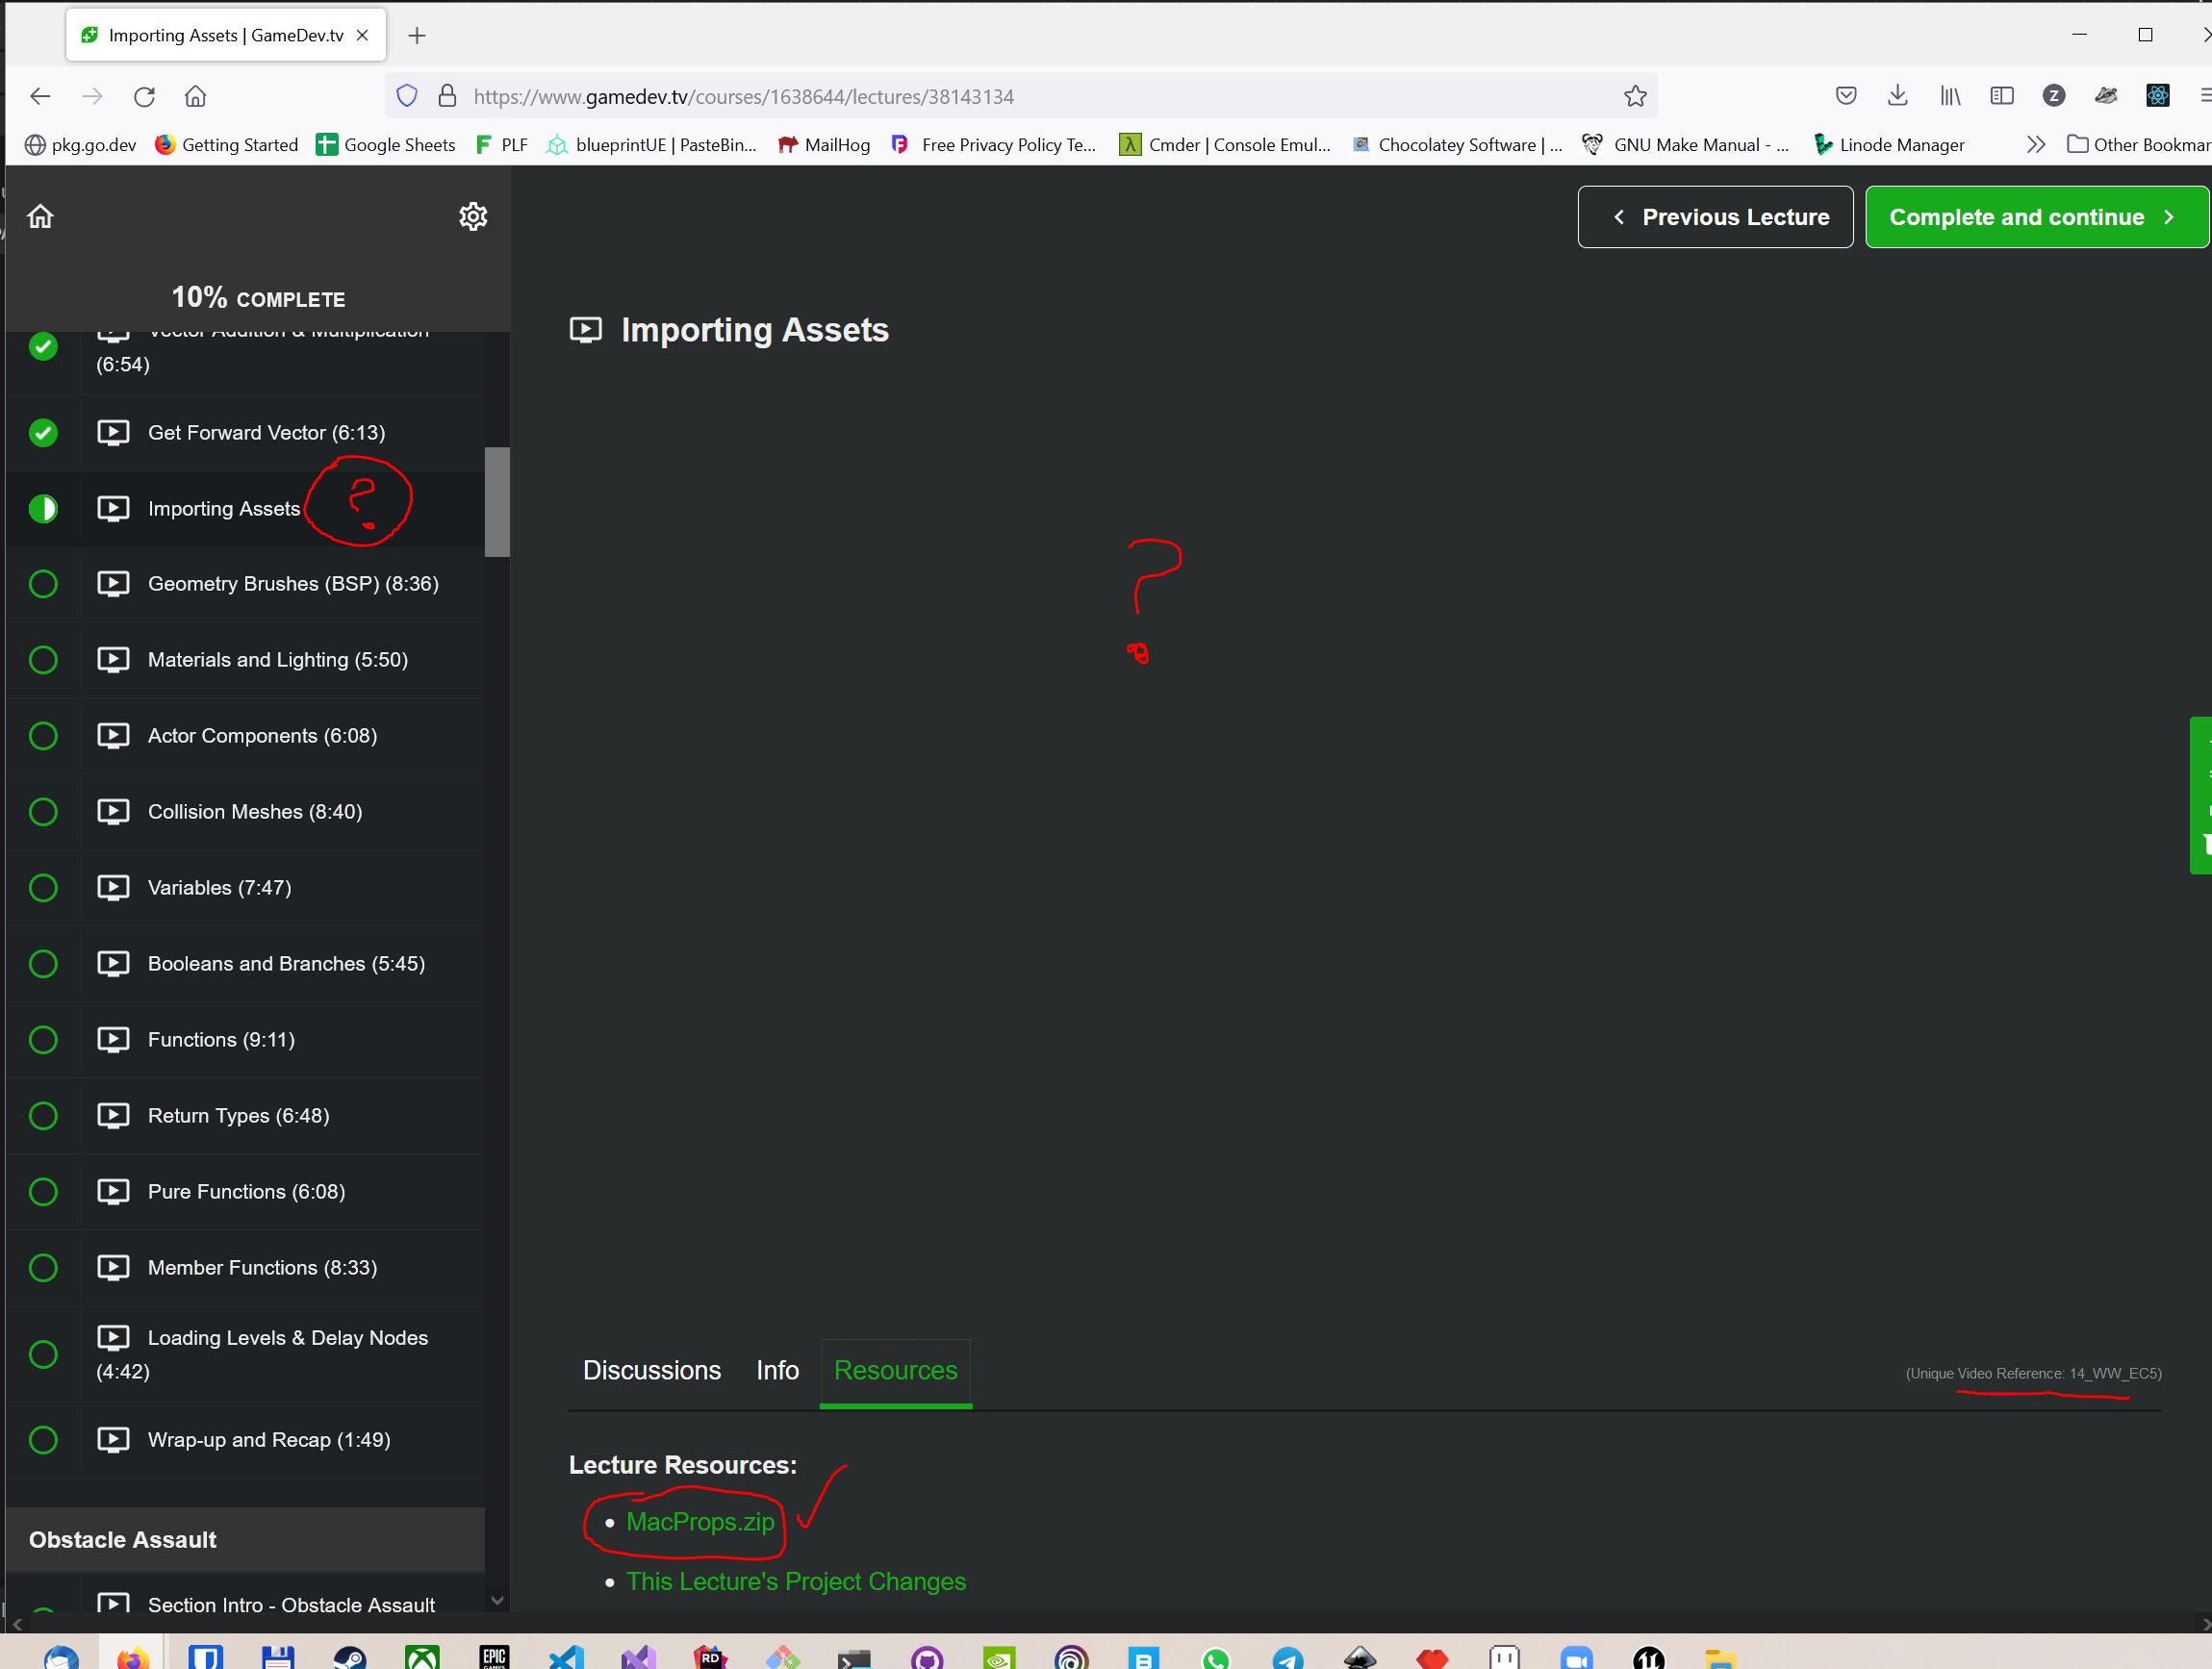
Hi. I don’t know if it’s only for me, but the video for Importing Assets is missing. The resources are there, no problem with downloading them (MacProps.zip), but there is no video.
Even the video length in the navigation is missing (see photo bellow).
I did a forced hot reload in the browser, but nothing changed.
Best regards,
Zeno
Edit : The MacProps.zip file is not easily importable with drag and drop. It’s a full UE5 project, so easier would be direct import from market place, but as I don’t se the video or text description, I can’t figure out if this is explained in the video or not.
The other workaround for using the props from the zip file, would be to have both projects open and copy from one project to another. In UE4 this worked so it should also work in UE5.
For the lecture Pawns and Actor Location, we’re spawning a projectile to add an impulse to, but the default pawn has collision. When I spawn the projectile at the actor’s location, the two collisions end up colliding with one another and sending the projectile straight into the air. It’s an easy enough fix by simply spawning the projectile a little bit away from the pawn’s collision, but if we fixed that issue in the lecture somewhere I must have completely missed it.
I need help with the collision. I got to the “Collision Meshes” video and hoped that will fix the issue but it doesn’t.
It seems to me everything has weird collision rules - even chairs and tables on the basic scene then racks once in the warehouse.
The video said removing collision and adding straight ones would solve the issue but it doesn’t. It seems to be making it a bit better but doesn’t solve it.
When scene is loaded everything (racks, barrels, random meshes I added) that has physics will jump a little bit or in some cases just go crazy. How to fix this and get it stable as in the videos?
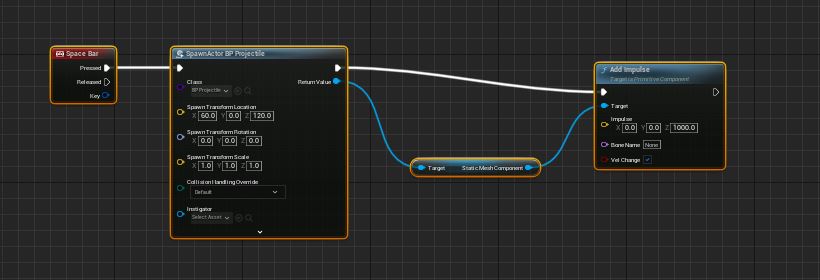
When attaching the “space bar” to “spawn actor”, then attach it to “add impulse”, the space bar doesn’t work any more, i.e., the space bar spawns a new projectile when only the space bar is attached to spawn, then when I attach the impulse function, the space bar doesn’t work anymore. I followed the video exactly as instructed, however, I seem to have a problem. Do you have any idea about what’s happening?
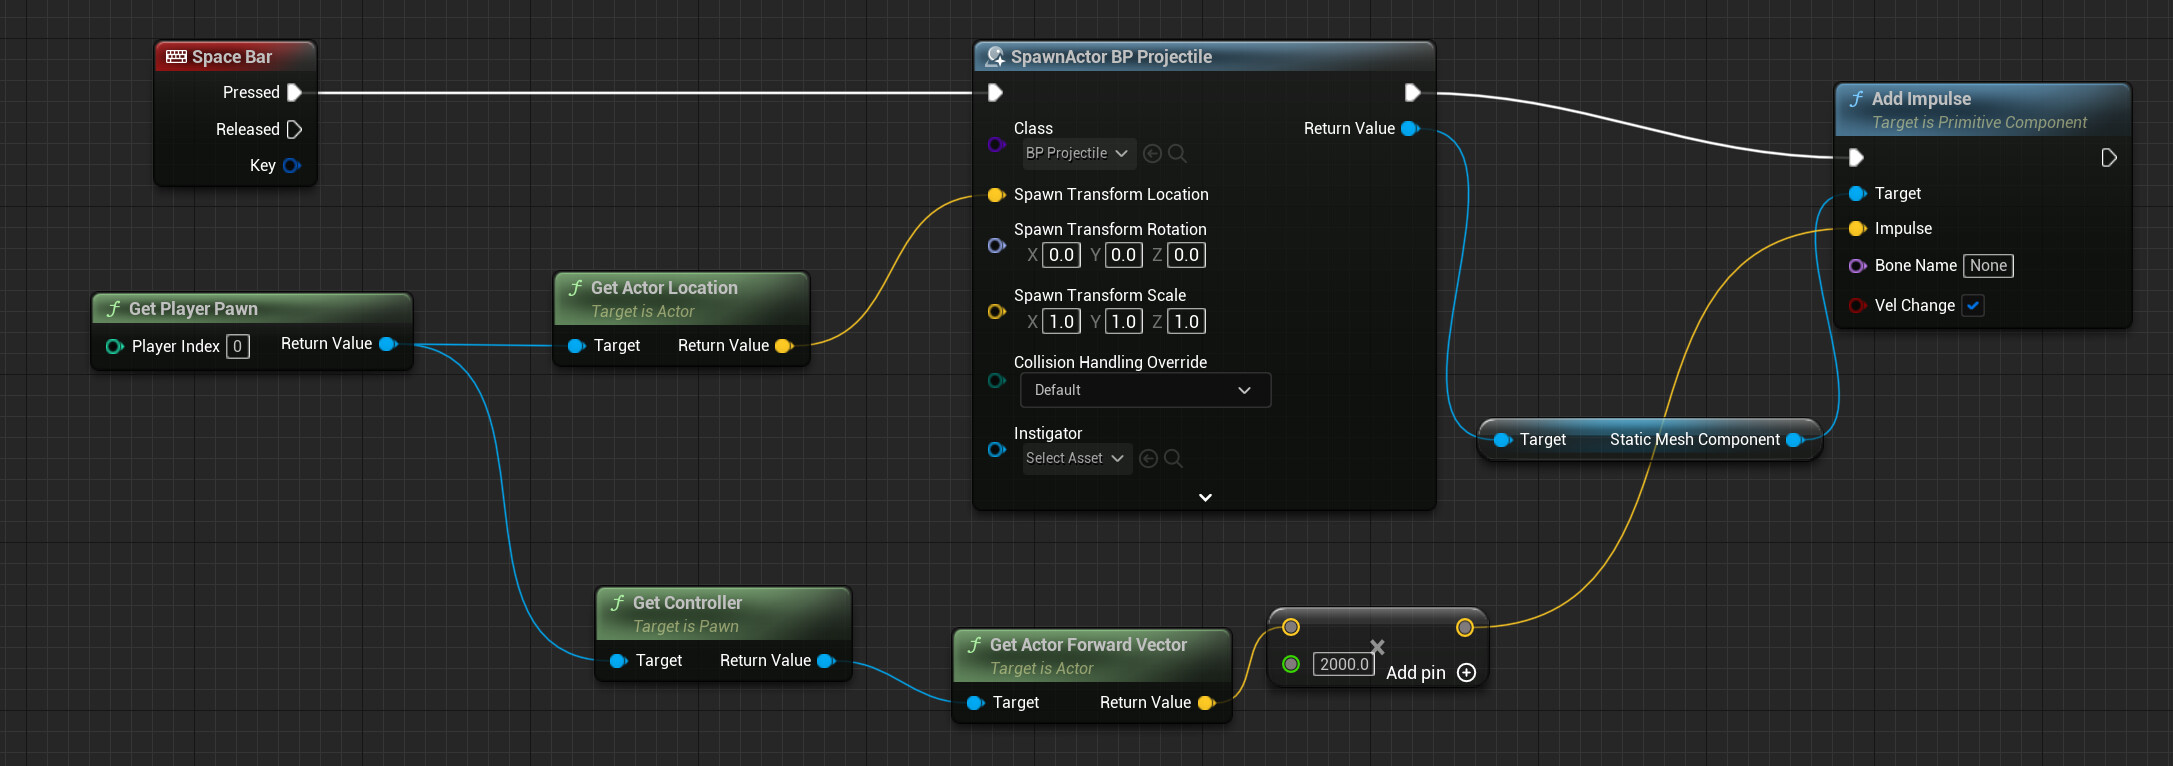
Hey, I’ve been going to your course. Really good stuff! I have a question/possible suggestion for the Get Forward Vector video.
I understand that we get the forward vector of the projectile so we knew which direction to shoot it. It works because the forward vector itself is obtained from the vector of the player.
However, might it make more intuitive sense to get the vector straight from the player object, since we’re effectively shooting from the player? In other words, I can get the controller and obtain the forward vector from that. Here’s what my blueprint looks like.
Great stuff!
Good pacing, and you keep it interesting all the way.
Although I was expecting C++ from the get go, I think it was really clever to start with Blueprints for the basic concepts.
A tiny ting:
You could perhaps make the lecture on pure functions even more concise, as you state in the notes that a pure function only have output, which you clearly show afterwards is not really the case. A pure function can have inputs and has an output, but does not alter state - it can compute things.
@JaredS Were you by chance adding your impulse to the Z axis instead of X? It wasn’t specifically fixed in any of the lectures I’ve watched so far but I believe setting the impulse high enough immediately after spawn causes the initial location checked by the collision system to be outside of the pawn’s collision sphere.
However, I noticed what you described would happen if I enabled CCD on the projectile’s mesh. CCD solves the issue with the projectiles going through the barrels on occasion if the velocity is really high. Your approach is fine (and common), in fact, usually there will usually be some visible gun barrel or turret with a socket attached to the end for spawning at the logical location instead of the actor (or mesh’s) origin.
Another method that that works fine for this project is disabling collisions with the ‘Pawn’ channel specifically under Collision Presets. That isn’t the best solution for all projects but it works fine for this one since there’s just one pawn and we don’t want the projectile to collide with ourselves.
@Alex_Summers I did the same thing for the challenge. This method is fine for projectiles that are symmetrical on the forward axis (i.e. the ‘cannon ball’ in this lecture) and if we don’t need local rotation to follow the direction of movement.
@SteveMerritt No I’ve been messing around with adding the impulse to all the different axis, and also spawning it at different locations, and also messing around with the blueprint itself to try different methods of fixing it. But when I have the project set up exactly the way the instructor has his set up, I run into the collision issue and have to alter the code somewhat in order to fix it. Like I said, the solution is pretty simple, but it seemed like that should be an issue a lot of people run into.
I can’t believe I seem to be the only one running into that issue. How strange.
@JaredS You aren’t the only one who has run into that issue. As I mentioned, I was able to reproduce what you were describing by enabling CCD on the projectile’s mesh. CCD is beyond the scope of this section but Sam mentioned it will be discussed later on in the course.
You’ll often find when doing tutorials or lectures that even though it appears that you have everything set up exactly like the instructor, there’s almost always some small difference in setup. It could be that the lecture was recorded with a slightly different engine version, a setting that the instructor changed locally and intentionally omitted from the lecture (or forgot about), or even something you overlooked yourself.
In the professional world, we sometimes run into situations where the exact same version of the game is being run on different hardware - sometimes with only slightly different specs - and yet we’ll end up with different results. I believe that’s actually a fundamental example of Chaos Theory in action. =]
Bottom line - don’t worry about it too much at this stage. The important thing is that you found a solution that worked for you.