
Fixed by applying new scrip directly to the camera (stole the script from YouTube vid) 
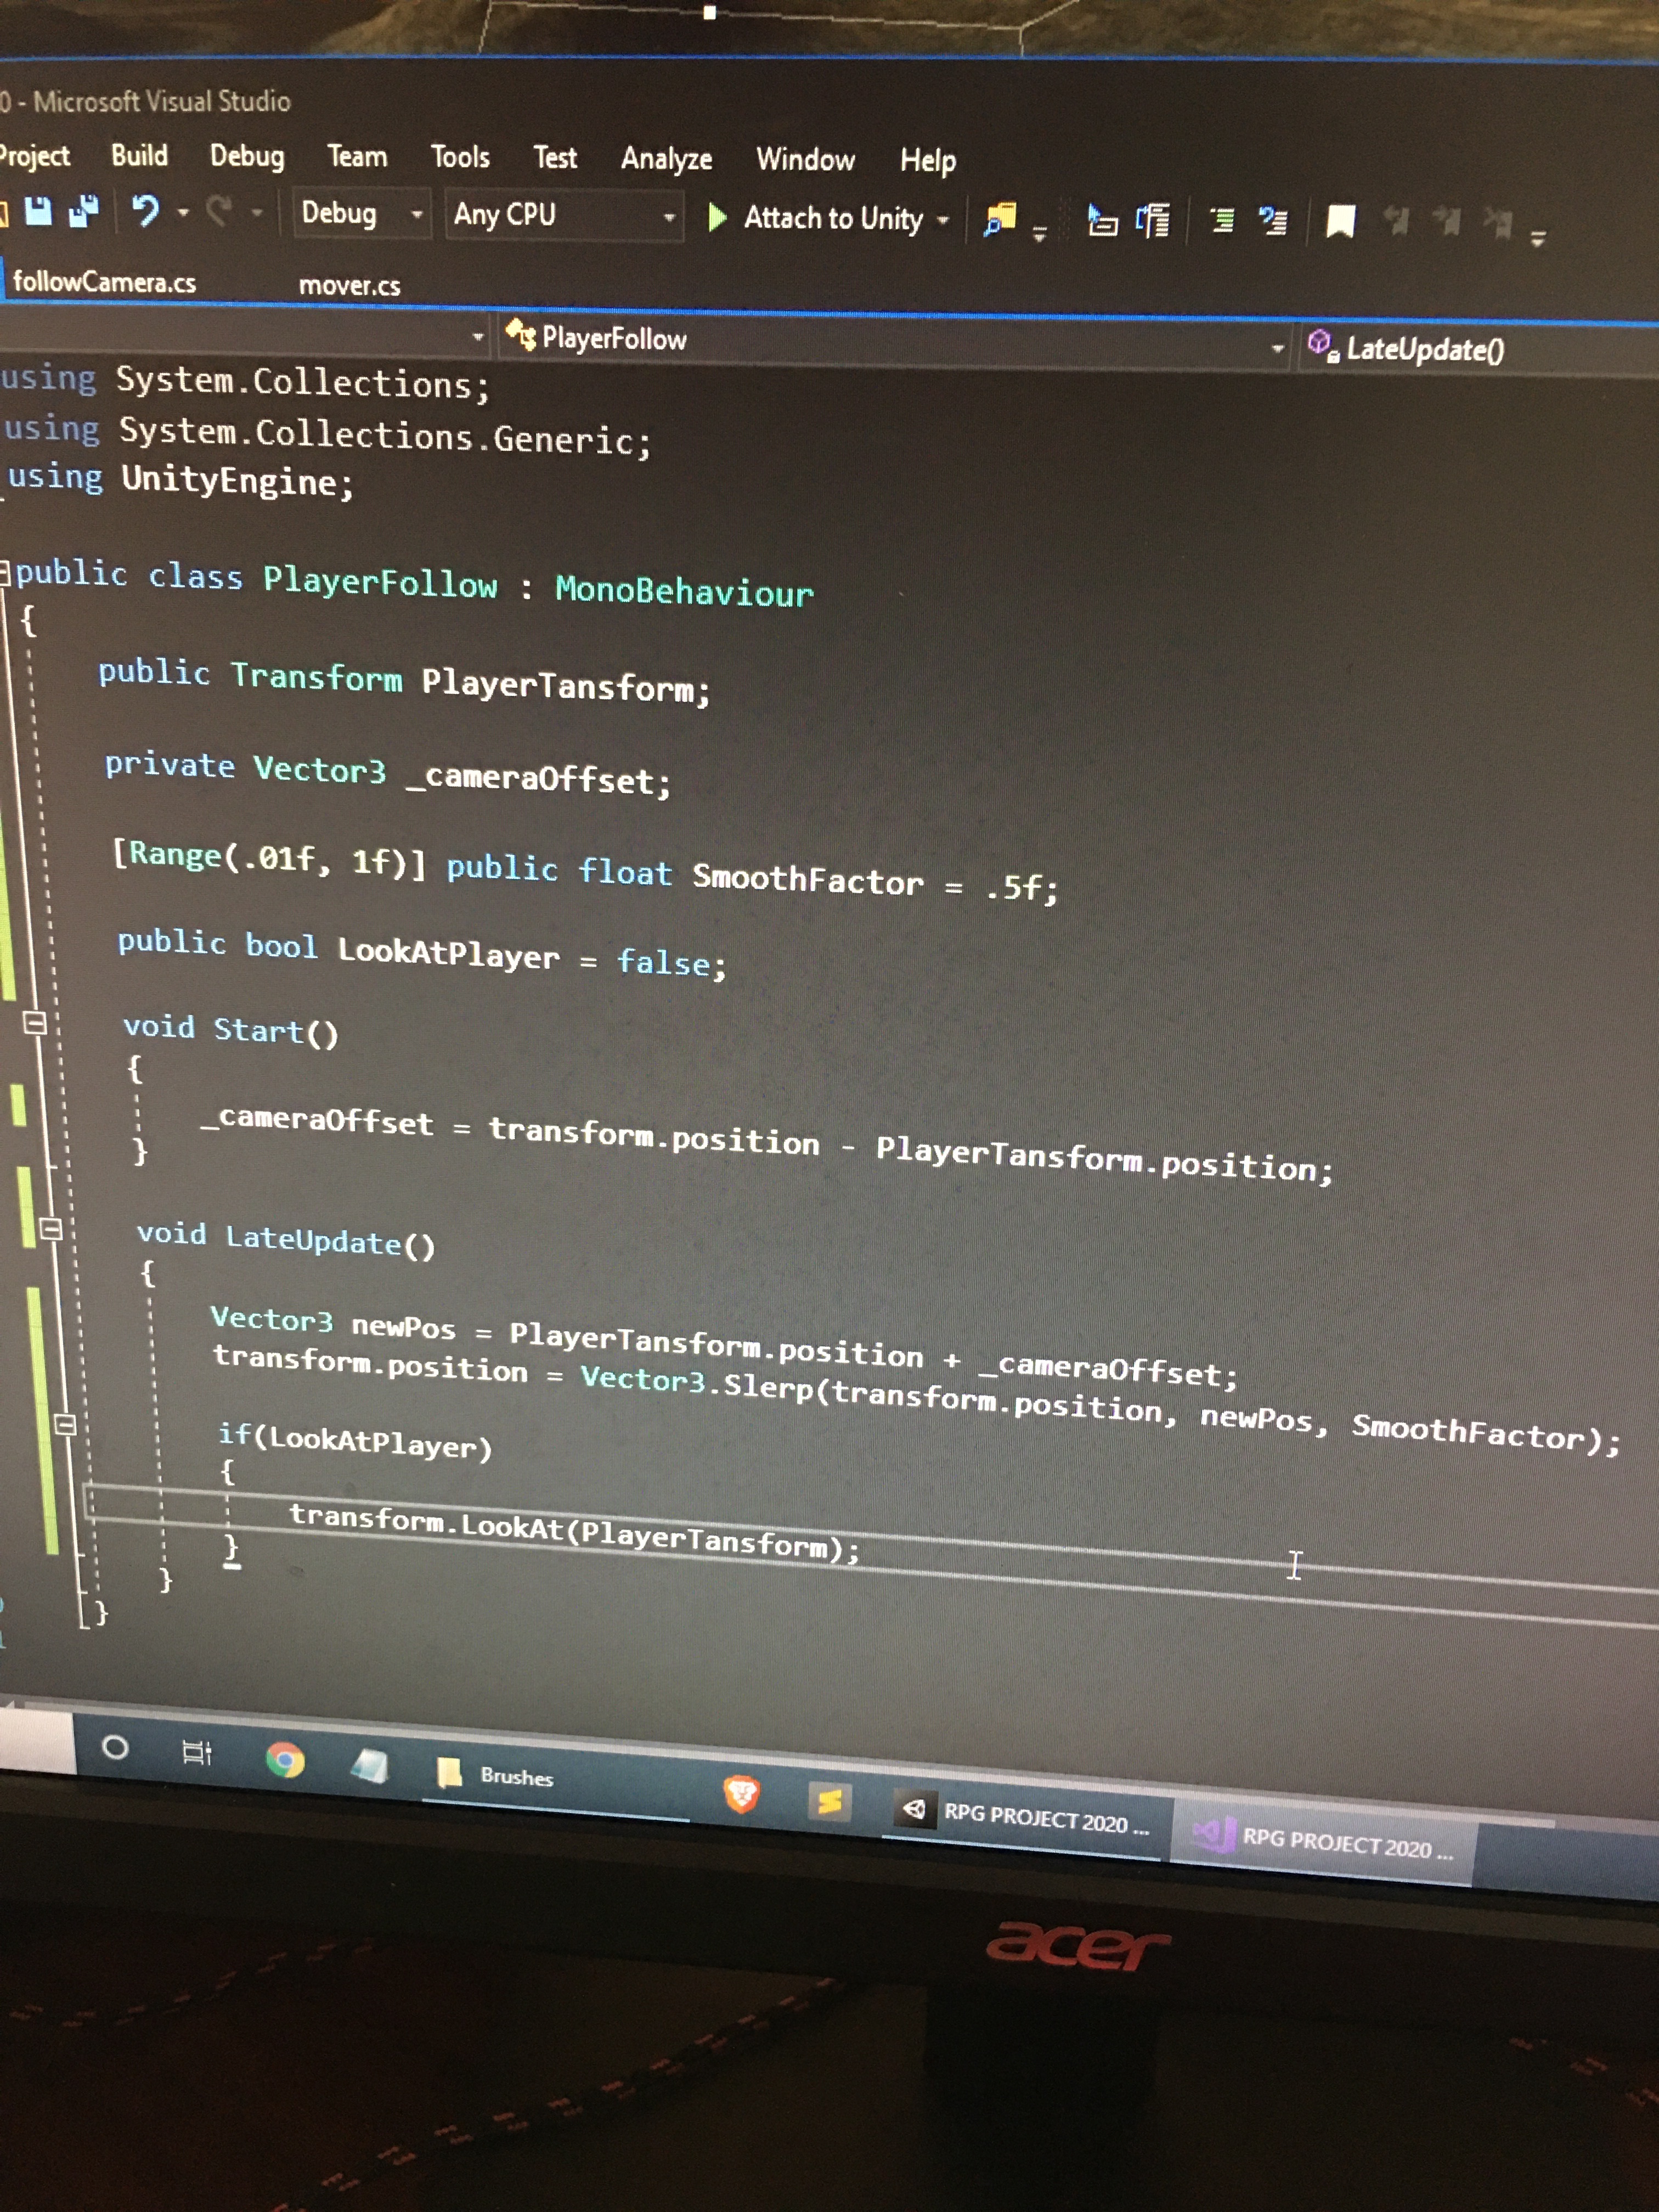
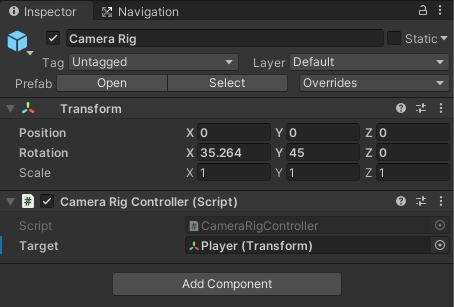
TIP : Settings for an easy orthogonal camera.
- Child the main camera to your parent Camera Rig (Follow Camera) object.

- Rotate your rig by the values in the screenshot and attach the camera controller script to this object.
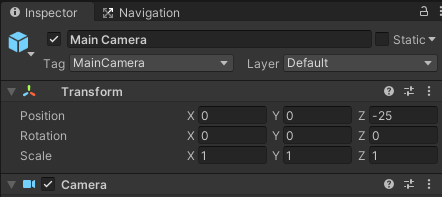
- Move your main camera away from the rig by the “z” value in the screenshot.
Note:
- The camera rig should be placed at the players position just like the follow camera object.
- Change the “z” value of the main camera to zoom in and out.
- On the main camera you can play around with the field of view and projection settings to get a more “flatter” view as you wish.
Sorry about the messed up formated above.
Following is the code I wrote to allow the right-click-rotation and middle-wheel-zooming.
using System;
using System.Collections;
using System.Collections.Generic;
using UnityEngine;

public class FollowCamera : MonoBehaviour
{
    [SerializeField] GameObject target;
    [SerializeField] Camera controlledCamera;
    [SerializeField] float minDistance = 2f;
    [SerializeField] float maxDistance = 15f;
    [SerializeField] float initialDistance = 10f;
    [SerializeField] float rotationSpeed = 3f;
    [SerializeField] float scrollSpeed = 3f;

    // Start is called before the first frame update
    void Start()
    {
        ChangeDistance(initialDistance);
        LookAtCenter();
    }

    private void Update()
    {
        RotateCamera();
        OnScroll();
    }

    void LateUpdate()
    {
        gameObject.transform.position = target.transform.position;
    }


    private void LookAtCenter()
    {
        Vector3 fromCameraToCenter = transform.position - controlledCamera.transform.position;
        controlledCamera.transform.rotation = Quaternion.LookRotation(fromCameraToCenter);
    }

    private void OnScroll()
    {
        if (Mathf.Abs(Input.mouseScrollDelta.y) > Mathf.Epsilon)
        {
            float currentDistance = Vector3.Distance(controlledCamera.transform.position, gameObject.transform.position);
            float newDistance = currentDistance - Input.mouseScrollDelta.y * scrollSpeed;
            ChangeDistance(newDistance);
            LookAtCenter();
        }
    }

    void RotateCamera()
    {
        if (Input.GetButton("Fire2"))
        {
            float xMove = Input.GetAxis("Mouse X") * rotationSpeed;
            float yMove = Input.GetAxis("Mouse Y") * rotationSpeed;
            gameObject.transform.rotation = Quaternion.Euler(yMove, xMove, 0) * gameObject.transform.rotation;
            LookAtCenter();
        }
    }


    void ChangeDistance(float targetDistance)
    {
        if (targetDistance > maxDistance || targetDistance < minDistance)
            return;
        targetDistance = Mathf.Clamp(targetDistance, minDistance, maxDistance);
        controlledCamera.transform.position = controlledCamera.transform.position.normalized * targetDistance;
    }
}
1 Like
Very nice! I took the liberty of reversing the Y controls:
e.g. gameObject.transform.rotation = Quaternion.Euler(-yMove, xMove, 0) * gameObject.transform.rotation;
Something is wrong with my code or some setup, because when I press play, my camera grabs to player and looks like a first person click to move.
I used LateUpdate instead of Update. Why? LateUpdate happens just before rendering in Unity, so moving the camera on a late update usually looks smoother than on update or fixedupdate. It might not matter here, but some things I’ve done in the past, it mattered, so it’s my habit.
I also used Vector3.MoveTowards to smooth out the motion a little, giving the camera a slight lag.
Here is the code:
using UnityEngine;

namespace Deplorable_Mountaineer.RPG {
    public class FollowCamera : MonoBehaviour {
        [SerializeField] private Transform target;
        [SerializeField] private float maxSpeed = 10;

        private Transform _transform;

        private void Reset(){
            target = GameObject.FindGameObjectWithTag("Player").transform;
        }

        private void Awake(){
            _transform = transform;
        }

        private void LateUpdate(){
            if(!target) return;
            Vector3 position = _transform.position;
            position = Vector3.MoveTowards(position, target.position, maxSpeed*Time.deltaTime);
            _transform.position = position;
        }
    }
}
[QUESTION] Allocation of 56 bytes error.
Good morning,
Hopefully this is a good place to ask. I saved my project and reopened after a few hours but I came back to an empty project! I still had the prefab I luckily saved like the terrain (!!) and the scripts.
When I even try to add anything, I get this
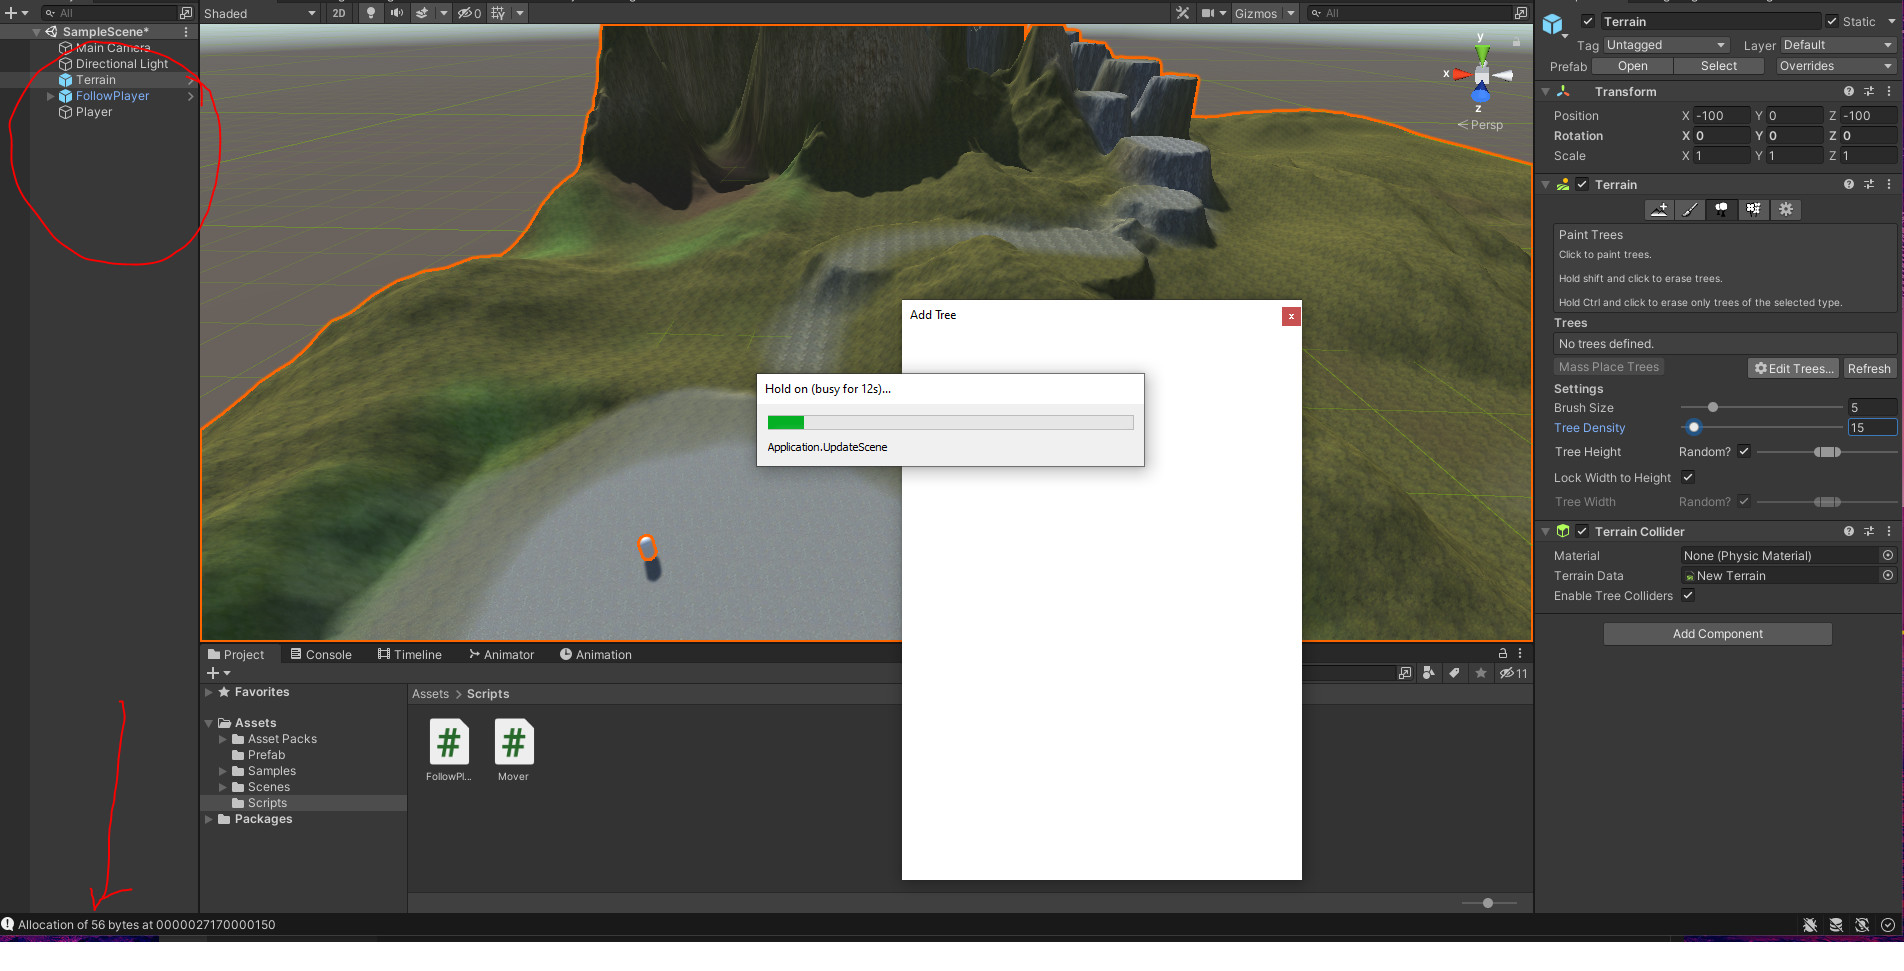
I closed and restarted multiple times, rebooted my computer. It works fine but when I start adding stuff it happens again. using Unity 2021.1.9f1 which I used for the entire Zombie runner course without an issue.
Please help.
This appears to be a known Unity issue with no clear solution. I found a thread here: https://forum.unity.com/threads/allocation-of-32-bytes-at-0000027d70016a00-error-on-unity-editor.832390/ which suggests it may be something that happens after a build.
1 Like
Good morning,
And thank you for the quick response. I had to clear the GI cache here

Also free some space on my C: drive where all the assets were being downloaded to.
So far so good. Fingers crossed !
1 Like
Ok, that’s the first time I’ve actually seen a solution for this. Adding to my notes for if this happens to anybody else!
everything is great until this problem came where when i play the camera spawn on the ground and i can’t see anything though i moved it please help me
In the Cinemachine Virtual Camera, turn off Save During Play
With the game running, play around with the settings in the Aim and body settings to align the camera the way you want it. When it looks right, click on the three dots on the far right of the Cinemachine Virtual Camera components and select copy.
Exit play mode and choose Paste Component Values.
It sounds like you have the Aim component set up with a LookAt target, and combined with the Framing Transposer, it’s causing strange effects… Usually, playing with the tracked object offset Y dimension can help with that.
If I use Cinemachine and I do not implemnt the code for the following camera. Will I run into any problems in the future? I am using what was taught in the Complete C# Unity Game Developer 3D Online Course during the Obstacle Course section.
I’m not entirely sure. I actually haven’t been through the remastered 3d materials as I tend to focus on the RPG course. If you’re using your own script to make the camera follow, that should be fine, though.
This camera make me crazy - I use 2020 Unity and all time I try to make camera follow the player it start at ground level - so I can see all from the undeground… lol. Well after few unsuccesfull tries I drop it and create cinemashine virtual camera. I was much more simple. And looks much better for my taste.
Hey!
The whole thing looks kind of complicated (not your bad though, it’s just Unity could support it from box).
The one thing I wanted to ask - so I’m going to move my player’s start position to somewhere else. After it’s done - I need to manually copy and paste “Transform” component from Player to “Follow Camera” object in order to adjust my camera. It’s not really suitable, is there option to automatically keep them together always? Of course they will be copied after game starts, but while developing they are completely independent.
Once you get to the Cinemachine section, you’ll find that the Cinemachine Brain takes care of this much more nicely than the old way of managing a camera.
2 Likes