I’m having an issue with baking a cavity map. For some reason, it’s resulting in Black and white. Does anyone have any ideas?

Please search the ask section, there have been several baking related issues and answers worked out. See if they cover this first.
1 Like
Right now, (looking at your material) you’re just baking a colour map using the diffuse output in the bake settings so you will get just white as a texture map.
I would suggest watching that video again and carefully following the steps that are explained. I’m sure this isn’t how it’s explained.
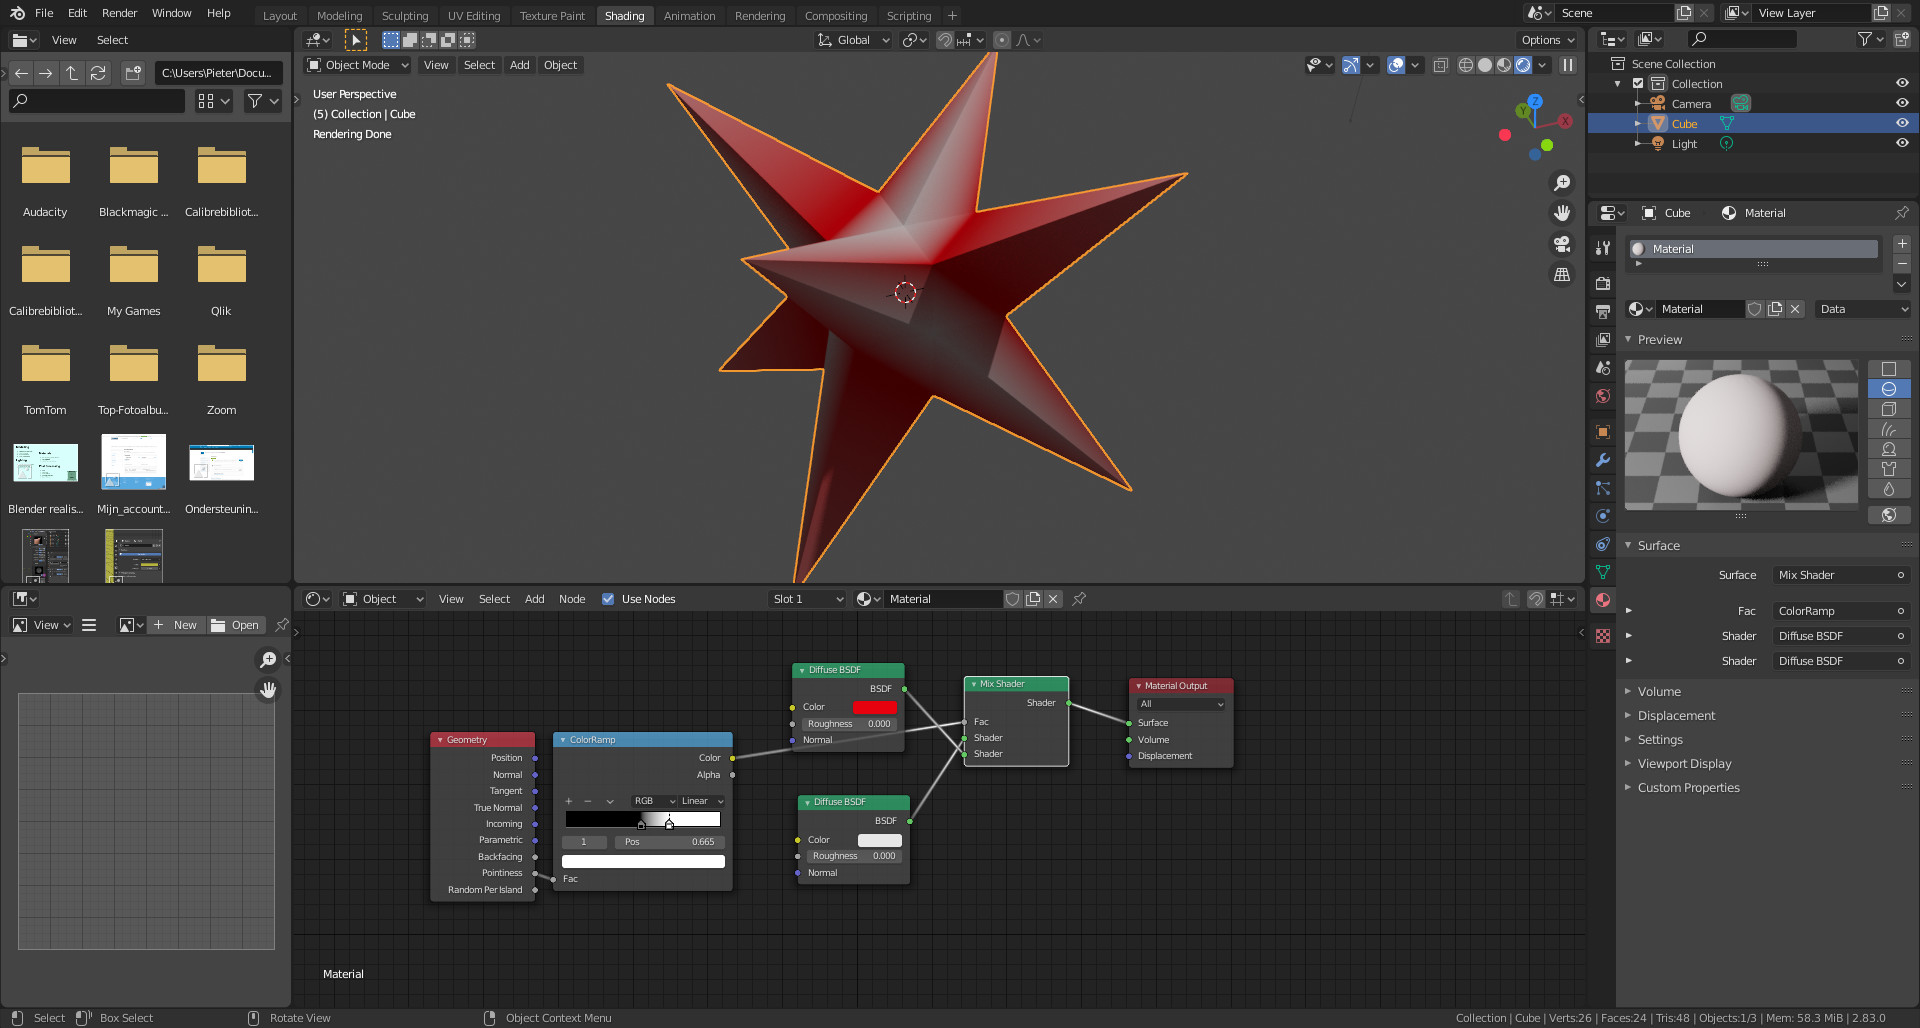
I working node set up with bake settings and color management settings could be something like below:

Note:
Carefully check all options underlined in the image and add the appropriate nodes in the material.
Play with the sliders in the Color Ramp node to get a nice result for the cavity map. It should have as smooth a gradient as possible from black to white.
Hope that helps you 
1 Like
I’ve looked everywhere. Udemy, and searched asked.
1 Like
Thank you, i’ll try that out.
Hi Mark,
I did exactly as you mentioned and now my cavity map is just a black image. Could it be lighting?
1 Like
Ok, perhaps I forgot to mention that the texture image node needs to be in the material of the low poly version of your model and not in the material of the high poly version (the sculpted version) of your model.
I assume you are baking from a high poly sculpt to a low poly retopologized version right? The image texture node to bake to needs to be in the low poly material.
-
First, get the levels right on the high poly model so that it looks correct in the viewport.
-
Then the high poly (with the curvature material) needs to be selected first, then the low poly version also needs selecting (Shift+Left-click) and needs to be the “active” model. This model will have a material which contains the image texture node with the new texture added to bake your curvature map to.
-
Make sure this image texture node is selected in the shader node editor.
-
Check the settings are correct (use the previous image to check your bake settings and color managaement settings).
-
Hit “bake”.
Again, I would closely watch the video again and follow it step by step. I’ve not seen the video and perhaps Grant does it slightly differently but this is the general workflow for baking “curvature” in blender. I’m sure he explains these steps in that video.
2 Likes
Hi Mark,
I really appreciate your time.
I assume you are baking from a high poly sculpt to a low poly retopologized version right? The image texture node to bake to needs to be in the low poly material.
Correct. That’s where my image is located for the orc cavity.
- Then the high poly (with the curvature material) needs to be selected first, then the low poly version also needs selecting (Shift+Left-click) and needs to be the “active” model. This model will have a material which contains the image texture node with the new texture added to bake your curvature map to.
I did this with Ctrl + Left click like in the training video. Shift left click wasn’t selecting the HP and LP correctly.
- Make sure this image texture node is selected in the shader node editor.
This was done also
- Check the settings are correct (use the previous image to check your bake settings and color managaement settings).
I did catch that the cavity image was using RGB but there was still no change in the outcome.
Again, I would closely watch the video again and follow it step by step. I’ve not seen the video and perhaps Grant does it slightly differently but this is the general workflow for baking “curvature” in blender. I’m sure he explains these steps in that video.
I did, I even went back to the video for creating normals.
I think the fact that my ORC high poly wasn’t showing correctly in the viewport raised a question mark. I’m not even sure why it doesn’t look like the video. He also may be using an older version of Blender because nothing is explained about Extrusion & Max ray Distance. I have played with these to get normals looking correctly. I’m going to bake the cavity map for the horns to see if the result is the same.
Update*
I realized that my color ramp has no effect on the shadows of the orc. I’m not sure how to solve it but I suspect it’s the cause.
Double check how the lecture sets their colour ramp. It may just be a setting, or where the sliders are placed. As it seems if you have had both all white and all black, it is giving all one end or all the other.
I’ve tried playing around with it with the same results. I did find the Fac can be adjusted but that isn’t the cause of the issue.
The way to see if the pointiness is working correctly is to change the viewport to rendered view and make sure that you’re in Cycles (not Eevee) and then play with the sliders in the Color Ramp.
So you need to be in rendered view in the viewport (and make sure you are using Cycles and not Eevee).
2 Likes
I believe the pointiness isn’t working correctly. I’ve tried playing with the color ramp and it has little effect. I’ve been in render mode with cycles with no success. I’m starting to wonder if it’s a bug but I’m waiting on Grant to get back to me with some feedback.
Pointyness is difficult!!!
Because the range of effectiveness is tiny.
And errors happen fast, see Mark_Jackson answers. Eevee and Cycles are different engines and different functional support.
It’s not about how ‘Pointy’ things are, but the angle between faces.
1 Like
Just so the newberts such as myself can find a solution…
I reached out to Grant and he pointed me towards the issue that a beginner may experience. In my case, Grant discovered that I had 2 material slots on my high poly element(Orc Body). Once I deleted all slots and started over with the default slot. I then added the Principal BSDF, Geometry node, and color ramp node. After adjusting the color ramp node per the training specs, I baked, and Voila!!
Thank you to everyone who tried to assist and thanks a bunch to Grant for the help. You all are awesome!!
2 Likes
Thanks for letting us know. Yet another oddity of baking to add to the list. A list we all need!
1 Like
This topic was automatically closed 24 hours after the last reply. New replies are no longer allowed.
Just had reason to look at this again and check the lecture.
Grant does not use Emit he used Diffuse and there is no emission node use.
1 Like