Introduce lists and how they are different to arrays.
Store our path waypoints in our list.
After watching (learning outcomes)…
Create a list to store enemy path waypoints.
(Unique Video Reference: 11_LD_CUD)
We would love to know…
What you found good about this lecture?
What we could do better?
Remember that you can reply to this topic, or create a new topic. The easiest way to create a new topic is to follow the link in Resources. That way the topic will…
Hi Rick - thanks for amazing, thorough and instructive videos. I’m really enjoying these courses
I hope I’m directing this question correctly.
I’m stuck in lesson 93. I have searched the fora, browsed q&a (I asked here, but the question has disappeared) and not come across an answer yet. My Unity handles different from your video. When I choose a prefab I don’t get an immediate overview of properties/components in the Inspector. I need to click a button saying “Open Prefab” first, but whatever window I’ve have locked in order to drag the waypoints to the Enemy script, is overridden by this action making it impossible to perform the drag. Also - strangely - the “Path (0)” prefab appears in the Paths folder without the little expansion arrow, therefore I can’t open the prefab and drag from here either.
I have tried several installs and all show the same problem - have I overlooked a setting? I’m doing exactly as instructed except here “my” Unity looks different from your video.
Some screenshots could be useful here, showing the steps and the issues. Better still, if you are able to record a short video of you taking the steps and the issues, these would be really useful.
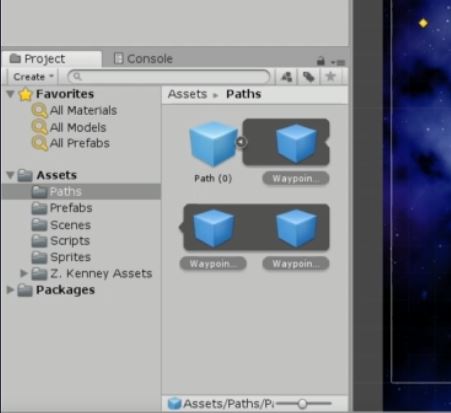
Thanks Rob - I may be overexplaining it. It boils down to the small arrow missing from my Path (0) prefab. Without it, I am unable to connect the prefabs. The pictures show the difference between me and lesson 93.
Assuming the Path (0) GameObject in the Hierarchy has been turned into a prefab, the differences may be due to your version of Unity. You are using 2018.3, which is still in beta, the course lectures were created in a previous version before nested prefabs were a thing and Unity have dramatically changed the way in which you work with them.
Hope this will help you, if you are still stuck let me know and I will download the beta version also and have a look myself, I may need you to share your project files with me though for consistency.
Note, the page linked above also links (at the bottom) to further documentation.
Yes, in 2018.3 they have made changes to the prefab system, including allowing nested prefabs - I expect that is the reason for the difference.
Normally I dont find it that useful to drill into a prefab to see whats in it because the information is not as clear as dropping the prefab into your hierarchy and viewing it.
Just to add to my previous response, I’ve had a quick look at 2018.3 this evening, just from the perspective of the Prefab Workflow.
Create your GameObject/GameObject hierarchy in the Hierarchy
Select the GameObject and drag it into Assets
To modify the prefab you can either;
select the prefab
within the Inspector, click the “Open Prefab” button
Or;
select the prefab instance in the Hierarchy
click on the small arrow pointing to the right on the right-hand side of the Hierarchy
Using either method;
note how the background within the scene view looks different
note the breadcrumb navigation at the top of the Scene view
make changes to the prefab
click on the small arrow pointing left at the top of the Hierarchy to return to the Hierarchy
or, click on “Scenes” in the Scene view breadcrumb navigation
If you make changes to a prefab instance, for example, adding a component and later want to apply that back to the prefab, you can;
make the changes to the prefab instance in the Hierarchy
select the prefab instance in the Hierarchy
within the Inspector, click on the Overrides button
note how the differences between the prefab instance and the prefab are displayed
to apply the changes to the prefab, click the Apply All button
to revert back to the original prefab, click the Revert All button
If you want to only apply specific differences to the prefab;
select the specific difference
a properties window is displayed for that specific change
click Apply or Revert as appropriate
Note, you can also edit the values at this point for any of the specific differences.
(best to watch in full screen mode)
Hope the above is of some use, sorry for the delay in getting a more detailed response back to you. Also, apologies the slightly rushed video and annotations in the above, audio recording unavailable this evening.
Just recently started up and I arrived at the same issue as Mikkel did. Because of the way that Unity has changed, it is no longer possible to open a drawer and drag the waypoint prefabs into the enemy prefab. I have tried the following 2 solutions to solve it without changing code and then ran out of ideas:
Define the lenght of the list to get the fields in the inspector, so that I could click “browse” for each field and find the prefabs. No dice, couldn’t see any prefabs in “browse mode”.
Drag them from the hierarchy to the enemy in the hierarchy (couldn’t drag to the prefab due to the whole “open” function that has been added in Unity. This resulted in them being added, but only to the instance of the enemy and I was unable to affect the prefab with this change. The change simply wouldn’t “commit”. This means that I would have to manually add the waypoints to each and every enemy I create.
I am now trying to find a way to set the path object in a serialized field on the enemy and then loop through that to extract the waypoints, which is also proving to be a bit of a pain when new to Unity.
Does anyone know of a way to foreach through all the nested GameObjects of a GameObject?
I am also guessing that it will be a less performance friendly approach - especially if it had been a larger game.
I will keep on trying to solve the problem (there’s always a solution when coding), but any suggestions are welcome!
Ah, seems that my solution to the problem was correct, as Rick actually does the very same thing in video 97. “Using A Foreach Loop”.
So if you get stuck with the same problem, just skip ahead a bit to that video to see how you solve the issue by assigning the Path instead of the Waypoints and doing a foreach loop on it.
I’ve reached this situation as well. Up until now I’ve been able to follow along even with the new prefab workflow but can’t find a way to do this in the inspector. I’m going to follow the advice of plowing along and hopefully doing this via code later.
This is a big enough issue that perhaps inserting one of your “from the future” videos is in order. Wouldn’t want folks to get frustrated here and stop with the course.
What you can do to get the “same effect” at this stage is just do it in the scene directly and not on the prefab. At around minute 7 of the video Rick says don’t do that because prefab to prefab is better, but since this all gets replaced later with code, it’s a decent work around for now.
As others have said, just stick with it and in a few videos this situation is resolved.
***** NOTE: The solution I put below DOESN’T work, I apologise for that ****
I’ve left what I’ve written in, as a way NOT to solve the problem so you don’t waste you time and also to keep the flow of the thread.
I came up to the same prob as using 2018.3. The way I resolved it was to make the changes in the hierarchy and apply them back to the prefab. The steps are:
1st to have created a prefab for both the path and the enemy.
Then in hierarchy select the enemy and lock it in the inspector window.
Next select the path in the hierarchy window, selecting the waypoints and moving them into the enemy in the inspector.
Finally in the inspector for the enemy, select override and press apply all. This updates the prefab, and gives same end result as the lesson.
Same problem here, an update to the video would be great. Sambas your solution doesn’t seem to update the list in the Enemy prefab, even though I apply the overrides…
It sounds as if it will work out fine anyways later on, but I still wanted to comment on this because everything has been ‘super clear’ up to this point Great course so far!
I don’t think this works as you expect because if after you have performed your steps you then remove the Path(0) from your Hierarchy the Waypoint elements in the Enemy prefab then change to None and the elements in the Enemy gameobject in your Hierarchy change to Missing.
Hi Andrew - thanks for letting me know. You’re absolutely correct, I checked my solution and it doesn’t work. Spent the morning seeing if could find a way to do it but I don’t think it is possible. The best solution I can think of is to reference the path prefab itself and then access the waypoints in script through the path prefab, if that makes sense…
Hi folks,
my little makeshift workaround for this problem was to make a prefab out of every waypoint, childed
them to a Path Gameobject, and made a prefab out of that too.
This somehow was the closest i got to how it was done by rick in the course.
The waypoints can then be dragged to the enemy prefab making a connection on prefab level not instance
But this also seems to introduce some issues.
Changing position of the waypoints has to be done in the prefab editor of the specific waypoint.
Changing the “Prefab editing environment” in the project settings to the current scene surely helps with the placement.
This whole “what change affects what on which level” can be a little confusing in the new prefab system.
With this approach dragging the position of the waypoints around in the scene view in an attempt to change the way the enemy is suppoesed to take, doesn´t actually change the route of the enemy because this newly changed position is part of the “Path” Parent Prefab as far as i get it, but since we connected the waypoints PREFABS to our enemy prefab, changing the nested waypoints prefabs inside the Path Prefab, as part of the “Path” Parent Gameobject will just alter the Path Prefab but not the single waypoints prefabs. This results in potentially confusing behaviour and those yellow waypoints icons sitting on a position, that can be totally different from the points the enemy is actually orienting itself. If the waypoint prefab is opened in the prefab-editor, then the real positions can be “seen” and tweaked. This problem is gone, if the waypoints are not nested prefabs but rather just regular gameobjects and just the parent Path gameobject is made a prefab for easy reuse and clean hierachy, but then we´re back to the problem that we cannot connect the waypoints inside on a prefab/asset level.
another drawback is obviously that there are way more prefabs around
my advice, like written by others before, is to just take the “non-optimised” way, make the connection on
instance level and progress with the course without being freezed by this problem too much, unless you want to dig deeper into the intricacies of the prefab system. Later with code, just create the Parent “Path” Gameobject, child the Waypoints to it and make a prefab out of the Parent Gameobject.

 - I may be overexplaining it. It boils down to the small arrow missing from my Path (0) prefab. Without it, I am unable to connect the prefabs. The pictures show the difference between me and lesson 93.
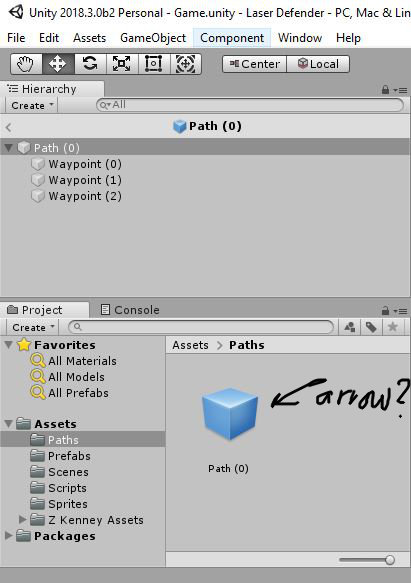


 Great course so far!