
so I’m taking this course specifically to design 3D printed items… and I’ve been looking at what it takes to export something created in blender into an stl that makes sense.
I’m exporting from blender to stl specifically for import into cura 2.70… I haven’t tried it into other slicers but I think if the model looks good sliced in cura is should be fine sliced in something else (don’t quote me on that).
so I used the bowling pin as my first export to try to find settings the would work and here are the results of the experiment:
- blender unit while not specific export as millimeters to curra… that means that the bowling ball as designed in this course being shrank down to 1.9 in height is 20 time smaller than the full size in mm. to fix this before exporting it, use the scale to scale the object. remember if you do this in object mode you must apply scale to your model; this will adjust the “dimensions” and set the scale back to 1(ctrl-a)
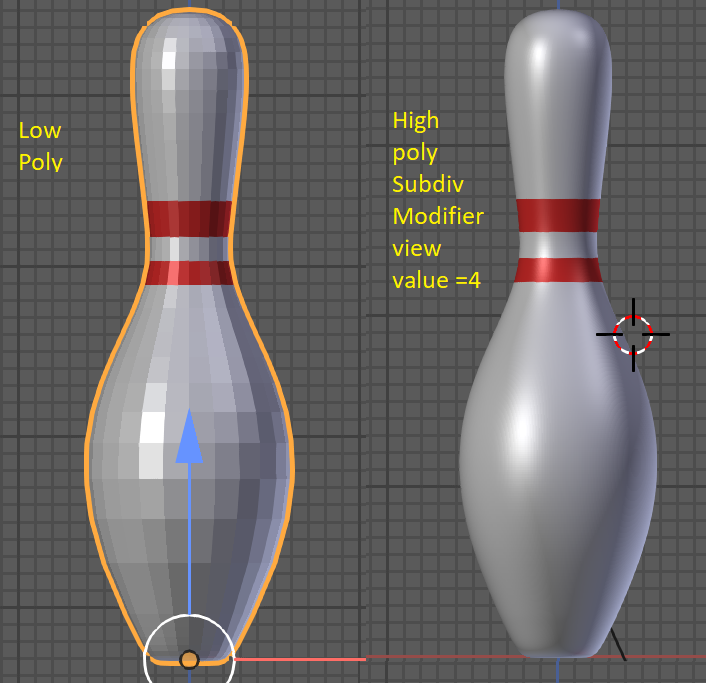
- cura is very much “what you see is what you get” in relation to blender… if your model is very low poly in blender, it will be low poly in cura… this can be adjusted by added a subdivision modifier (none destructive, not applied); the VIEW, not the “Render” is used by cura to determine what the model looks like… so that’s the value you must increase to set the visual and end product smoothness. I used a value of 4 in the view for perfect smoothness.
- The model must be “solid”; when you first build the model, it’s more of a representation rather than an physical object, it has no substance as far as a slicer is concerned; you can make the object solid by adding a “solid” modifier (again non destructive); and set the thickness to the nozzle size of your printer; this will become the OUTER wall in cura… you can always increase the wall thickness in cura by adding additional Inner walls. the "solid’ modifier can create artifacts:
so play with the settings until those artifact disappear… I think the “Clamp” attribute was what was needed (value of 2.0)

note… a full size bowling pin is a big item… with a 1.2 wall thickness (.4 outer +3 more inner) 3% zigzag infill a full size model will take 15 hours… with 5% it will take 20 hours (estimated… likely 24)
I’m going to try to print my bowling pin over the week end at a smaller scale… I haven’t decided what yet… possibly 50% so it’s bid enough but not huge… that should only take about 4 hours.
update: I have now successfully printed the bowling pin… it’s not very exiting but it’s my first blender to print and that’s exciting.
