You’re telling me that LoadSceneAsync(sceneToLoad) loads a different scene than LoadScene(sceneToLoad)? You do know, that’s impossible, right?
Are there any errors along the way?
Let’s add some Debugs.
private IEnumerator LoadMainGameScene()
    {
        if (sceneToLoad < 0)
        {
            Debug.LogError($"LoadMainGameScene scene index {sceneToLoad} is not valid");
            yield break;
        }
        if(transform.parent !=null) Debug.LogError($"This GameObject is not a root scene object, and will not be DontDestroyOnLoad");
        DontDestroyOnLoad(gameObject);
        Debug.Log($"Preparing to Fade");
        Fader fader = FindObjectOfType<Fader>();
        yield return fader.FadeOut(fadeOutTime);
        Debug.Log($"Faded out, saving");
        savingWrapper.Save();
        Debug.Log($"Loading new scene {sceneToLoad}");
        yield return SceneManager.LoadSceneAsync(sceneToLoad);
        Debug.Log($"Scene loaded, preparing to Restore");
        savingWrapper.Load();
        Debug.Log($"Restore complete, fading in");
        yield return fader.FadeIn(fadeInTime);
        Debug.Log($"My job is done here.  Enjoy the new scene");
        Destroy(gameObject);
    }
You are in the new level, by the way. I can tell because you have a debug.Log in the console about assigning a patrol path to Enemy 3(Clone).
Oooh… one more thing to check… The Mover component will be reporting your position based on where it was in the Creation scene. Remove the Fighter, Mover, and PlayerController from character in the Character Creation scene so that these components do not interact nor get saved while in the Character Creation scene. This way you won’t get a restore to the middle of an apparent blizzard in Yukon territory.
Without a description of what “not so much means”, I’m going to start ignoring statements like these… I have no idea what is still wrong. Please be specific.
Apologies Brian, I said that on the fly (I’m still testing the system again), please give me a moment to test it out
AND… it works for now - a very big thank you again Brian, because this one was a bit of a hassle to figure out on my own (especially with the main level teleporter staying under the UI canvas, and I had no idea that it wasn’t saving any external factors in the rest of the hierarchy)
For now I’ll try playing with the armor system before calling this topic off
Trouble is, I saw you posted and stopped what I was doing…
In terms of the clothing… it’s possible you’re not saving the body parts, as I look at the original tutorial above…
In fact, mine isn’t either. I set the default armor in the regular CharacterGenerator inspector, because that shouldn’t be changeable in the player’s version of the character creation scene.
When the game starts, the default body parts are activated, and then whenever equipment is changed, the equipment replaces the default body parts with the worn equipment.
I apologize about this, I meant this in no bad way
I think right now it’s just a matter of adding more code and buttons to the UI, it should be doable for me to try and do by myself. Right now I’m just trying to integrate new functions first before doing the repetitive stuff (at least the ones I’m 99% sure they won’t be replaced anytime soon, before making any deeper decisions). I’ll probably make the clothes tunable in the character customization as well too
For now let me start trying to fiddle with the armor system and see what type of surprises this system gives me (I didn’t want to touch new topics before solving old problems)
If you do that, you’ll have players putting their charactes in plate armor and then complaining in the reviews that the armor doesn’t work. (Trust me on this).
honestly though, some of these look like fancy clothes over armor (like some of these outfits genuinely don’t deserve to be labelled as armor)… (but alright, I trust you)
btw do you know of any solution to quickly find the location of additional audio listeners? I have 2 in my character generator scene, and I’m about to start a man… I mean, audio listener, hunt down (nvm found one in one of my cameras)
Got it - time to go check the armor logic and try find a matching UI for a cape or something down the lines… capes are nice too, xD (not touching the Character generator scene until the final design stages now)
So to wrap this issue up:
Make sure your scene teleporter is in the root of the hierarchy (i.e: not under anything else), and your UI button that calls it, can stay under the UI
delete the fighter, mover and player controller scripts in the Character Generator, so your asychronizer doesn’t mess things up
Don’t forget to save and load when switching scenes from the saveWrapper
Quick question on the fly, in ‘CharacterGenerator.cs’, “Player Clone”, the boolean, ensures that we get the equipment of the player for the player, and for Randomly Generated NPCs this one is turned off, right? I’m a little confused on why this or “Pickup” exist
(apart from the fact that I’m not sure what to write in the “deactivate” section to deactivate whatever armor we have on, in the “Synty Equipable Item(s)” SO that we created. If it’s as direct as it seems, then I’m probably creating a LONG LIST of items that need to be deactivated when one item is active, which doesn’t sound too efficient tbh (right?). I’ll fiddle around with the system a little more and see what I can learn, for that one)
Ignore this. It was used for a custom editor I wrote that would show the character with the armor equipped when editing Equipable Items.
Also part of a custom editor, and special pickups that would use the model fo the item being dropped. I went a different direction with this, and that custom editor is no longer in use.
You only need to deactivate things directly related… for example… if you have a Helmet, it often makes sense to deactivate the hair. You don’t have to deactivate all the other armor pieces (nor do you want to).
When the character is redrawn (at start and after any equipment change) everything is deactivated. Then the base character is activated (all that stuff you saved plus the default armor. Then one by one each piece in the Equipment is checked to see if it’s a Synty item, if it is, then it’s activated.
Now if you have a chest piece, and all you’re doing is activating that chest piece, then there is no need to deactivate the old chest piece because each category is mutually exclusive… so if Chest 1 is active, and I am now wearing a plate that is chest 13 (just pulling these out of a hat), all other Chest category items are deactivated before activating the chest.
Some armors (lots of wrist items, helms feet) may require deactivating another category to avoid poke through. You’ll get a feel for this as you equip. I can tell you that in my games I’ve never had to add more than two categories to the ItemsToDeactivate (and that’s because certain categories are right and left like gloves, feet, and wrists.
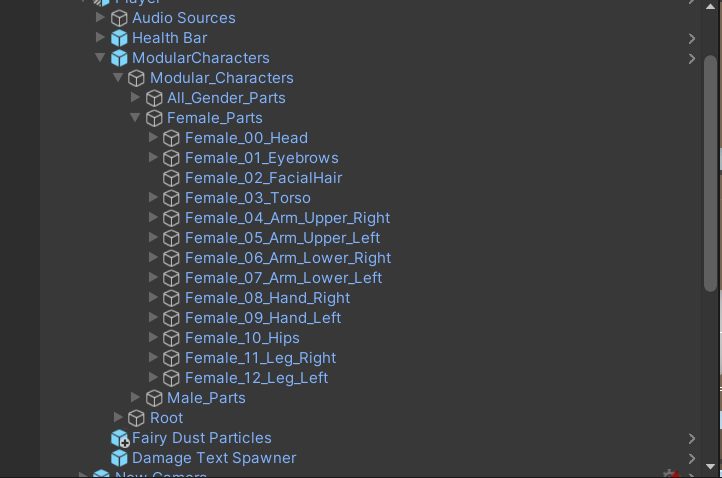
I read that like 5 times to get the idea, and I don’t blame you for that (it took me a while to grasp the concept). My question though, was that for every Synty Equipable Item, I have to deactivate a body, right? So let’s take a look at a Synty item below, and let’s assume I’m trying to activate the players’ chestplate, and deactivate his body to get this to properly work:
(Later I filled in the female equivalent in the slot below the male one, before the colors and the deactivator)
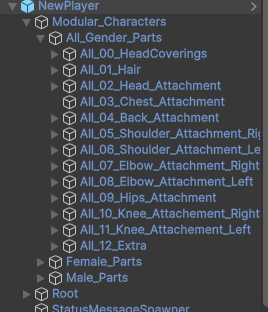
At the bottom of this, we have ‘Slot Categories to Deactivate’, which I’m guessing is responsible for deactivating body parts when others are activated. For example, a helmet might not want your head poking out of it, so this is necessary, and I can see why. However, from the hierarchy:
What do we place in that ‘slots to deactivate’ category? The parent of the objects, the objects we want to deactivate? The children gameObjects of these, or…? Because the way I see it, I think it makes sense to put the parent name and the computer automatically turns off whatever is in there, right? Apologies if the question is a bit long, I’m a little confused here
And when we activate an item in the ‘Synty Equipable Item’, the index is the value in the hierarchy starting from 0, right?
I think a screenshot of how you set this up might be extremely helpful for me to understand what’s going on
First of all, your equipment definition should be gender neutral. The system should properly select the male or female version based on the gender in the character’s definition.
With that in mind, rather than activating Chr_Torso_Male_02, you’ll simply activate the Torso category (If you go back through the scripts, you’ll see that there are several categories like Torso that serve as wrapper categories and activate the correct categories based on Gender…
So the player’s Torso is already set as the Default Torso value. When your SyntyEquipableItem has Torso, 2 in it’s definition, that’s all it needs to know that it should use this Torso value instead of the default torso value.
Here’s an example from Beneath, from which this script was ultimately adapted by the post author. It’s a custom inspector, but the general idea should be clear here:
The first case is the item to Activate, which in the case of this item is Torso 5… whether it’s the female or male, the armors are designed to match up by index.
There is no category to remove,because the shirt in question is all on the Torso.
OK so basically just type in the keywords which are in the “switch” scenes, in the “Load Armor” function. Got it
For future reference though (again, in the distant future I might use Blink), do we add any imported armor under this character, or is there an entirely different setup?
My Blink setup is very different, and I’m not prepared to release it just yet. It requires a great deal more work in advance before you can even begin coding to use it.
OK After some serious editing of the character generator code, I only have three questions left…
How do I deactivate the turned-on-by-default knee caps through code, without messing with it in the hierarchy? I’d like them to be armor-optional, but not mandatory for my player (for this issue, this debugger in ‘CharacterGenerator.ActivatePart()’ unfortunately gives out a response):
if (!CharacterGameObjects.ContainsKey(identifier))
            {
                Debug.Log($"{name} - {identifier} not found in dictionary");
                return;
            }
How do I get my wooden shield to show up in the players’ hand when its wielded? (I’ll probably revise the Udemy course for that (I did that, and Thomas’ post about that, but none of them actually worked to get my shield to be visible in my players’ hand))
The armor items themselves are, somehow, empty gameObjects in the inspector. How can we create a 3D Model out of them to work as Pickups? (I also need the 3D Models to create 2D Sprites out of them for my game)
Apparently after the armor started working, my pickups stopped showing in the game world (i.e: they stopped showing up), for the first time ever, when I build my game, or when I access the game scene from another scene, and I have absolutely no idea why. Any suggestions of what would have went wrong? (It acts completely randomly… sometimes it works, sometimes it doesn’t, and I have no idea why it suddenly started acting this way (both in and out of the game engine… now it just won’t display any pickup items out of the game engine for some reason)). Again, this issue does not exist in the main game scene, but it exists with my old pickups when I’m accessing my main game scene from a different scene, the character generator in this example
If it helps in anyway, I recently developed a 360 degree slider in my character generator, to give my players a 360 view of their character prior to playing the game (but that’s in the character generator scene, it has nothing to do with the game world where the pickups are).
They should be getting deactivated in the DrawDefaultCharacter (where every category is deactivated, and then the base character is rebuilt).
Please note that there is a typo in the Modular Characters category when it comes to the knee attachments:
So make sure that the values in the strings for the knee categories in SyntyStatics use Atachement instead of Attachment.
This is done the same way as with weapons. I recommend a separate socket (empty GameObject) for the shield attach point.
Remember the scaling bug… it’s likely the shield is there, but super teeny tiny (ironically, it will still do it’s job and protect you even though it’s teeny tiny
Look in Models/ModularCharacter_StaticParts and you’ll find the FBX files for each part. You’ll have to make them into your own prefabs. You can then use those prefabs to take pictures.
I did notice the spelling mistake in the ‘SyntyStatics.cs’ script, and I fixed it. However, I don’t think I fully understood what else I should be fixing, but the knees somehow are all activated at the start of the game
Apart from that, I’ll look into the other fixes in a bit, as I’m currently out of the house (and the pickup issue still persists, hence why I didn’t delete that comment. Please have a look into it )
 - a very big thank you again Brian, because this one was a bit of a hassle to figure out on my own (especially with the main level teleporter staying under the UI canvas, and I had no idea that it wasn’t saving any external factors in the rest of the hierarchy)
 (but alright, I trust you)
 - time to go check the armor logic and try find a matching UI for a cape or something down the lines… capes are nice too, xD (not touching the Character generator scene until the final design stages now)