Glass Pawn and File Separation/Git

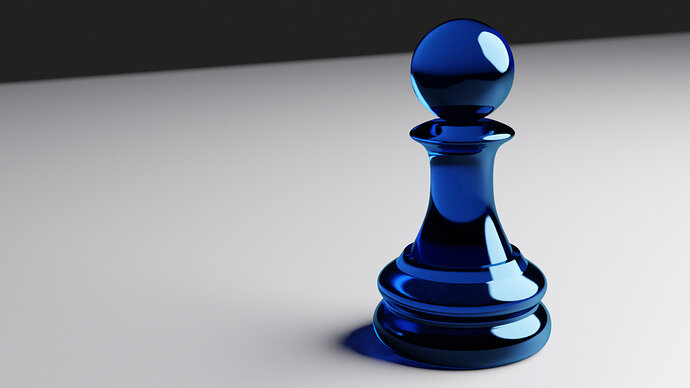
Here’s my pawn. 196 faces. I think that qualifies as low poly? I guess it’s better than the 3-5K Mike was showing with the subsurface modifier in the previous lecture.

I took about a 3 week detour and studied materials and shaders. There’s so much to learn! But I ended up learning how to build a node tree for volume absorption, and LOVE the effect it gives. Conveniently, Blender has a Volume Absorption shader built in now so it’s easy to do. Anyway, at the end of the journey I thought, “Wow, I can totally apply all this to the chess set!” So I finally circled back.

And voila!

I plan to keep my pieces in separate files, appending the base mesh (edit: link? I want to be able to edit the main base mesh and have all the separate files reflect those changes), and having the materials that I really want in the final scene. I’m a software developer and plan to use git to version control this at some point, I’m just too lazy and haven’t gotten around to it, though I thought I saw it in the lecture line up. Separating out the files will let me version them better with clear commit messages alongside what files changed and why. (tweaks to the mesh, removing unneeded objects, etc.) Version control in general will be useful in so many ways.

In the meantime, I found applying a temporary material beneficial in that it helped me see the form a little better, especially the creases.

Edit: I tried linking a file instead of appending, and while the mesh changes made in one file are reflected in the file linking that mesh, I can’t toggle subsurface modifier options, for example. So, not sure how I’ll use that in my workflow. I link it, and if I then duplicate it I can shade smooth/change modifier settings, but I might as well just append at that point.

10 Likes

There is a Blender option for, called “Matcap”.

A detour is good. But, these things will also be explained in the course. But then in a more logical way. Based on things you’ve learned in previous lessons.

You can use link to manage all instances of the object in one place, but then you loose also some flexibility. Because there is always something you need to tweak for a project. You can better spend time on a good project management structure, naming convention, collection, texture libraries, etc.

Thanks for the matcap reminder. Now I totally understand the problem that’s solving!

From your comments FedPete I get the sense that you frown upon my detour, but I think this should be encouraged more!

The detour was very refreshing for me. I looked ahead through the course lecture list but it didn’t look like materials would be covered very extensively. I had played with procedural textures for the bowling ball and that really piqued my interest, so I dived in. I think supplementing one’s study with things that interest them when it interests them really keeps the creativity flowing. The autonomy that this learning structure provides is so beneficial to the learner.

I appreciate that I have a great course structure and content, and an active forum through which to gain feedback. And I like that I can duck out of class to delve deeper into topics I want to explore further, then bring the knowledge and experience I’ve gained and apply it to upcoming projects within the course.

1 Like

That is a very nice rich colouring. Slightly transparent?

For that using separate files, it’s ‘linked’ rather than ‘appended’. The Game Assets section covers how it works in Blender as I recall. You can link various aspects form a separate file.

Thanks, @NP5. The material is a glass shader with some volume absorption and a gloss shader mixed on. Just a test material, really, but I’ll probably expand on that material for the final scene.

Thanks for the tip about append. I’m eager to see the game asset material now!

Privacy & Terms