
If you’re reading this, there probably aren’t very many posts yet. But don’t worry, you can be the first! Either create a new post or just reply to this one to say ‘hi’.
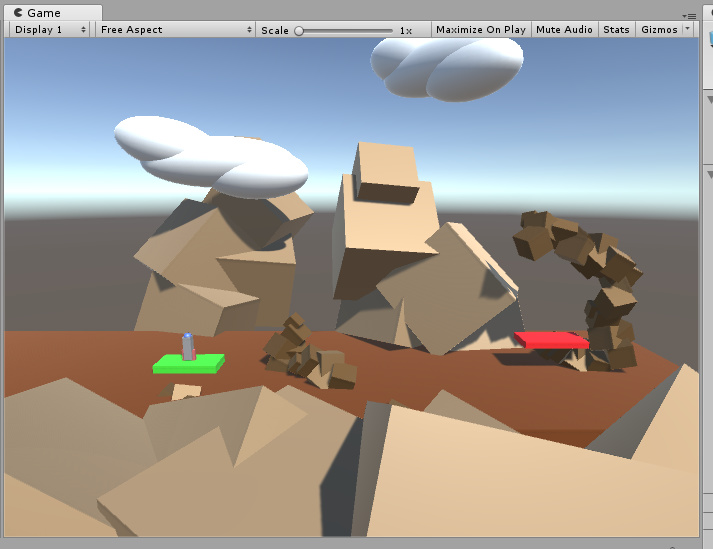
Not sure what to call it, Primitive Art Meets Booster?
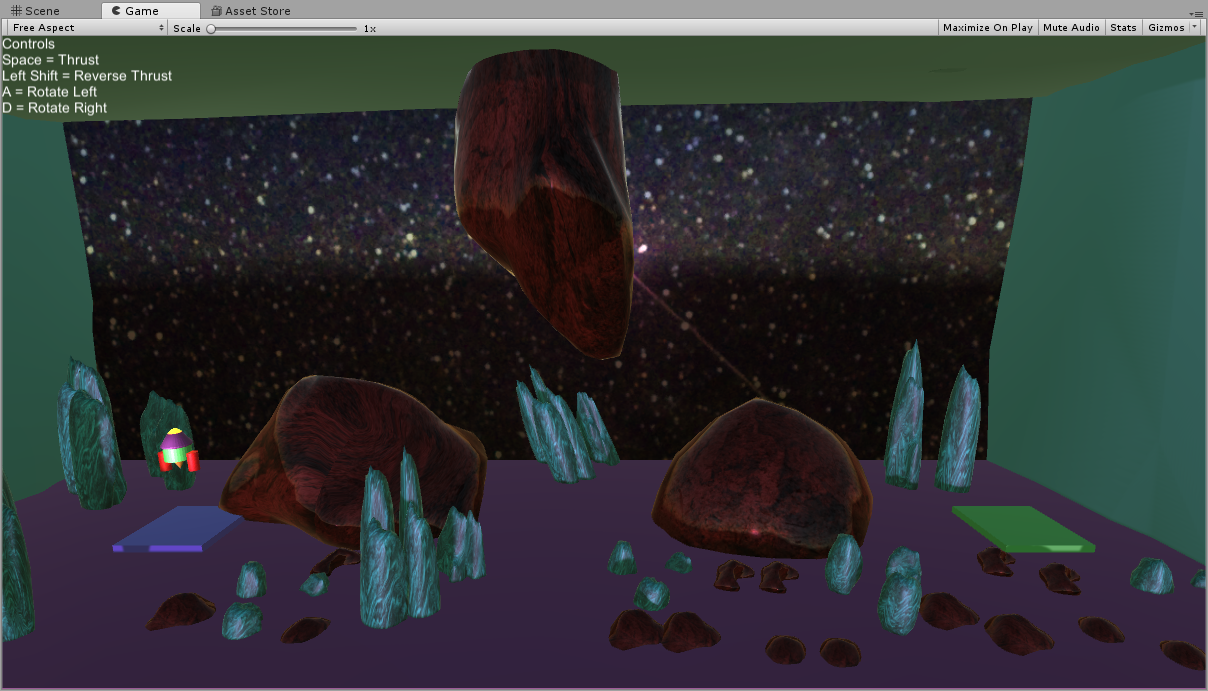
I enclosed my scene with walls and a ceiling, which was really hard to work on without some form of lighting. Enhanced the brightness/contrast in the image so you could actually see it. 
5 Likes
My aproach for extreme tuning, was to rotate the game by 90°.
So my game chenge from a rocket simulation to a submarine game.
After a few changes i now use the gravity as drift, an ad some desingner parameters for backwards and downwards drift.
14 Likes
I rather wish Unity had a few more basic shapes like, cones and pyramids! Barring Unity’s assistance, I guess I am going to have to breakdown and try making a few things in Blender.
I am assuming making it in Blender requires it to be done in Blender Render? Do I need to unwrap the object(s) and bake textures? I know there is a difference in rotation between the two but can’t remember what I need to do in Blender so it is upright in Unity. Is assuming I have to apply a material or texture in Blender Render?
Any guidance would be appreciated!
1 Like
I use blender render, since the simple materials come across (ie basic colored faces etc), nice and quickly.
I find that when you export, make sure the model you want is selected, go to export, and you can change the UP axis on the export settings and that will set the rotation when dragging the FBX into unity.
Thats about as much as I can remember, about to go down that route tonight. if I hit any obvious snagging points ill pop a post up.
1 Like
I forgot about that option i was doing it manually as if using the blend file by rotating -90 applying it and rotating back 90.
Ah well but heres a video showing how i get weird textures but to do it properly means lining up UV maps.
Hope it will help a little
There is no sound,
3 Likes
Glad you said there was no sound, even then I kept waiting and waiting for it! LOL
Ok so does size matter in Unity? Is 1 Blender unit it basically 1 Unity unit as far as scaling is concerned? I believe currently I have my Blender units set to meters. Also, how conscious of geometry do you need to be? I noticed you add a sub surf and were sculpting, which tends to add lots of geometry…in general…not your rock…thinking about other items. Add your modifier before you export?
So, with FBX, you just export it to the Assets folder of the Unity project? Does it bring in the texture with the mesh? Or, do you have to import (assume you can drop and drag the texture to Unity’s materials or drop and drag to the asset folder) the texture separate?
Yes, so many questions. I see where you can use Blender’s Cycles for this project so, that will be helpful also. I would like to see what I can do with a texture. I will have to play around with it tomorrow and see what I can do. Would like a stalagmite for my game I think but might have to try rocks as well.
Thank you so much for the video! You did a great job on it and is very helpful to watch. And, the scene you were showing of your rocks and such is great as well. Nice job!
That is much more than I remember, Obo! I will give both your advice and that of IrresistibleJelly’s video serious consideration and play with both Blender some and Unity. I think I will make a separate experimental project first. Have come too far with mine to mess it up till I get it right.
Thank you both!
2 Likes
Size does matter but the scale i am working at in blender is meters as well so its fine as long as you remember to apply the transforms.
I did actually import the texture over in unity afterwards and drag it into the albedo of the unity material on the model.
I tried my best to indicate without sound that it was the same file in blender.
I think the rock ends up somewhere about 1,300 polys which is a bit high so i could have lowered the detail in the sculpting. Alternatively i could use the smooth tool on a UV sphere for really low poly items 
700 poly is usually what Michael has suggested for low poly so for a small game like this 1,300 might be ok.
My headset was charging but even then my mic is not the greatest in the world. Fantastic sound though
Yang from the facebook group just showed me the unity asset post processing stack which massively improves the camera so i will be playing with that as well tomorrow
I’m really enjoying project boost and thanks for the encouragement. I look forward to seeing what you come up with
3 Likes
Thanks for the info, Irresistible!
So you think max of around 700 poly per object or for the whole scene? I am just trying to get a feel for maximums. I am sure the more poly objects you have in the scene the slower it will be to play. I will play around with both the ionosphere and the sphere and see what I come up with. My sculpting abilities are rather horrid after experiencing the Fuzzy Bunny in the other Blender course. LOL
Let us know about the post processing stack. Not sure what that is at this point, but guess I will learn soon.
Yes, I too think project boost is a good project. It is much more fun than the last project I gave up on in V1.0…I think it was Block Breaker. I will have to go back and try some of the other projects in the first course once I am further along in this one.
I just seem to remember Michael mentioning a ball park figure, “I want to keep this under 700 polygons in case it goes into a game engine.” Or words to that affect in reference to low poly.
My models of the rocks you have been seeing vary between 700 and 2000 depending on if i feel the need for one level of subsurface. It depend son what you are gonig for anf if you ware going to use the nodes like i did.
The processing stack adds a lot of graphics effects to the camera but mostly bloom and a huge color option which i foret the name of atm.
Took this
To this
Then applied the post processing and added new assets
10 Likes
Oh and remember to rename your texture images as unity likes to say “Hey i recognise the name Material.001, You must want to use this material and if you change the texture i will change it on the other models named that way too!”
Caught myself out a couple of times with that
1 Like
Thank you! You have been very very helpful! Not to mention, your scenes look fantastic with all the added rocks and things. It really gives it life and a real game sense just looking at it.
I was thinking about the Landscape add-on for terrain but it requires a lot of verts. I will have to mess around with all of it. Currently, I am watching the first section of the Blender Character’s Creation Course and seeing what I missed in the 1st course now that I have figured out how to solve my Mac docking issue with Blender. Trying to do some of each course. Just not enough hours in the day.
Again, I appreciate all the advice and suggestions you have made. It is what I like about these courses the great student helping student community we have!
2 Likes
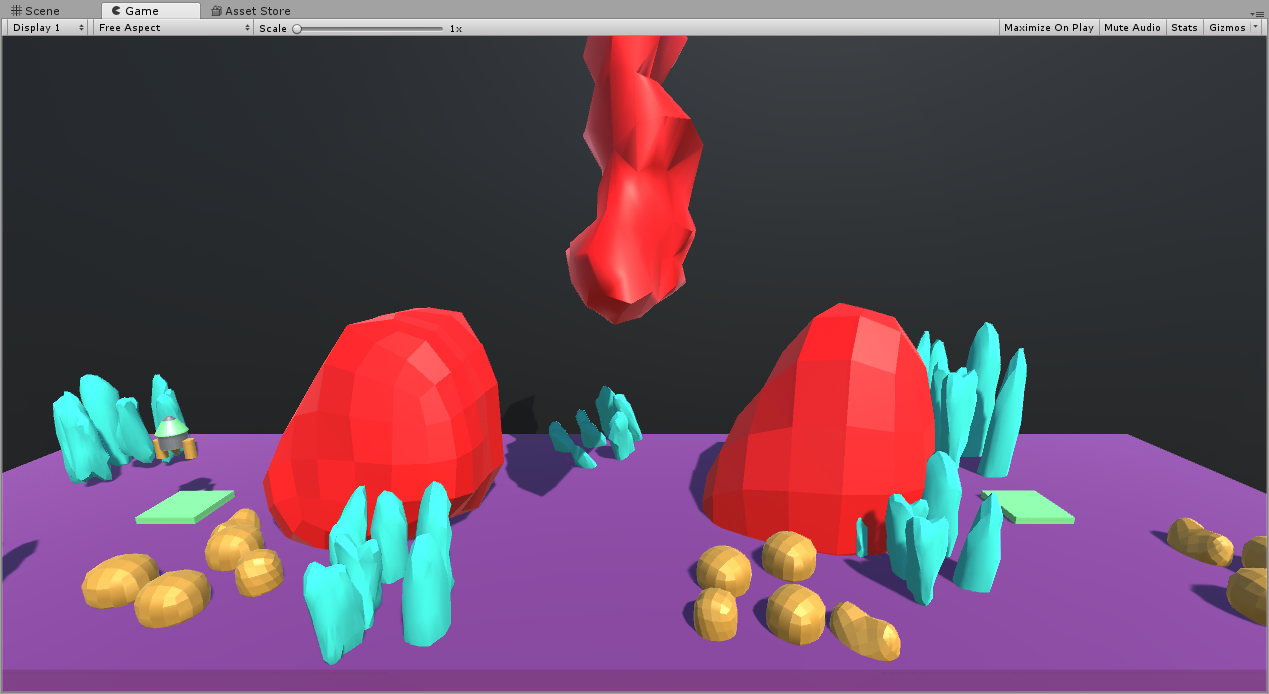
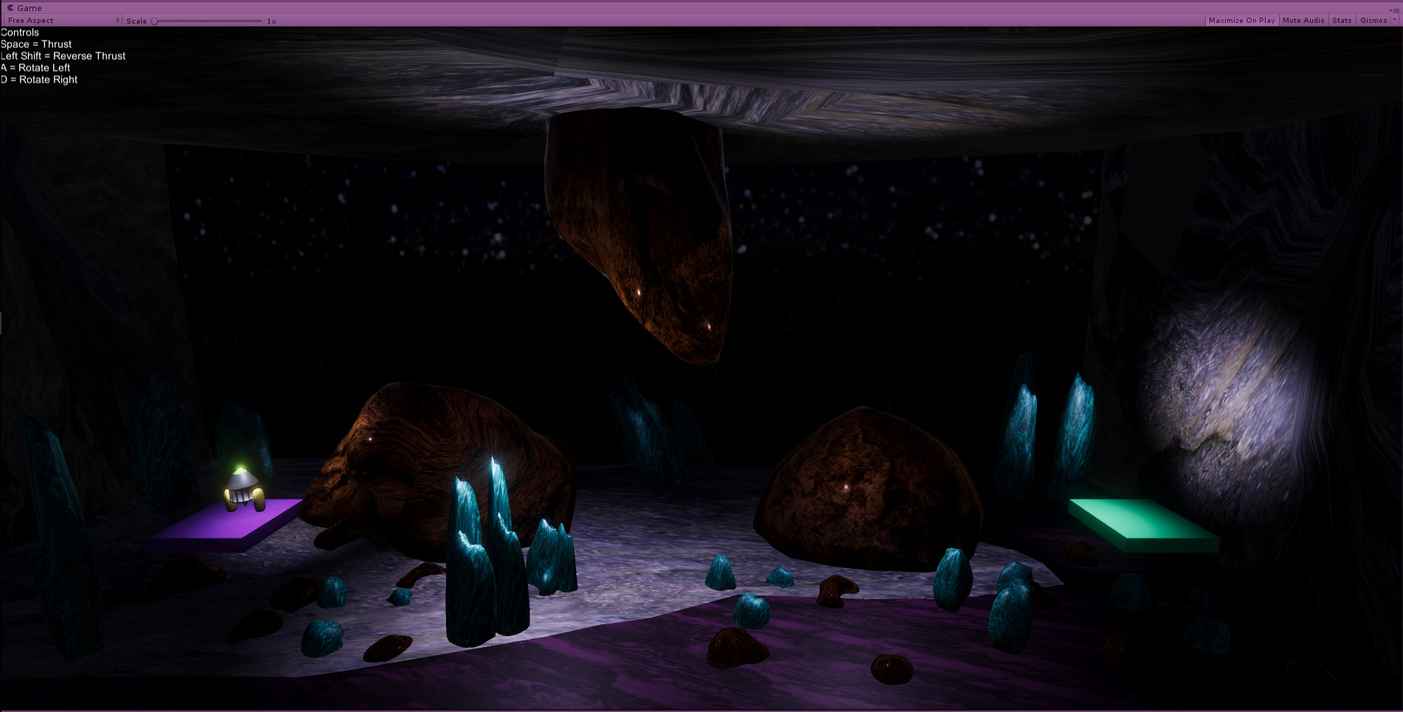
Install the Pro Builder Basic plugin for unity from the asset store. The basic version is free, has limited functions (no bevel, and stuff) but you can make more primitives, including stairs, pyraminds, arches, and more. You can then do very basic (ala blender) basic edge and face operations on them, like extrude and scale and move and what not. The more advanced features are locked behind the advanced addition, but the basic version has enough for rapid prototyping, and you can even UV map them in Unity or export to an external program.
Here is a video I shot from a prototype level using nothing but Unity primitives and the ones on pro builder. Also some post processing with the PP stack.
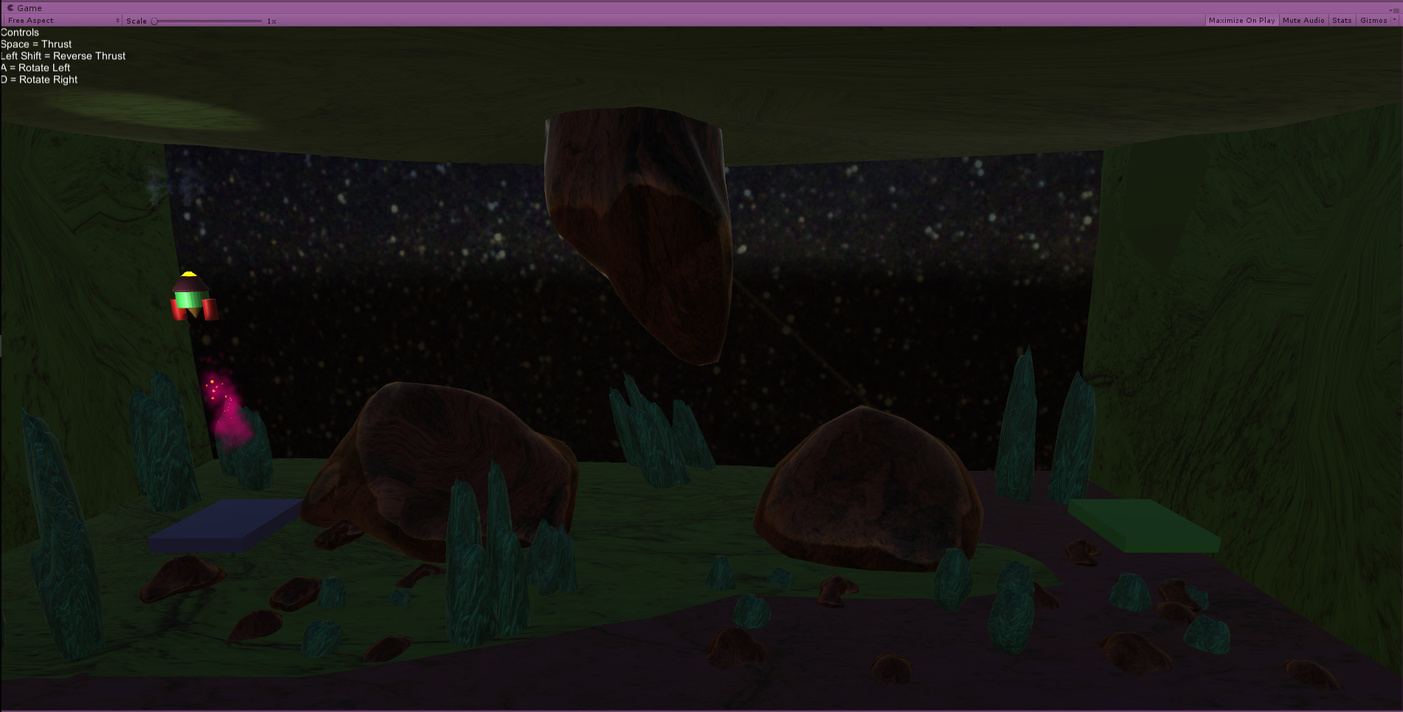
I am thinking of making more of a cave style setup, changing the rocket to something else when I actually finish the course, but just wanted to play with a level.
4 Likes
Well done! Looks very “hellish and otherworldly”, very nice job with the spikes. It is what I sort of had in mind. Good use of material colors aas well.
Thanks for the info. I downloaded ProBuilder Basic and watched the accompanying video. It’s very impressive especially the texturing aspect. It looks like it was originally released in 2012 so I am curious why Unity hasn’t incorporated something similar by now.
It looks like you can do the basic stuff with the free version but the pro version doesn’t seem that outrageously priced to me in comparison with other software and their various plugins, although Blender is free. I can see the advantages of doing basic modeling and texturing in Unity instead of an external program(s). I will have to play around with it some and see what I can come up with.
Again, thanks for the tip! Very useful!
That looks amazing in its own dirty and quick way 

Thank you for both of your tipps (PP Stack and Pro Builder) i will for sure looking into them.
I have pondered a bit about the gameplay and came up with the plan to turn it more into the puzzle-direction.
Several landing “switches” where each one enables the next one, so you have to take a tour through the level to finally open up the "nextlevel-switch"
I was thinking to indicate the active one with some nice particles and let the particle move on to the next active to give the player a general direction.
Also, to make things a bit more pressing there will be lava rising up, eating the available space (and landingpads!).
To give it a bit more space, I’ve attached the camera to the ships movement.
I ve made a little mockup to get a feeling about it.
No particle or even working pads buuut a lava-indicator and rising lava.
6 Likes
I like it! A bit more advanced than my skills at the moment makes me rather envious!